© 2017 Halco Lighting Technologies, LLC. All rights reserved. Halco and ProLED are registered trademarks of Halco Lighting Technologies. Warranty@halcolighting.com
All sizes and specications are subject to change. Print Edition 07-25-17
Halco Lighting Technologies | 2940 Pacic Drive | Norcross, GA 30071 | Toll Free 800.677.3334 | Phone 770.242.3612 | Fax 800.880.0822 | Email customercare@halcolighting.com | Atlanta | Carlstadt | Chicago | Cleveland | Houston | Phoenix
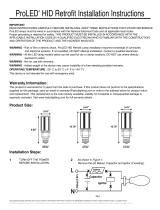
1. Make sure the POWER IS TURNED OFF at the source to the location at which you are installing the product.
2. Remove existing panel if applicable.
3. Before installing the panel in the ceiling, pull up the safety hooks on the back of the luminaire (Fig. 1)
4. Insert the panel into the ceiling so it rests securely on the T-grid. Bend each safety hook 90° so they extend over the
T-grid on both sides of the xture. (Fig. 2)
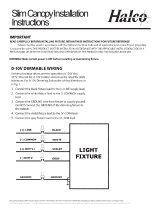
IMPORTANT
READ INSTRUCTIONS CAREFULLY BEFORE INSTALLING. KEEP THESE
INSTRUCTIONS FOR FUTURE REFERENCE.
ProLED luminaires must be wired in accordance with the National Electrical Code and all applicable local codes. Proper
grounding is required for safety.
THIS PRODUCT MUST BE INSTALLED IN ACCORDANCE WITH THE APPLICABLE INSTALLATION CODE BY A
QUALIFIED ELECTRICIAN WHO IS FAMILIAR WITH THE CONSTRUCTION AND OPERATION OF THE PRODUCT
AND THE HAZARDS INVOLVED.
WARNING - Risk of fire or electric shock. ProLED Panel Light installation requires knowledge of luminaires and electrical
systems. If not qualified, DO NOT attempt installation. Contact a qualified electrician.
WARNING - Risk of fire or electric shock. Suitable for damp locations. Make sure the power is off prior to installation.
WARNING - Risk of fire or electric shock. Suitable for flat T-Grid in non-insulated ceilings. Access above ceiling required.
WARNING - DO NOT install in unstable, loose or easily breakable surfaces.
WARNING - DO NOT let objects impact or exert force on the surface of the luminaire.
Warranty Information:
This product is warranted for 5 years from the date of purchase. If this product does not perform to the specifications sup-
plied on this package, send an email or write to the address below for product return and replacement. This replacement
is the sole remedy available. Liability for incidental or consequential damage is expressly excluded.
Visit www.halcolighting.com for full warranty details.
Installation Steps:
ProLED® Edge Lit Flat Panel
Installation Instructions ®
12