Page is loading ...

1 of 2 Workrite Ergonomics | (800) 959–9675 www.workriteergo.com
#2 & #3 tip Phillips screwdriver or drill/driver
Drill with ⅛" drill bit
Pencil
Tranquility Poly Panel(s) with threaded inserts
Worksurface at least 1" thick
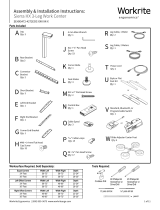
A Single Panel Desk Mount,
"L" Bracket
Qty: 2
C #12 × ¾" Pan Head
Phillips Screws
Qty: 4
B #10-32 × " Pan
Head Screws
Qty: 4
Tools RequiredRequired, Sold Separately
Assembly & Installation Instructions:
Tranquility Single Panel Desk Mount Kit,
TRQ-MNT-DESK1PNL-B
Parts Included Hardware Kit
Note: If you've purchased the Trough Mount kit, see other side.
Locate Panel and Mount to Worksurface
Center the Panel le to right on the side of
the worksurface. Position flush with edge of
worksurface.
Optional: If cables need to be routed down the
side of the worksurface where the Panel will be
attached, move the panel back " to create a
small gap to route cables.
Using a pencil, mark the location of the four
holes on the bottom of the worksurface using the
holes in the two "L" Brackets as guides.
Use ⅛" drill bit to drill pilot holes at the four
locations.
You may wish to mark your drill bit so you do
not drill any more than ¾" deep and damage
your worksurface top. Do not drill all the way
through your worksurface!
Attach Panel assembly using the four #12×¾"
Pan Head Phillips Screws (C).
Attach "L" Brackets to Tranquility Poly Panel
Attach the two "L" Brackets (A) to the threaded
inserts on the Tranquility Poly Panel with the
four #10-32 × " Pan Head Screws (B). Tighten
Securely.
¾"
¾"
A
1
2
B
C
Tranquility Poly Panel
Threaded inserts
a
a
b
b
c
c
d
d
e
e
Oset 1/2" to create
gap to allow for
cables if required
Mark bit
at 3/4"

2 of 2 Workrite Ergonomics | (800) 959–9675 www.workriteergo.com
#1500348 Rev B
" wrench
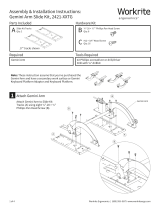
Workrite Trough installed onto workcenter
Tranquility Poly Panel(s) with threaded inserts
A Trough Mounts,
Qty: 4 B #10-32 Keps Nut
Qty: 4
Tools RequiredRequired, Sold Separately
Assembly & Installation Instructions:
Tranquility Single Panel Trough Mount Kit,
TRQ-MNT-TROUGH1PNL-BA
Parts Included Hardware
Note: If you've purchased the Single Panel Desk Mount Kit, see other side.
Attach Mounts to Panel
Attach the four Trough Mounts (A) to your Tranquility Poly Panel.
Attach Panel Assembly to Trough
Attach the four Trough Mounts (A) on your
Panel assembly through the holes in the
backside of your Workrite Trough using the
#10-32 Keps Nuts (B). Tighten securely with
" wrench.
1
2
A
B
Tranquility Poly Panel
Holes in Trough
Threaded inserts
/