Page is loading ...

1 of 4 Workrite Ergonomics | (800) 959–9675 www.workriteergo.com
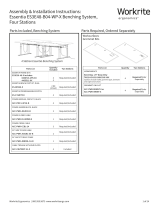
4 mm Allen Wrench (H) included
#2 tip Phillips screwdriver or drill/driver
Tape
Tranquility Panels
Workrite Workcenter with pre-drilled top
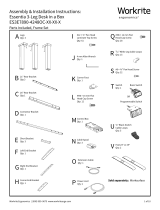
Attach Mounts to Bottom of Workrite Pre-Drilled Worksurface
Attach the four Mounts to underside of worksurface into
pre-drilled holes using the #12 × " Pan Head Phillips
Screws (F). Be sure to use the Rear Corner mounts (A
& B) in the appropriate corners. Front Mounts (C) are
interchangeable.
A Rear Corner Desk Mount,
Le
Qty: 1
B Rear Corner Desk Mount,
Right
Qty: 1
C Front Desk Mount,
Le & Right
Qty: 2 F #12 × ¾" Pan Head
Phillips Screws
Qty: 8
G M6 × 8 mm Button
Head Screws
Qty: 4
H 4 mm Allen Wrench
Qty: 1
D Rear Corner Clamp
Assembly
Qty: 4
E Front Clamp
Assembly
Qty: 2
Tools RequiredRequired, Sold Separately
Assembly & Installation Instructions:
Tranquility Panel Desk Mounting Kit,
TRQ-MNT-DESK3PNL-BA
Parts Included Hardware Kit
A
C
F
F
F
F
C
B
1
Under Workcenter

2 of 4 Workrite Ergonomics | (800) 959–9675 www.workriteergo.com
6½"
6½"
6½"
6½"
6½"
6½"
Mount area
Mount area
Mount area
Mount area
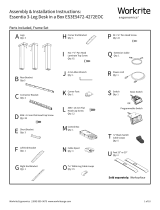
Clamp Panels Together
Loosen the screw to attach the clamp. Position Clamps (D &
E) 6" from the top or bottom of the Panels.
Tip: The "Workrite" tag is positioned approximately 6.5"
from the edge as a guide. Start by placing clamps above
the tag. Do not place clamps on or below the tags. Use
tape or something that won't damage your panels to guide
placement for the other clamps.
Note: You may wish to have your panels lower or higher than
the recommended height. If so, clamp assemblies must be
attached within the designated "mount area." Take care that
the panels will not interfere with any objects above or below
the workcenter as it moves and that the structure is rigid and
stable when assembled.
Insert the Side Panel and Back Panel into the clamp, making sure the panel rests against the
backstop. Note that the flat sides of the panels face inwards and the padded sides face outward.
Clamp the Panels in place using the 4 mm Allen Wrench (H). Suggested Sequence of assembly is
listed 1, 2, 3, 4, 5, 6.
Note: Rear Corner Clamps (D) need to be tightened until secure, being careful not to pinch the
panel material any more than necessary yet have the panel securely held.
Front Clamps (E) can be tightened all the way until the two back sides of the clamps meet and
Clamp is securely fastened to Panel.
2
D
E
E
H
D
D
D
D
Disassembled
Use "Workrite"
tags as a
starting point
for clamp
placement.
Back panel
Side panel
Backstop
Tape
Flat side
Flat side
Padded Side
a
b
c
d
d
c
cc
c
bb
a
1
2
3
4
5
6
Correct positioning of Clamps on the Panels is critical! Double
check height and position the bottom clamps and confirm
they are positioned at exactly the same height from the
bottom of the Panels. Use a ruler and level if necessary.

3 of 4 Workrite Ergonomics | (800) 959–9675 www.workriteergo.com
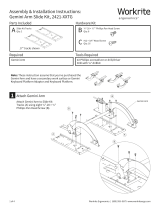
Attach Panel Assembly to Mounts on Worksurface
Note: This step must be performed by two people.
Li Panel Assembly onto workcenter, supporting bottom of panels
and using caution not to distort the assembly. Slip the Rear
Corner Clamps (D) onto the Rear Corner Desk Mounts (A & B).
The Clamp will rest under Worksurface and on top of the Bracket.
The Clamps have a guide pin on the bottom that will rest inside
an oval hole in the Bracket and will *click* in place. One person
needs to continue holding the assembly in place from the rear, as
the other person attaches the Front Clamps.
Attach the Front Clamps (E) to the Front Desk Mounts (C) by
slipping the Clamp onto the Mount. The Front Clamps and Mounts
also have a guide pin and oval notch to guide the assembly.
Once in place, attach the Front Clamps (E) to the Front Mounts (C)
with the M6×8mm Button Head Screws (G).
With Front Clamps and Mounts attached, then attach the Rear
Corner Clamps (D) to the Rear Corner Brackets (A & B) with the
remaining M6×8mm Button Head Screws (G).
3
a
a
b
b
c
c
d
e
e
d
c
Under worksurface, shown
without panels for clarity.
Under worksurface, shown
without panels for clarity.
Guide pin
Guide pin
Oval hole
B
D
C
G
G
E
Oval notch

4 of 4 Workrite Ergonomics | (800) 959–9675 www.workriteergo.com
#1500327 Rev A
Reposition Panels if Needed
Since the Tranquility Panels and Clamp positioning are flexible, they may require last minute adjustments
to make panels level, square and keep them from interfering with objects as your workcenter is raised or
lowered.
Simply loosen the clamps with the included 4 mm Allen Wrench and reposition the panes accordingly.
Tighten securely once positioned correctly.
Cleaning Instructions
Vacuum clean regularly. Professional dry cleaning is recommended for treating marks or stains.
For self treatment, treat stains immediately by wiping clean with pH neutral soap and a damp cloth.
3
✓
/