Midmark Dental Light (Halogen) Installation guide

Category
Wall & ceiling mounts accessories
Type
Installation guide

Midmark Dental Light (Halogen) is a versatile and adjustable lighting solution designed to meet the specific needs of dental professionals. Its key features include:

  • Adjustable Tension: Allows customization of the light's resistance at various pivot points, ensuring effortless positioning and precise alignment during procedures.

  • Flex Arm Adjustment: Provides flexibility in adjusting the light's reach and angle, allowing for optimal illumination of the treatment area.

  • Leveling Mechanism: Equipped with leveling screws, the light can be easily adjusted to maintain a stable and balanced position, preventing unwanted movement during use.

English-1
Style G
© 2011 Midmark Corp. | 60 Vista Drive Versailles, OH 45380 USA | 1-800-643-6275 | 1-937-526-3662 |
Midmark
®
Light Install: L/R mounted on Knight Chair
Applies to Models:
153937 (-003 & -004)
153938 (-003 & -004)
Language of origin: English
WARNING
Equipment is not suitable for use in the
presence of a flammable anesthetic mixture.
003-1150-00 Rev. WA1 (4/2/19)
Step 1: Lift seat section of chair.
Step 4: Secure lower arm by threading
mounting bolt into nut plate
in L/R mount assembly.
Lower
Arm
Bearing
Cap
Bearing
Bolt
Stop Ring & Pin Installation
Halogen
LED
NOTE: This install guide applies to Halogen and LED-style lights.
Spacer
Bearing
Step 2: Lubricate bearing and osition components
as shown over nut plate in L/R mount assembly.
Step 3: Lubricate bearing and position components
as shown in lower arm; then insert bolt.
midmark.com
English-2
Style G
© 2011 Midmark Corp. | 60 Vista Drive Versailles, OH 45380 USA | 1-800-643-6275 | 1-937-526-3662 |
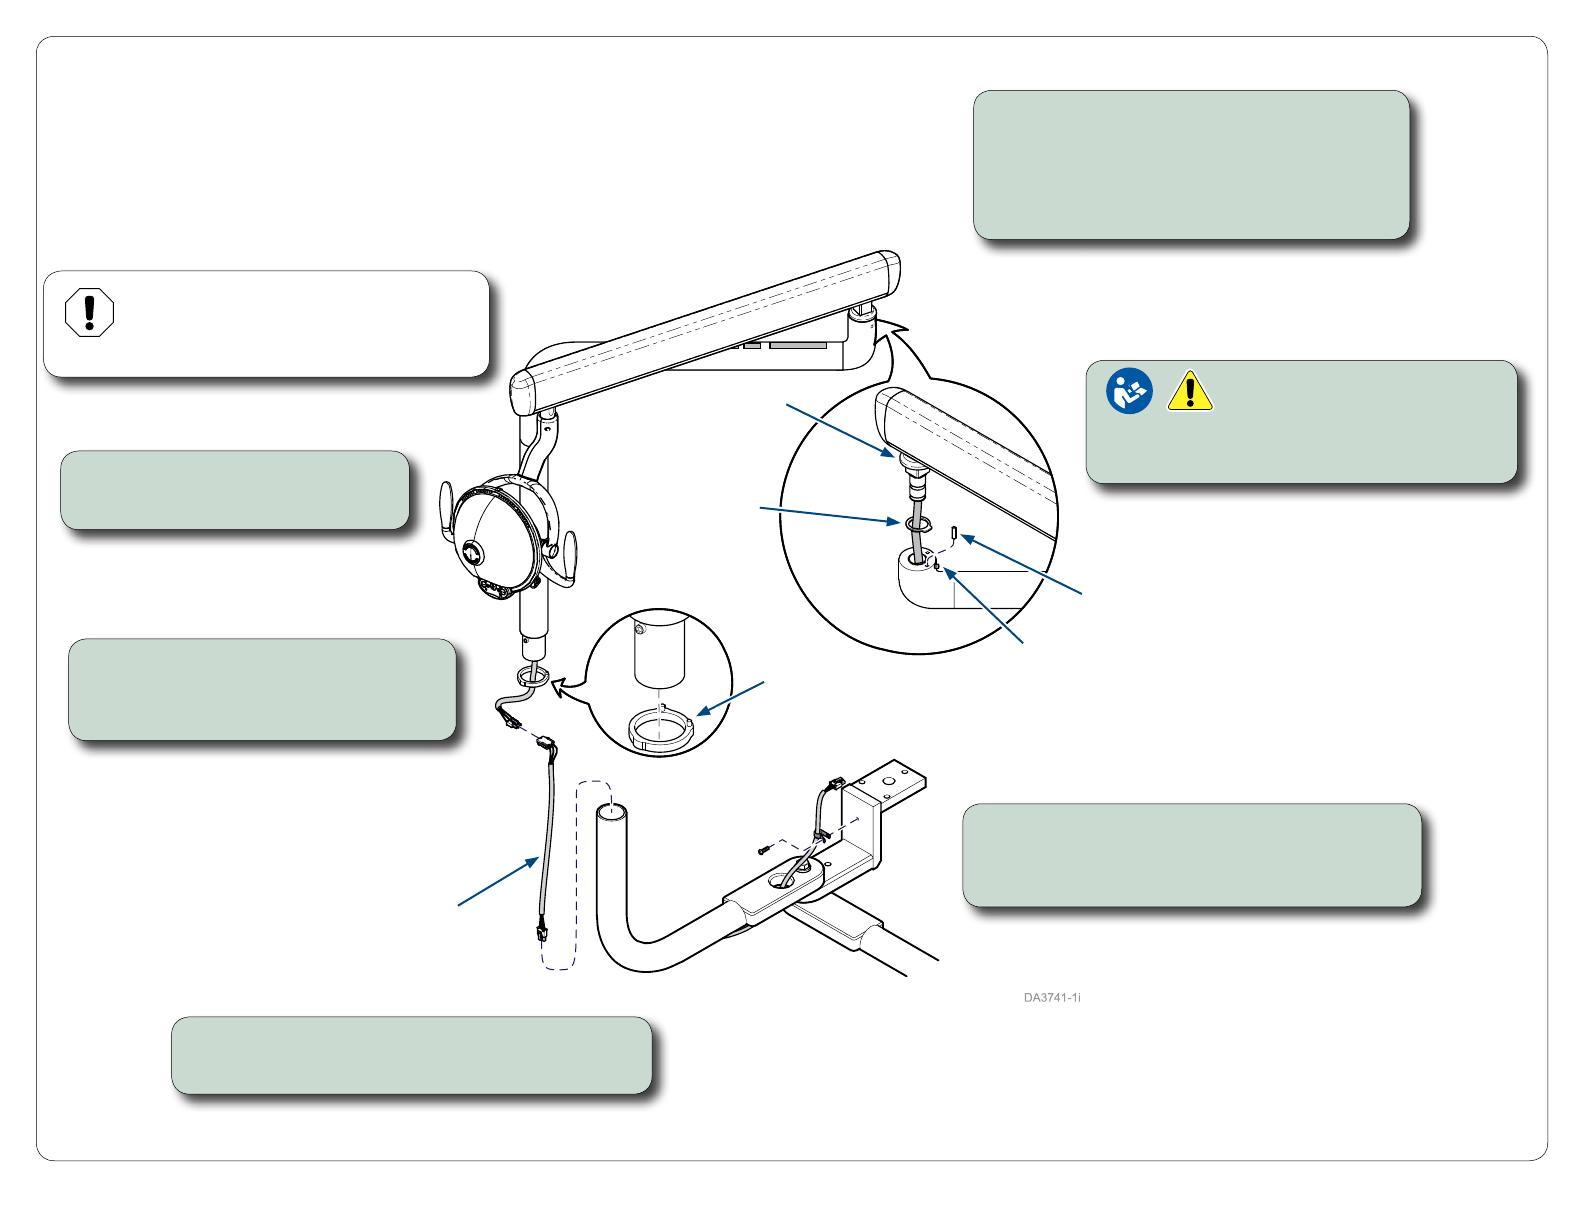
Step 2: Install rotation stop plate
onto light arm post.
Upper Light Arm installation
Step 4: Feed wire harness down thru lower arm
& insert light arm post into lower arm.
Step 5: Pull wire harness thru hole in end of
lower arm and retainer clip. Securing
retainer clip to bracket as shown.
Step 3: Connect from upper light arm
harness to jumper harness
[shipped loose].
Equipment Alert
Use an assistant to secure light arm at
pivot points. Failure to do so could result
in damage to lighthead.
Rotation
Stop
Plate
Step 1:
A) Position tab of rotation stop ring in line
with flex arm, facing lighthead as shown.
B) Insert flex arm shaft into curved arm
assembly & secure with set screw.
Step 6: Lift cover ring & install stop pin
into hole in curved arm assembly.
Set
Screw
Stop
Pin
Rotation
Stop Ring
Cover
Ring
Jumper
Harness
midmark.com
English-3
Style G
© 2011 Midmark Corp. | 60 Vista Drive Versailles, OH 45380 USA | 1-800-643-6275 | 1-937-526-3662 |
Electrical Connection /
Leveling Light Arm
Step 1: Lift seat section of chair.
Step 2: Route wire harness from light
up thru hole in light arm.
Step 4: Position light arm straight out as
shown; then adjust three leveling
screws until light arm is level.
Jumper
Harness
Step 3: Connect jumper harness
to umbilical harness.
Retainer
Clip
Leveling
Screw
Umbilical
Harness
Step 5: Connect chair light harness to power supply.
Chair
Light
Harness
Power
Supply
midmark.com
English-4
Style G
© 2011 Midmark Corp. | 60 Vista Drive Versailles, OH 45380 USA | 1-800-643-6275 | 1-937-526-3662 |
Tension Adjustments
To adjust Flex Arm tension...
A) Remove end cap and top cover as shown.
B) Loosen or tighten adjustment nut as desired.
To adjust tension at Arm / Yoke pivot joints...
A) Remove neck cover as shown (see Note).
B) Loosen or tighten appropriate screws to adjust tension.
Note: Some halogen models have a short neck on the lighthead. It is not
necessary to remove the neck cover on these models.
To adjust tension at Light pivot joint...
A) Remove screw cover as shown.
B) Loosen set screw.
C) Loosen or tighten light pivot adjustment screw.
D) Tighten set screw.
Short Neck
Yoke Pivot
Adjustment Screw
Arm Pivot
Adjustment Screw
Adjustment Nut
Yoke Pivot
Adjustment Screws
Arm Pivot
Adjustment Screws
Light Pivot
Adjustment Screw
Set Screw
Neck Cover
(Long Neck)
midmark.com
  • Page 1 1
  • Page 2 2
  • Page 3 3
  • Page 4 4

Midmark Dental Light (Halogen) Installation guide

Category
Wall & ceiling mounts accessories
Type
Installation guide

Midmark Dental Light (Halogen) is a versatile and adjustable lighting solution designed to meet the specific needs of dental professionals. Its key features include:

  • Adjustable Tension: Allows customization of the light's resistance at various pivot points, ensuring effortless positioning and precise alignment during procedures.

  • Flex Arm Adjustment: Provides flexibility in adjusting the light's reach and angle, allowing for optimal illumination of the treatment area.

  • Leveling Mechanism: Equipped with leveling screws, the light can be easily adjusted to maintain a stable and balanced position, preventing unwanted movement during use.

Ask a question and I''ll find the answer in the document

Finding information in a document is now easier with AI