Midmark Dental Light (Halogen) Installation guide

Type
Installation guide

This manual is also suitable for

Midmark Dental Light (Halogen): Halogen dental light designed for precise illumination in dental procedures. Offers adjustable brightness, a versatile swing radius of 280 degrees, and halogen bulb technology for optimal clarity. Mountable on posts with diameters of 1-3/8 or 1-3/4 inches, it provides focused lighting for enhanced visibility during examinations and treatments.

Midmark Dental Light (Halogen): Halogen dental light designed for precise illumination in dental procedures. Offers adjustable brightness, a versatile swing radius of 280 degrees, and halogen bulb technology for optimal clarity. Mountable on posts with diameters of 1-3/8 or 1-3/4 inches, it provides focused lighting for enhanced visibility during examinations and treatments.

English-1
© 2011 Midmark Corp. | 60 Vista Drive Versailles, OH 45380 USA | 1-800-643-6275 | 1-937-526-3662 |
MA3476i
Universal Light Installation
Applies to Models:
153639 (-001)
153904 (-002)
Language of origin: English
WARNING
Equipment is not suitable for use in the
presence of a flammable anesthetic mixture.
003-1238-00 Rev. H (5/29/13)
Equipment Alert
Before installing the Midmark Cabinet / Wall Light, ensure
the physical room requirements outlined are met.
Halogen LED
NOTE: This install guide applies to Halogen and LED-style lights.
Dimensions / Swing Radius
28”
(71.1 cm)
57”
(144.8 cm)
280°
Style A
midmark.com
English-2
© 2011 Midmark Corp. | 60 Vista Drive Versailles, OH 45380 USA | 1-800-643-6275 | 1-937-526-3662 |
____
Installing Light Arm
DA3474i
Note
Make sure post is level before installation. This light can be
installed into 1-3/8 or 1-3/4 in. diameter mounting posts.
Step 1: Install bearing sleeve... (ONLY)
A) Install bearing sleeve into mounting post.
1-3/8”
(3.5 cm)
Step 2: Installing Fixed Arm...
A) Route power cord thru mounting post.
B) Insert fixed arm into mounting post.
C) Remove screw, end cap and bottom cover.
D) Route wire harness thru rotation stop ring and
fixed arm.
Step 3: Installing Flex Arm...
A) Position tab of rotation ring as shown.
B) Insert flex arm into fixed arm.
Step 4: Wire connection...
A) Slide retaining ring over wire harness and install in fixed arm.
B) Connect wire harnesses from flex arm and fixed arm.
C) Install screw, end cap and bottom cover.
Bearing
Sleeve
Mounting
Post
Wire
Harnesses
Bottom
Cover
End Cap
Screw
Rotation
Ring
Fixed Arm
Flex Arm
Retaining
Ring
Style A
midmark.com
English-3
© 2011 Midmark Corp. | 60 Vista Drive Versailles, OH 45380 USA | 1-800-643-6275 | 1-937-526-3662 |
____
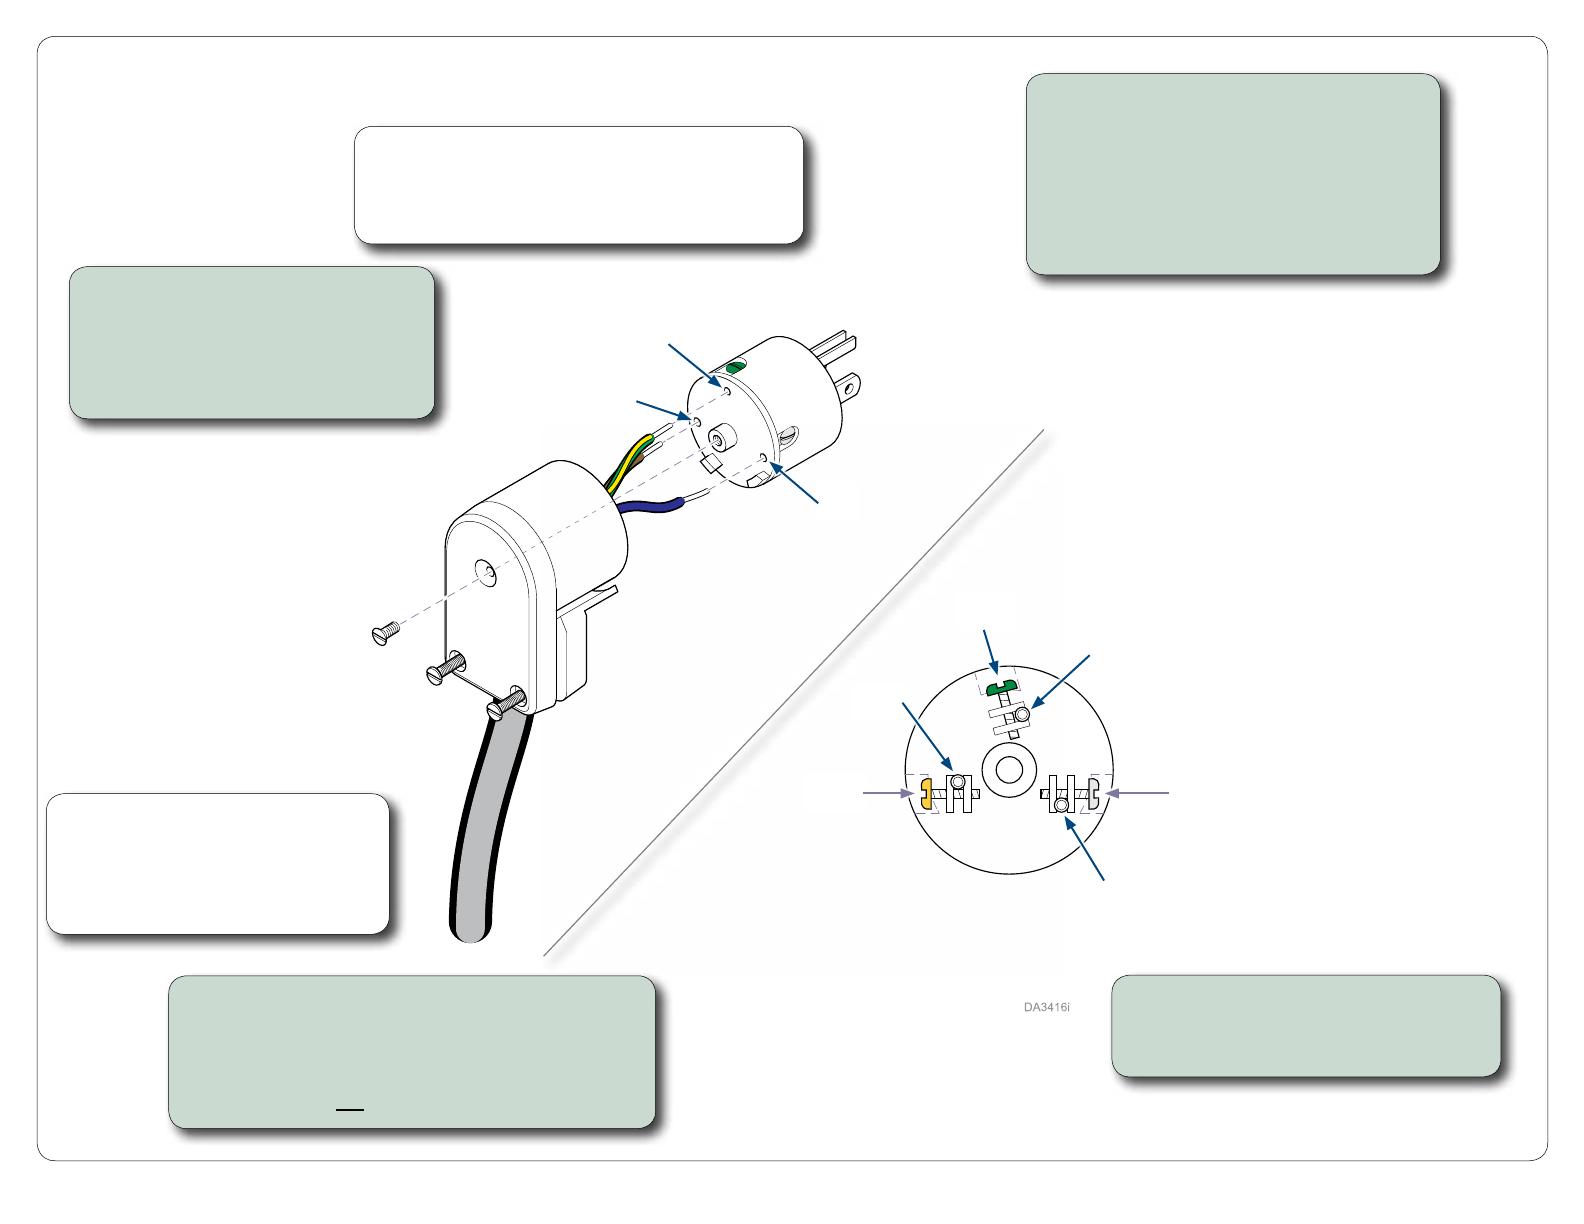
Installing Plug to Power Cord
Note (Halogen ONLY)
If facility voltage is 230 VAC, install a properly rated
plug according to local codes and regulations.
Adjust transformer for 230 VAC operation.
Step 2:
A) Insert BROWN wire from power cord
into hole (A) & tighten GOLD screw.
B) Insert BLUE wire from power cord
into hole (B) & tighten SILVER screw.
C) Insert GREEN wire from power cord
into hole (C) & tighten GREEN screw.
Hole
(B)
Hole
(A)
Hole
(C)
Brown
Wire
Green
Wire
Blue
Wire
Silver
Screw
Gold
Screw
Green
Screw
Step 3:
A) Rotate three pronged portion of plug to desired
position in housing & secure with screw.
B) Tighten two screws so that power cord is
secured. Do not overtighten screws.
Note
The three pronged portion of plug may
be installed in four different positions.
Be sure two tabs on pronged portion
align with notches in housing.
Step 4: Plug power cord into properly
rated receptacle & check for
proper operation.
Step 1:
A) Remove screw as shown & three
pronged portion of plug.
B) Loosen two screws as shown &
insert power cord into housing.
Style A
midmark.com
English-4
© 2011 Midmark Corp. | 60 Vista Drive Versailles, OH 45380 USA | 1-800-643-6275 | 1-937-526-3662 |
____
DA3477i
115V
230V
N
S
S1
S2
Changing Tranformer VAC (Halogen ONLY)
Transformer
Cover
Note
If facility voltage is 230 VAC, the fol-
lowing procedure must be performed
before connecting power to light.
Step 2: Installing transfer cover...
A) Install transfer cover and secure with four screws.
B) Plug power cord into proper rated receptacle.
Step 1: Removing cover and diconnecting...
A) Remove four screws and transformer cover.
B) Disconnect brown electrical lead from 115V tap of
transformer and connect to 230V tap.
Screw
Tab
Style A
midmark.com
English-5
© 2011 Midmark Corp. | 60 Vista Drive Versailles, OH 45380 USA | 1-800-643-6275 | 1-937-526-3662 |
Tension Adjustments
To adjust Flex Arm tension...
A) Remove end cap and top cover as shown.
B) Loosen or tighten adjustment nut as desired.
To adjust tension at Arm / Yoke pivot joints...
A) Remove neck cover as shown (see Note).
B) Loosen or tighten appropriate screws to adjust tension.
Note: Some halogen models have a short neck on the lighthead. It is not
necessary to remove the neck cover on these models.
To adjust tension at Light pivot joint...
A) Remove screw cover as shown.
B) Loosen set screw.
C) Loosen or tighten light pivot adjustment screw.
D) Tighten set screw.
Short Neck
Yoke Pivot
Adjustment Screw
Arm Pivot
Adjustment Screw
Adjustment Nut
Yoke Pivot
Adjustment Screws
Arm Pivot
Adjustment Screws
Light Pivot
Adjustment Screw
Set Screw
Neck Cover
(Long Neck)
Style A
midmark.com
  • Page 1 1
  • Page 2 2
  • Page 3 3
  • Page 4 4
  • Page 5 5

Midmark Dental Light (Halogen) Installation guide

Type
Installation guide
This manual is also suitable for

Midmark Dental Light (Halogen): Halogen dental light designed for precise illumination in dental procedures. Offers adjustable brightness, a versatile swing radius of 280 degrees, and halogen bulb technology for optimal clarity. Mountable on posts with diameters of 1-3/8 or 1-3/4 inches, it provides focused lighting for enhanced visibility during examinations and treatments.

Ask a question and I''ll find the answer in the document

Finding information in a document is now easier with AI