
ProLED
®
HID Retrot Installation Instructions
1 2
As shown in Figure 1;
Remove the old Ballast, Capacitor and Ignitor (if existing).
Warranty Information:
This product is warranted for 5 years from the date of purchase. If this product does not perform to the specications
supplied on this package, send an email to [email protected] or write to the address below for product return
and replacement. This replacement is the sole remedy available. Liability for incidental or consequential damage is
expressly excluded. Visit www.halcolighting.com for full warranty details.
IMPORTANT
READ INSTRUCTIONS CAREFULLY BEFORE INSTALLING. KEEP THESE INSTRUCTIONS FOR FUTURE REFERENCE.
ProLED lamps must be wired in accordance with the National Electrical Code and all applicable local codes.
Proper grounding is required for safety. THIS PRODUCT MUST BE INSTALLED IN ACCORDANCE WITH THE
APPLICABLE INSTALLATION CODE BY A QUALIFIED ELECTRICIAN WHO IS FAMILIAR WITH THE CONSTRUCTION
AND OPERATION OF THE PRODUCT AND THE HAZARDS INVOLVED.
WARNING - Risk of re or electric shock. ProLED HID Retrot Lamp installation requires knowledge of luminaires
and electrical systems. If not qualied, DO NOT attempt installation. Contact a qualied electrician.
WARNING - All the LED lamp models below can be used for dry or damp locations, DO NOT use where directly
exposed to water.
WARNING - Not for use with dimmers.
WARNING - Added weight of the device may cause instability of a free-standing portable luminaire.
OPERATING TEMPERATURE: -20° C to 60° C (-4° F to 140° F)
This device is not intended for use with emergency exits.
TURN OFF THE POWER
BEFORE INSTALLATION
.
Product Size:
Installation Steps:
L
N
Ignitor
Capacitor
Ballast
Fig 1
© 2016 Halco Lighting Technologies, LLC. All rights reserved. Halco and ProLED are registered trademarks of Halco Lighting Technologies. All sizes and specications are subject to change. Print Edition 11-05-16.
Halco Lighting Technologies | 2940 Pacic Drive | Norcross, GA 30071 | Toll Free 800.677.3334 | Phone 770.242.3612 | Fax 800.880.0822 | halcolighting.com | Atlanta | Carlstadt | Cleveland | Houston | Los Angeles | Phoenix
3.43”
9.60”
36W
3.43”
10.79”
45W
3.43”
10.79”
54W

Installation Steps Continued:
3
4
As shown in Figure 2;
Connect A/C line voltage wires directly to EX39 socket.
(Reattach or replace ground lead if one is needed)
As shown in Figure 3;
Screw the LED lamp onto the corresponding socket.
L
N
Fig 2
Halco Lighting Technologies | 2940 Pacic Drive | Norcross, GA 30071 | Toll Free 800.677.3334 | Phone 770.242.3612 | Fax 800.880.0822 | halcolighting.com | Atlanta | Carlstadt | Cleveland | Houston | Los Angeles | Phoenix
Fig 3
L
N
© 2016 Halco Lighting Technologies, LLC. All rights reserved. Halco and ProLED are registered trademarks of Halco Lighting Technologies. All sizes and specications are subject to change. Print Edition 11-05-16.
-
 1
1
-
 2
2
Halco Lighting Technologies HID54/850/MV2/EX39/LED 84015 Operating instructions
- Type
- Operating instructions
- This manual is also suitable for
Ask a question and I''ll find the answer in the document
Finding information in a document is now easier with AI
Related papers
-
 Halco Lighting Technologies FL4/CL200BZ40U/YK 99684 Operating instructions
-
 Halco Lighting Technologies HID54/850/MV2/LED 84013 Specification
-
Halco Lighting Technologies 82119 Specification
-
Halco Lighting Technologies CDL6FR15/950/RTJB/LED 99617 Installation guide
-
Halco 22FSEPL/8DU 10331 Installation guide
-
 Halco Lighting Technologies ADL4FR9/940/LED 99968 Installation guide
-
 Halco Lighting Technologies CDLH10AR40/830/LED 99852 Installation guide
-
 Halco Lighting Technologies DL4FR10/930/ECO/LED2 99634 Installation guide
-
 Halco Lighting Technologies S14RED1C/LED 80517 Specification
-
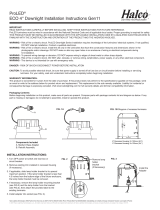 Halco Lighting Technologies DL4FR10/930/ECO/LED2 99634 Installation guide
Other documents
-
Halco T5FR25/850/BYP/HO/LED Installation guide
-
Halco 48T8HE-10-840-DSE-BYP-LED Installation guide
-
Halco CSP/60U40/MS Installation guide
-
Halco FL150/U50/SF Installation guide
-
Halco WPFS2-WS-CS-U-PC Installation guide
-
Halco RDL4-8-CS-ST Installation guide
-
Halco LS8-WS-CS-U Installation guide
-
Halco ALM/SASR Installation guide
-
Halco EMG-EXC-WH-RG-RC Installation guide
-
 PROLED L514070 User manual


