Page is loading ...

VIDEO WIRELESS
ACCESS POINT
Installation Guide
DESCRIPTION
The Video Wireless Access Point
(WAP) is a secure wireless access
point that automatically connects
to DMP cameras and DMP Wi-Fi
enabled panels.
The WAP allows DMP Wi-Fi enabled
panels to communicate through
Wi-Fi connection to the Central
Station and SecureCom Wireless.
When connected, the WAP and
cameras allow app users to view
live or recorded video feeds from
their smartphones.
Compatibility
• All Video Cameras
• DMP Wi-Fi enabled panels
What is Included?
• V-IP1006RR 450 Mbps Wireless
Access Point
• 3 Detachable Antennas
• Power Adapter
• Ethernet Cable
• PoE Power Injector
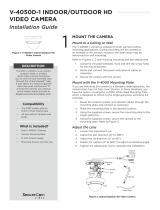
1POWER THE WIRELESS ACCESS POINT
1. Connect the Wireless Access Point (WAP) to a router or a
switch using an Ethernet cable.
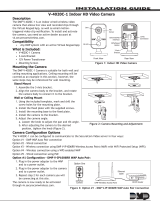
2. Power the WAP by using one of the following options:
a. Power Adapter
Plug the provided power adapter into the power jack on
the back of the WAP, then connect it to a standard wall
outlet. See Figure 2.
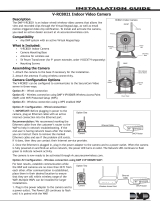
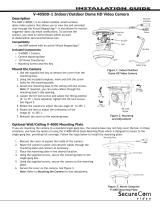
b. Power over Ethernet (PoE)
Connect the WAP to the PoE port on the power injector
using an Ethernet cable. Connect the LAN on the power
injector to the router or switch using an additional
Ethernet cable. Connect the provided power adapter
from the DC jack on the power injector to a standard wall
outlet. See Figure 3.
3. Press the ON/OFF button on the WAP. If you are connecting
it to an XT30/XT50 Series or an XTLplus Series panel, the
WAP and the panel will automatically connect.
Note: For larger installations, multiple WAPs can be installed.
Each additional WAP requires a wired connection to the
customer’s router or switch.
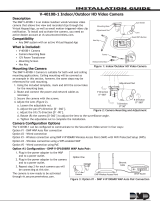
Figure 1: Wireless Access Point
Figure 2: Power
with Adapter
Figure 3: Power with
POE
WPS/RESETEthernet
WPS/Reset
Ethernet
PowerOn/O
Connect
LAN to
router or
switch
Power
Injector

LT-1440 22151
DMP VIDEO WIRELESS
ACCESS POINT
Specifications
Power 9 VDC
Dimensions 1.4” H × 7.1” W × 4.9” D
Wireless Speed 450 Mbps
Range Max 100 ft.
Ordering Information
V-IP1006RR Wireless Access Point
Compatibility
All DMP Cameras
DMP Wi-Fi enabled panels
INTRUSION • FIRE • ACCESS • NETWORKS
2500 North Partnership Boulevard
Springfield, Missouri 65803-8877
800.641.4282 | DMP.com
© 2022
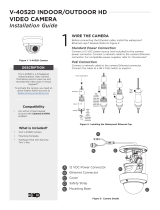
CONNECT A CAMERA
2For best results, ensure the WAP and camera are no more than 20 feet apart during pairing.
Pair Automatically
On power up, the cameras search for the WAP and pair to it automatically.
Pair Manually
WARNING: Do not press and hold the WPS button on the back of the WAP for 30 seconds or more.
Thisresets the unit to default firmware, which causes paired devices to lose connection and prevents
cameras from pairing automatically. To have firmware reloaded, the unit must be returned toDMP.
1. To enable pairing, press the WPS button on the back of the WAP for 1.5 seconds, then release it. The
power indicator on the WAP starts flashing once per second.
2. Press the WPS button on the camera. When the camera is connected to the WAP, the power indicator
stops flashing.
3. Repeat the previous steps to manaully pair another device.
31. Log in to Dealer Admin at dealer.securecomwireless.com.
2. Go to Customers.
3. Select the system’s name.
4. Press Add Camera and enter the 12-digit MAC Address located on the back of the camera. Press Next.
5. Enter a name for the camera, then configure time settings as needed.
6. If the camera image needs to be inverted due to mounting position, toggle Flip Image.
7. To allow this camera to record motion triggered video clips, select Clips.
a. If you only want this camera to oer a live camera view through the Virtual Keypad app, choose
Never Record Motion.
b. If you want this camera to record video clips any time it detects motion, choose Always Record on
Motion.
c. If you want the camera to record motion triggered clips only when the system is armed, choose
Record Motion When Armed.
8. To record video clips continuously during the first minute after the system triggers an alarm, select
Record on Alarm.
9. Press Save.
The device status is displayed next to the camera name. Refresh the page to display the latest status.
To view the camera’s live feed for the first 60minutes after it is activated, go to System Information > Video
Devices and select the camera. This enables you to troubleshoot issues and adjust camera positioning. Once
60minutes has expired, the camera feed can only be viewed by the user from Virtual Keypad.
ACTIVATE THE CAMERA
/