Page is loading ...

System Power ON
Teacher
Microphone
Active
Student
Microphone
Active
3.5mm
unbalanced
TRS (tip, ring,
sleeve) line
inputs
Balanced
Line Input
Remote Control Ports
(Future Implementation)
RS-232
Power/Status
Indicator LED
USB Port
Note: Volume levels on line
inputs can only be adjusted
via USB. Install and run the
GL-300 software before
connecting the USB.
Reset Button
Line Output
Press and hold the PWR button to turn
the microphone on or off.
A momentary press of the PWR button
will mute or unmute the microphone
audio. If muted for more than 5 minutes,
the microphone will turn off
automatically.
UP Volume
control button
DOWN Volume
control button
ChargingtheMicrophone
Step 1. Position the Teacher Microphone with the
black back of the microphone facing towards you.
Step 2. Align the charger connector so that the
small triangle shaped arrow on the charging
connector faces you.
Step 3. Insert the connector into the microphone.
www.AudioEnhancement.com • 800.383.9362
Note: Individual volume
levels of the Teardrop
Microphone can be
adjusted with the UP and
DOWN volume buttons.
Input on the GL-300 can
be controlled via USB
which is mic1, mic2 and
Line mixed audio.
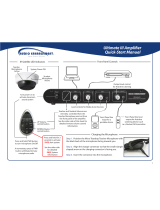
Front Panel Terminals
IR Satellite (TLD100)
Dome Sensor LED Indicators
GL-300 Amplifier
Quick-Start Manual

RS-232 connection to
the TLD100 (as shown
on amplifier) for use in
SAFE System. Additional
hardware required.
DC Power Supply
Use a set of tin leads and connect
to the speaker. Then cut the
speaker wires to appropriate
length. Strip the newly cut ends
to bare copper before inserting
into the screw compression
terminals.
Bad
Good
When using 4 speakers, wire ceiling speakers parallel
in the ceiling - bringing one speaker wire per pair to
the GL-300 Amplifier channel.
TLD100
IR-Satellite
Receiver
CAT6 Cable
Call Audio Enhancement at 800.383.9362
for more wiring diagrams
www.AudioEnhancement.com • 800.383.9362
www.AudioEnhancement.com • 800.383.9362
RS232connection

To adjust the volume of the GL-300:
1. Go to http://audioenhancement.com/downloads
2. Download GL-300 Configuration Software
3. Unzip and install the software
4. Connect the USB cable to the amplifier. (Note: When
the GL-300 is connected, the title will say GL-300
rather than “No Device Connected”)
Note: Settings cannot be adjusted until the USB
cable is connected to the GL-300 amplifier
5. Adjust volume to desired levels
Line Inputs 3, 4, and 5
Student/Teacher microphones,
line mixed input
Balanced Line Input
www.AudioEnhancement.com • 800.383.9362
Adjusting Volume Levels
DC-40485.01
/