Page is loading ...

XD CA-60 Amplier
Quick-Start Manual
1
www.AudioEnhancement.com • 800.383.9362
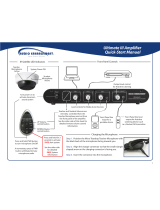
24 VDC Wall Switching Power Supply
Public Address Mute Input 5 to 70V
4- or 8-Ohm Speakers
3 Line Level Inputs
Tone Controls - Low, Mid, High
Line Output with level control
XD Wireless Systems
Receiver audio and power connections
are through a single CAT6 cable.
- Teacher and Student microphones are available.
Input
level
controls for
three Line
Level Inputs
Convenience
Line Input
Connector
ALD
Assistive
Listening
Device
Output
with
level
control
Eco Mode
Power
Saving
Indicator
CAT6

2
XD Receiver
Connect the wall mount 24 VDC power supply
with 18-gauge wire. Be sure to observe polarity
and connect plus to plus and minus to minus.
www.AudioEnhancement.com • 800.383.9362
OR
SPEAKER CONNECTION OPTIONS
OR
The amplier will drive a
2-Ohm load so four 8-Ohm
speakers can be connected
in parallel and connected to
one of the amplier’s outputs.
The 2nd output is unused.
You could parallel two 8-Ohm
speakers and run two sets of
two speakers and connect
each pair to one of each of the
two ampliers’ outputs.
CAT6 Cable

Remote Volume Control of the
Teacher and Student Microphones
Pairing Microphones to Your Receivers
UP
Volume
DOWN
Volume
Teacher Microphone
(OWN) Level Adjustment
Student Microphone
(OTHER) Level Adjustment
Teacher Microphone
Student Microphone
The “SELECT” button determines which level
will be controlled by the UP/DOWN buttons
3
Multimedia Level Adjustment
Press either the UP or DOWN
arrow button to increase or
decrease the level of the Teacher
microphone. A blue LED over the
OWN (for own microphone) will
ash with each press.
To adjust the Student Microphone
(OTHER) volume, rst press the
SELECT button so that the LED
over the OTHER label comes on.
Now press the UP/DOWN buttons
to control the level of the OTHER
microphone, which is typically the
Student Microphone.
Your XD microphones should already be
paired to the receiver. You can check this
by turning on your Teacher and Student
Microphones (Teacher Mic: press PWR for
1 second; Student Mic: ip TALK switch up).
If the LED under the BATT indicator turns
green, the mic is paired. If the LED blinks
another color (orange), then turn o your
microphones and use the following
instructions to pair them to the receiver.
Teacher Mic Student M.
Turn mic o: ip the TALK switch down.
The green BATT light will extinguish.
Press the LINK button on the receiver
(LINK LED will blink yellow).
Press and hold the LINK button and ip up the
TALK switch on the Student Microphone until
the microphone links. You will know it is linked
when the BATT LED on the microphone and
LINK LED on receiver glow green and an
audible beep will sound through the speakers.
Turn mic o: press and hold PWR/MUTE until
the green BATT light extinguishes.
Press the LINK button on the receiver (LINK
LED will blink yellow).
Press and hold the PWR/MUTE and REC
buttons on the Teacher Microphone until the
microphone links. You will know it is linked
when the BATT LED on the microphone and
LINK LED on receiver glow green and an
audible beep will sound through the speakers.
Selecting the LINE audio source
will control the volume of audio
devices that you have plugged
into the “Line In” input on the XD
receiver or Input 3 on the CA-60 if
the RS232 lines are connected.
DC-40562.01 XD
www.AudioEnhancement.com • 800.383.9362
/