Page is loading ...

CA-30 Amplier
Quick-Start Manual
1
www.AudioEnhancement.com • 800.383.9362
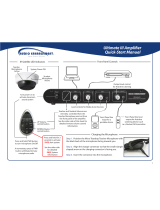
DVD
16 Watt amplifier can power 2 or 4 speakers
Optional XD wireless system. Receiver audio
and power connect through a single CAT 5/6 cable.
Teacher and student microphones are available.
DVD Players
Computers Projectors
Accepts line level inputs from
typical media sources
CA-30A Amplifier
Quick-Start Guide

2
2 - CS-12 Speakers
XD Receiver
WPA-03
Wall Plate
Microphone levels are controlled
directly from the controls on the
Teacher Microphone
Output for ALD
2nd Wall-Mounted
Input for MP3
The projector remote control is
used to adjust the volume level
in the classroom
The computer output
control is used to adjust the
volume level in the classroom
Connect only one output
device to the input.
The input level control should be set to 3
to 5 o’clock position for proper operation.
Call Audio Enhancement at 800.383.9362 for more wiring diagrams
www.AudioEnhancement.com • 800.383.9362
4 - CS-12 Speakers
in series/parallel,
are 8 Ohms
Accessory port for WPA-03
CAT 5/6 from XD Receiver
Line input
volume control
24VCD @ 2.0 A
Line input
stereo TRS
3.5mm
Projector Line
Output
Computer Line
Output
Although the DC Power input connector is marked with
polarity “+/-,” it does not matter which polarity is connected
to each side of the euroblock connector.
- OR -
AUDIO ENHANCEMENT
ALD Output
WPA-03
Line Input

3
DC-40739.01
www.AudioEnhancement.com • 800.383.9362
Remote Volume Control of the
Teacher and Student Microphones
Pairing Microphones to Your Receivers
UP Volume
control button
DOWN Volume
control button
Teacher Microphone
(OWN) Level Adjustment
Student Microphone
(OTHER) Level Adjustment
Teacher Microphone
Student Microphone
The “SELECT” button determines which level
will be controlled by the UP/DOWN buttons
Multimedia Level Adjustment
Press either the UP or DOWN
arrow button to increase or
decrease the level of the Teach-
er microphone. A blue LED over
the OWN (for own microphone)
will flash with each press.
To adjust the Student Micro-
phone (OTHER) volume, first
press the SELECT button so that
the LED over the OTHER label
comes on. Now press the
UP/DOWN buttons to control the
level of the OTHER microphone,
which is typically the Student
Microphone.
Your XD microphones should already be
paired to the receiver. You can check this
by turning on your Teacher and Student
Microphones (Teacher Mic: press PWR for
1 second; Student Mic: flip TALK switch
up). If the LED under the BATT indicator
turns green, the mic is paired. If the LED
blinks another color (orange), then turn o
your microphones and use the following
instructions to pair them to the receiver.
Teacher Mic Student M.
Turn mic o: flip the TALK switch down.
The green BATT light will extinguish.
Press the LINK button on the receiver
(LINK LED will blink yellow).
Press and hold the LINK button and flip up
the TALK switch on the Student Microphone
until the microphone links. You will know it is
linked when the BATT LED on the micro-
phone and LINK LED on receiver glow
green and an audible beep will sound
through the speakers.
Turn mic o: press and hold PWR/MUTE
until the green BATT light extinguishes.
Press the LINK button on the receiver (LINK
LED will blink yellow).
Press and hold the PWR/MUTE and REC
buttons on the Teacher Microphone until
the microphone links. You will know it is
linked when the BATT LED on the micro-
phone and LINK LED on receiver glow
green and an audible beep will sound
through the speakers.
Selecting the LINE audio source
will control the volume of audio
devices that you have plugged
into the MIC IN and AUDIO IN
inputs on your microphones.
/