Page is loading ...

1
www.AudioEnhancement.com · 801.254.9263
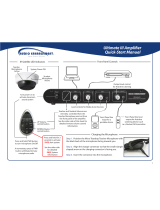
This new XD classroom audio system is designed to meet the needs of your learning environment. It is
engineered to bring reliable audio to large rooms, outdoor environments, libraries, and more.
• XD microphones are designed for rooms with windows and learning environments of every size.
• Microphone signals travel through walls, book cases, and other objects to reach your receiver.
• These microphones use a dierent type of signal than interactive whiteboards, allowing you to
work closely with the technology already present in your room.
Quite simply, this classroom audio system is designed to enhance your lessons. Here are some quick
pointers to help get started on your new system.
Pairing Microphones to Your Receivers
Your XD microphones should already be paired to the receiver. You can check
this by turning on your Teacher and Student Microphones (Teacher Mic: press PWR
for 1 second; Student Mic: ip TALK switch up). If the LED under the BATT indicator
turns green, the mic is paired. If this LED blinks another color, then turn o your
microphones and use the following instructions to pair them to the receiver.
Teacher Microphone
• Turn mic o: press and hold PWR/MUTE until the green BATT light
extinguishes.
• Press the LINK button on the receiver (LINK LED will blink yellow).
• Press and hold the PWR/MUTE and REC buttons on the Teacher
Microphone until the microphone links. You will know it is linked when
the BATT LED on the microphone and LINK LED on receiver glow green
and an audible beep will sound through the speakers.
Student Microphone
• Turn mic o: ip the TALK switch down. The green BATT light will extinguish.
• Press the LINK button on the receiver (LINK LED will blink yellow).
• Press and hold the LINK button and ip up the TALK switch on the Student Microphone until
the microphone links. You will know it is linked when the BATT LED on the microphone and
LINK LED on receiver glow green and an audible beep will sound through the speakers.
1
XD Microphones
First-time User Guide
Teacher Mic Student M.

www.AudioEnhancement.com · 801.254.9263
2
The Student Microphone
(
similar to the IR version)
There are two dierent ways for students to use the pass-around Student
Microphone:
Push-to-talk button. Student holds button down to use microphone
On/O switch. Student ips this switch up. Microphone is live until student
turns it o
Student Microphone Tips
• Microphone can be cleaned with standard disinfecting wipes.
3
1
2
2
1
XD Teacher Microphone
(
similar to the IR version)
Press and hold PWR for about 3 seconds to turn the
microphone on or o. Tap the PWR button to mute and
un-mute. If you have the microphone on mute for over 5
minutes, it will turn o to save battery life.
If there is no sound, make sure your volume isn’t turned down.
Adjusting Volume
Control the volume of your amplier and auxiliary devices
using the volume controls on your microphone.
Adjust volume with the arrow buttons. When the row of LED lights above the arrow buttons indicate
OWN, you are adjusting the volume of your Teacher Microphone.
To adjust the volume of the Student Microphone, tap SELECT until the LED light moves to OTHER, then
adjust the volume with the arrow buttons.
Selecting the LINE audio source will control the volume of audio devices that you have plugged into
the MIC IN and AUDIO IN inputs on your microphones.
2
Indicates which
audio source is
playing through
the speakers
Adjust
volume
Choose audio
source
Turn on mic
Maintaining Your Microphones
4
Your Teacher and Student Microphones contain a
rechargeable Lithium-ion battery. Charge your microphones
every night and over the weekend.
The CHG indicator shows
charging status:
• Charging: Flashing
• Finished Charging: Steady
Battery Life
Indicator
3120-0006
XD Lithium-ion Battery
Call 1.800.822.8837 for
recycle instructions

www.AudioEnhancement.com · 801.254.9263
3
DC-40484.01
5
Playing Sound from External Devices
There are two methods of connecting a multimedia device such as a phone, tablet, MP3 player, or
computer to an Audio Enhancement system. They may be connected to an input on the back of the
amplier or to the AUDIO IN port of either the Teacher or Student Microphone.
Most Audio Enhancement ampliers have 3.5 mm audio line inputs. The auxiliary input on the
microphones uses a 3.5 mm input.
Step 1:
Step 3:
Step 2:
Obtain a standard audio cable that has a 3.5 mm stereo plug on
both ends.
The volume control on the MP3 player or computer should be used to set the playback
level. The up/down arrows on the microphone can also be used to control the volume
when the microphone is set to LINE.
Connect one end of the cable to the AUDIO IN port on the
microphone or amplier and the other end to the headphone
output of the MP3 player or computer.
3.5 mm Audio Input
Volume
control for
playback
Audio IN ports
Tips & Tricks
• Use your Audio Enhancement
system every day.
• Wear your microphone 4-6 inches
below your chin.
• Charge your microphone nightly.
• Speak at a normal conversational
volume.
• Don’t turn up the volume too high.
If you can hear your voice, it’s too
loud. Have another adult in the
room to help you set the volume.
Standard USB to
Micro USB charging
cable
Wall Charging
Adapter
Charging Port
(Micro USB)
For more information, visit www.AudioEnhancement.com/XD-Teacher-Microphone
/