Deagostini Spitfire User guide

Type
User guide

Deagostini Spitfire: Build and learn about the iconic World War II fighter plane with this detailed model kit. Construct your own replica of the Spitfire, exploring its intricate design and engineering. Follow the step-by-step instructions to assemble the model, learning about the aircraft's history and features as you progress.

Deagostini Spitfire: Build and learn about the iconic World War II fighter plane with this detailed model kit. Construct your own replica of the Spitfire, exploring its intricate design and engineering. Follow the step-by-step instructions to assemble the model, learning about the aircraft's history and features as you progress.

1
Build the Spitfire: Step-By-Step
Pack 3
Stages 9-12
2
Build the Spitfire: Step-By-Step
Stage PagesParts
929-32
1 - Main wing spar
2 - Fuselage tail reinforcements
3 - Wooden strips 3 x 3 x 300mm
11 37-39
1 - Wing rib 4
2 - Wing rib 5
3 - Wing rib 6
4 - Wooden strips 3 x 5 x 300mm
10 33-36
1 - Wing rib 1
2 - Wing rib 2
3 - Wing rib 3
4 - Wooden strips 3 x 3 x 300mm
Contents
12 40-42
1 - Wing rib 11
2 - Wing rib 12
3 - Wing rib 13
4 - Wooden strips 3 x 5 x 300mm
29
Build the Spitfire: Step-By-Step
Carefully cut the joins that hold the fuselage tail
reinforcements to remove them from the sheet.
Sand the edges of the fuselage tail reinforcements
to remove any burrs or splinters.
1 2
This stages parts You will need
Stage 9
1 - Main wing spar
2 - Fuselage tail reinforcements
3 - Wooden strips 3 x 3 x 300mm
Knife
Sandpaper
Wood glue
Clamp
21
3
30
Build the Spitfire: Step-By-Step
Now place the two
reinforcements in between
the fuselage sides, as shown.
5
Apply glue to the highlighted contact areas on the
underside of the fuselage sides and have the two
shorter tail reinforcements to hand.
4
Take fuselage frame 9 provided in the previous
stage. Apply glue to the contact areas of frame 9
and insert it between the sides of the fuselage at
an angle, and snap into position.
3
31
Build the Spitfire: Step-By-Step
Then, apply glue to the highlighted areas on the
topside of the fuselage sides and have the longer
tail reinforcement ready.
First, insert the end of the tail
reinforcement into the hole
in frame 8. Then fit it into the
recesses (dotted lines) in the
sides of the fuselage.
7
8
Hold the two ends of the fuselage sides together
with a clamp.
6
32
Build the Spitfire: Step-By-Step
Take fuselage frame 10, provided in the previous
stage. Apply glue to the dotted red line shown on
the long tail reinforcement.
Then place frame 10 over the line and insert
the two projections at the bottom into the two
recesses on either side of the reinforcement.
910
Here is how the pieces that
you have assembled should
look at this stage.
11
33
Build the Spitfire: Step-By-Step
Take the fuselage and turn it over. Apply glue
to all the recesses along the centres of the
frames (arrows) and along the centre of the
reinforcement (dotted red line).
Take one of the 3 x 3mm wooden strips and
position it against the last frame, as shown.
1 2
This stages parts You will need
Stage 10
1 - Wing rib 1
2 - Wing rib 2
3 - Wing rib 3
4 - Wooden strips 3 x 3 x 300mm
Knife
Sandpaper
Wood glue
Clamp
Saw
1
2
3
4
34
Build the Spitfire: Step-By-Step
When dry, cut the strips flush with frame 4,
removing the bits that extend past the frame.
5
Apply glue to the recesses in the frames to either
side of the one placed in the previous step and
then place a 3 x 3mm wooden strip into them.
4
Adjust the strip into
position in the central
recesses of the frames.
3
35
Build the Spitfire: Step-By-Step
Place a 3 x 3mm wooden strip into the recesses at
the top of the frames, flush with the back side of
frame 10.
Don’t cut away the length of wooden strip that
extends past the frame.
78
Now apply glue to all
the central recesses
located at the top of
the frames.
6
36
Build the Spitfire: Step-By-Step
Test-fit two strips into the two lower notches on
the port side of the frames. Cut them to length,
flush with the front of frame 4, looking at the next
step to see where they should end.
Glue the two strips in place once you have cut
them to length. Then repeat on the other side of
the fuselage.
910
Here is how the pieces that
you have assembled should
look at this stage.
11
37
Build the Spitfire: Step-By-Step
Sand the wing ribs to smooth and remove
splinters. Then take the three wing ribs provided
in Stage 10 and number them 1 to 3 with a
pencil, as shown.
Have the spar supplied with Stage 9 to hand,
along with rib 3.
1 2
This stages parts You will need
Stage 11
1 - Wing rib 4
2 - Wing rib 5
3 - Wing rib 6
4 - Wooden strips 3 x 5 x 300mm
Pencil
Sandpaper
Wood glue
Set square
123
4
38
Build the Spitfire: Step-By-Step
Check that the lower projections of the spar and
the rib are level.
5
Place rib 3 into the notch, as shown.
4
Hold the spar upright and apply glue to the fifth
notch from the left.
3
Check that the upper part of the rib is flush with
the top of the spar.
6
1
234
5
39
Build the Spitfire: Step-By-Step
Before the glue dries, check with a set square that
the rib is at a 90° angle to the spar.
Apply glue to the seventh notch on the main spar
and have rib 4 to hand.
Position the ribs from this stage, as shown, and
number them 4-6.
Place rib 4 into place in the seventh notch. Then,
repeat this process to glue ribs 5 and 6 into the
ninth and 11th notches.
7
9
8
10
90º
1
2
3
1
1
3
2
11
Here is how the pieces that you have assembled
should look at this stage.
3
4
5
6
40
Build the Spitfire: Step-By-Step
Apply glue to the third notch in the main spar and
have rib 2 from Stage 10 ready.
Insert rib 2 into place, checking the projections at
the bottom, and the top edges are flush.
1 2
This stages parts You will need
Stage 12
1 - Wing rib 11
2 - Wing rib 12
3 - Wing rib 13
4 - Wooden strips 3 x 5 x 300mm
Sandpaper
Wood glue
Set square
Block of wood or similar
Pencil
1
234
41
Build the Spitfire: Step-By-Step
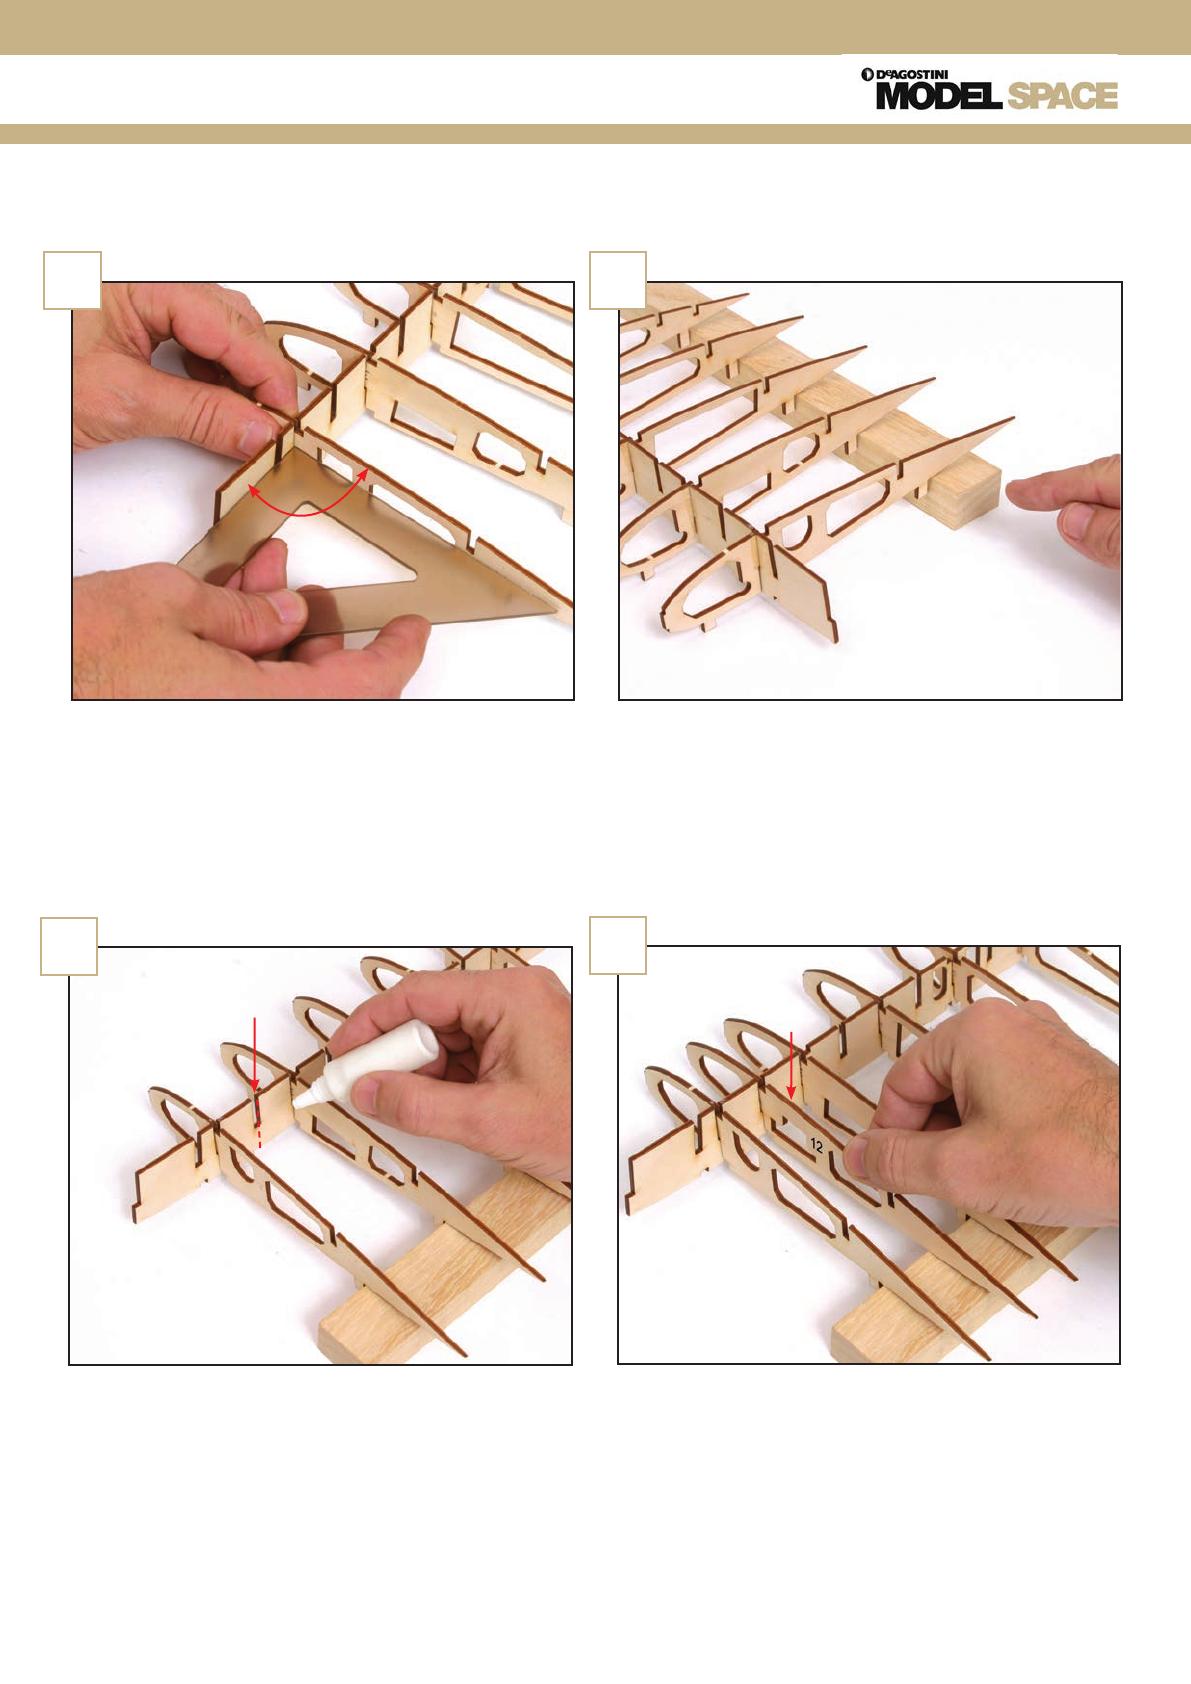
Apply glue to the fourth notch of the spar,
between ribs 2 and 3.
5
Place something underneath the ribs to raise the
entire rear portion of the wing, making sure the
projections at the rear of the ribs aren’t touching
the work surface. Prepare the ribs from this stage
in the same way as before, sanding them smooth
and marking their numbers (11-13) on them.
4
Check that the rib is at 90 degrees to the spar
when it dries.
3
Place rib 12 into the fourth notch, making sure it is
resting on the block holding the rear of the ribs up
and the top of the rib is flush with the spar.
6
90o
42
Build the Spitfire: Step-By-Step
Make sure the rear of rib 12 is centred between
the adjacent ribs.
Now take wing rib 13 and apply glue to the sixth
notch in the spar, as shown.
Before the glue has dried, check that the tops of
the rib and the spar are flush.
Place the rib into the notch, checking that it is
flush with the spar and centred between the
adjacent ribs.
7
9
8
10
Here is how the pieces that you have assembled
should look at this stage.
11
  • Page 1 1
  • Page 2 2
  • Page 3 3
  • Page 4 4
  • Page 5 5
  • Page 6 6
  • Page 7 7
  • Page 8 8
  • Page 9 9
  • Page 10 10
  • Page 11 11
  • Page 12 12
  • Page 13 13
  • Page 14 14
  • Page 15 15
  • Page 16 16

Deagostini Spitfire User guide

Type
User guide

Deagostini Spitfire: Build and learn about the iconic World War II fighter plane with this detailed model kit. Construct your own replica of the Spitfire, exploring its intricate design and engineering. Follow the step-by-step instructions to assemble the model, learning about the aircraft's history and features as you progress.

Ask a question and I''ll find the answer in the document

Finding information in a document is now easier with AI