Deagostini Spitfire User guide

Type
User guide

Deagostini Spitfire: Build your own iconic aircraft with this comprehensive step-by-step guide. Experience the thrill of assembling a detailed replica of the legendary Spitfire fighter plane. Follow the instructions to construct the model from scratch, using high-quality parts and materials. No special tools or expertise required. Perfect for aviation enthusiasts, history buffs, and model-building hobbyists.

Deagostini Spitfire: Build your own iconic aircraft with this comprehensive step-by-step guide. Experience the thrill of assembling a detailed replica of the legendary Spitfire fighter plane. Follow the instructions to construct the model from scratch, using high-quality parts and materials. No special tools or expertise required. Perfect for aviation enthusiasts, history buffs, and model-building hobbyists.

1
Build the Spitfire: Step-By-Step
Pack 13
Stages 48-51
2
Build the Spitfire: Step-By-Step
48 166
49 169
51 176
Stage PagesParts
1 - Engine side
2 - Engine parts fret
50 173
1 - Frame 12
2 - Frame 13
3 - Frame 14
1 - Fuselage reinforcement fret
2 - Wooden strips 2 x 5 x 300mm
Contents
1 - Frame 15
2 - Reinforcement fret
3 - Reinforcements
166
Build the Spitfire: Step-By-Step
Smooth the engine side with sandpaper. Test-fit
the engine side with frame 11, adjust if necessary
and then apply glue ot the contact points.
Place the engine side into position in frame 11,
making sure it is parallel to the other side.
1 2
This stages parts You will need
Stage 48
1 - Engine side
2 - Engine parts fret
Glue
Sandpaper
Knife
Tweezers
2
1
1
1
167
Build the Spitfire: Step-By-Step
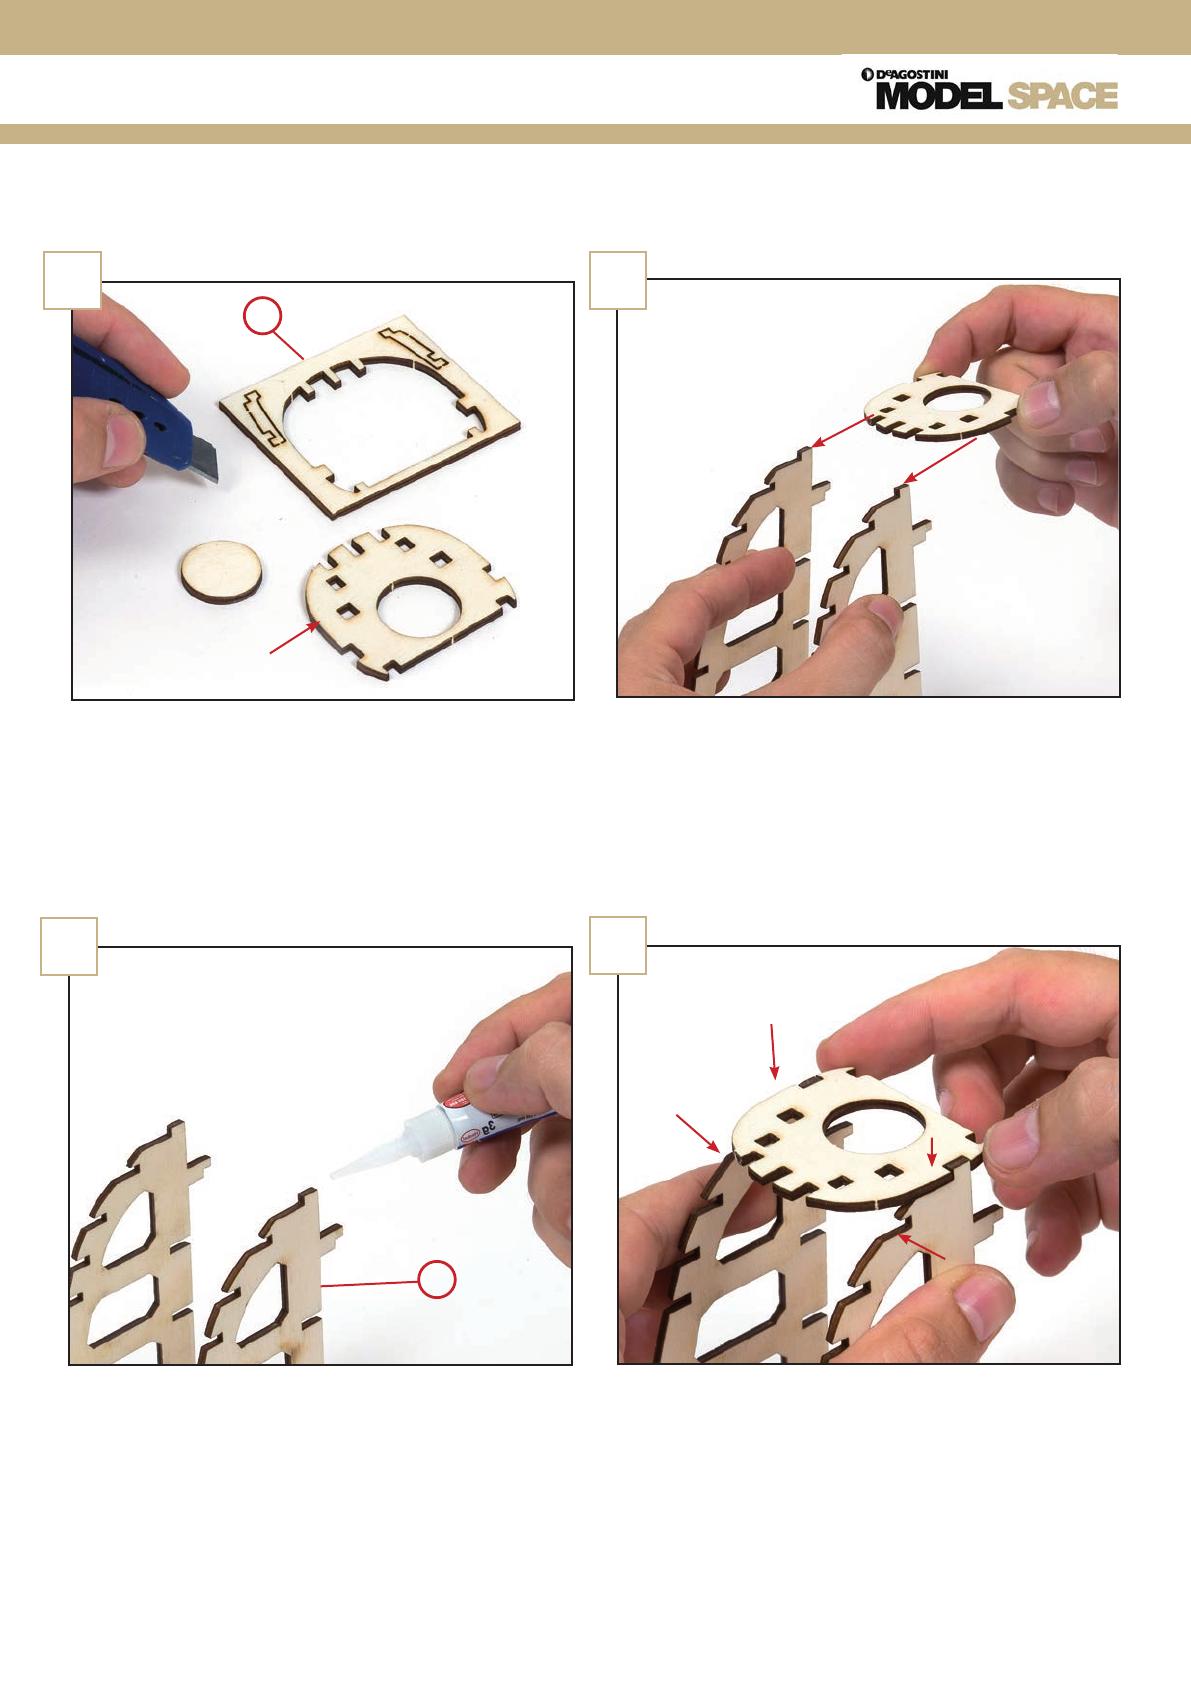
Remove the front frame and apply glue to the
contact areas on one of the sides.
5
Test-fit the front frame with the ends of the
engine sides. It should be parallel with frame 11.
4
Remove the engine front frame from the fret and
the circle from the centre of the frame, and then
smooth the frame with sandpaper.
3
Place the front frame back into position against
the glued side. Insert the non-glued side to the
side of the frame so that it is held in the correct
position as the glue dries.
6
2
1
168
Build the Spitfire: Step-By-Step
When dry, carefully remove the non-glued side
from the frame.
Glue the four reinforcements into the holes in
frame 11.
Remove the four reinforcements from the fret that
came with this stage and sand them smooth.
This is how the four reinforcements should look
when glued into place.
Your parts should now look like this. Keep any
unused parts to one side until they are needed.
7
9
8
10
11
169
Build the Spitfire: Step-By-Step
Take the left wing aileron parts fret that came with
Stage 45 and extract the parts shown in the photo.
Then smooth them with sandpaper.
Apply glue along the dotted line on the aileron
spar.
1 2
This stages parts You will need
Stage 49
1 - Fuselage reinforcement fret
2 - Wooden strips 2 x 5 x 300mm
Knife
Sandpaper
Glue
Tweezers
2
1
170
Build the Spitfire: Step-By-Step
5
43
6
Apply glue to the frame, along the dotted line.
Place up against the end of the spar and the
bracket.
Now remove the largest frame from the aileron
fret and smooth with sandpaper.
Place the bracket into the outlined section at the
end of the aileron spar, positioned as shown in
the photo.
Test-fit the aileron into place up against the rear
spar of the left wing and adjust the angle of the
frame before it dries in position.
171
Build the Spitfire: Step-By-Step
7
9
8
Remove the smaller bracket from the fret and
sand smooth. Glue into place at the other end of
the aileron spar.
Here you can see how the spar, bracket and frame should
look from another angle.
Remove and sand the smallest frame. Glue it into
place at the end of the spar, resting against the
bracket.
172
Build the Spitfire: Step-By-Step
Introduce the aileron to its location in the left half of the wing to check
that the angles of its ends coincide with those of the wing.
The left wing aileron
should now look like
this. Keep any unused
parts to one side, for
use later on.
10
11
173
Build the Spitfire: Step-By-Step
1 2
This stages parts You will need
Stage 50
1 - Frame 12
2 - Frame 13
3 - Frame 14
Pencil
Knife
Sandpaper
Glue
321
F
E
D
C
B
A
C
B
A
Take the aileron fret from the previous stage and
identify and label the remaining frames.
Remove all frames from the fret and smooth them
with sandpaper.
174
Build the Spitfire: Step-By-Step
5
43
6
C
B
A
F
E
D
Place the aileron into position on the left wing, as
shown, to check that it still fits correctly. Store the
two parts to one side for now.
Glue the remaining frames (D, E and F) into
position.
Retrieve the aileron from the previous stage.
Apply glue to the front of frame A and fit into
position, at a right angle to the spar. Repeat for B
and C.
Place the aileron assembly on a flat surface. All
the frames should be flush against it if correctly
positioned.
175
Build the Spitfire: Step-By-Step
Test-fit frame 12 in the position shown, between
the two engine sides.
Repeat the process in Steps 7 and 8 to glue frames
13 and 14 into place in the fuselage.
Remove the frame and smooth with sandpaper.
Apply glue to the inside of the fuselage, along the
dotted line, and glue the frame into position.
Hold the two sides up against the frames. You can
use an elastic band or clamps to hold them.
The aileron and fuselage should
now look like this. Store any
leftover parts.
7
9
8
10
11
11
2
3
176
Build the Spitfire: Step-By-Step
Smooth the surface of frame 15 with sandpaper.
Then apply glue to the fuselage, along the dotted
line.
Place frame 15 between the two sides, engaged in
the notches.
1 2
This stages parts You will need
Stage 51
1 - Frame 15
2 - Reinforcements
3 - Reinforcement fret
Glue
Sandpaper
Knife
32
1
11
177
Build the Spitfire: Step-By-Step
Remove the two reinforcements from the fret
received with Stage 49. Sand the edges of the two
pieces smooth.
5
Press the free side into place up against the
frames, and secure in place as the glue dries.
4
Lift the free side of the fuselage and apply glue to
the sides of the frames (dotted lines).
3
Apply glue to the notches (arrows) in the five
frames.
6
178
Build the Spitfire: Step-By-Step
Place the longer reinforcement into the notches,
positioned up against the outermost part of the
frames (see Steps 8 and 10).
Remove the piece shown from the fret received
with this stage. Smooth it with sandpaper.
Take the shorter reinforcement and glue it up
against the longer, in the notches of the first and
second frames.
Apply glue to the notches in frames 12 and 13 and
then place the reinforcement (Step 9) into them.
7
9
8
10
179
Build the Spitfire: Step-By-Step
The fuselage should now look like this. Store any unused parts for later use.
11
  • Page 1 1
  • Page 2 2
  • Page 3 3
  • Page 4 4
  • Page 5 5
  • Page 6 6
  • Page 7 7
  • Page 8 8
  • Page 9 9
  • Page 10 10
  • Page 11 11
  • Page 12 12
  • Page 13 13
  • Page 14 14
  • Page 15 15
  • Page 16 16

Deagostini Spitfire User guide

Type
User guide

Deagostini Spitfire: Build your own iconic aircraft with this comprehensive step-by-step guide. Experience the thrill of assembling a detailed replica of the legendary Spitfire fighter plane. Follow the instructions to construct the model from scratch, using high-quality parts and materials. No special tools or expertise required. Perfect for aviation enthusiasts, history buffs, and model-building hobbyists.

Ask a question and I''ll find the answer in the document

Finding information in a document is now easier with AI