Deagostini Spitfire User guide

Type
User guide

Deagostini Spitfire: Construct a detailed replica of the iconic World War II fighter plane with this engaging model kit. Immerse yourself in the history of aviation as you assemble the aircraft, piece by piece, following the step-by-step instructions. The kit includes intricate parts, allowing you to recreate the Spitfire's distinct shape and features. Enjoy the satisfaction of building a model that showcases your craftsmanship and passion for aviation.

Deagostini Spitfire: Construct a detailed replica of the iconic World War II fighter plane with this engaging model kit. Immerse yourself in the history of aviation as you assemble the aircraft, piece by piece, following the step-by-step instructions. The kit includes intricate parts, allowing you to recreate the Spitfire's distinct shape and features. Enjoy the satisfaction of building a model that showcases your craftsmanship and passion for aviation.

1
Build the Spitfire: Step-By-Step
Pack 28
Stages 107-110
2
Build the Spitfire: Step-By-Step
Contents
Stage Parts Pages
107 1 - Aileron trailing edges
2 - Rudder trailing edge 372-375
108
1 - Tail plate 2
2 - Tail plate 3
3 - Tail plate 4
4 - Template
376-378
109 1 - Engine cover 3
2 - Engine cover 6 379-382
110
1 - Tail plate 2
2 - Tail plate 3
3 - Tail plate 4
4 - Template
383-385
372
Build the Spitfire: Step-By-Step
Recover lower wing plate 24 and the template
from Stage 90. Place the plate onto the template
to identify it.
Test-fit the plate on the underside of the right
half of the wing, as shown. Adjust the edges with
sandpaper if necessary, so it’s aligned with the
surrounding plates (dotted lines).
1 2
This stages parts You will need
Stage 107
1 - Aileron trailing edges
2 - Rudder trailing edge
Sandpaper
Pen
Rivet marker
Glue
Awl
Hammer
Optional:
Brushes/light grey paint
2
11
373
Build the Spitfire: Step-By-Step
Glue the plate onto the wing. Then, using the awl,
pierce a hole in each corner of the plate.
5
Apply adhesive to the ribs and spars of the wing
where the plate will be positioned.
4
Transfer the lines from the template onto the plate
with a pen, and then press along them with the
rivet marker.
3
Hammer a nail into each of the holes made in the
previous step.
6
374
Build the Spitfire: Step-By-Step
Use a sanding block to smooth the surface of the
cut-out areas where the ailerons will go.
Sand the ends of the ribs smooth, being careful not to
scratch the plates.
If you want your aircraft to have an aluminium
finish, paint these areas with light grey paint. If
you are planning to paint your model, leave these
areas for the moment.
7
9
8
375
Build the Spitfire: Step-By-Step
If you have opted for an aluminium finish, paint the ends of the ribs
with light grey paint. If you have chosen a coloured finish, do not
paint the ribs.
The wing should now look like this. Keep any
unused parts to one side.
10
11
376
Build the Spitfire: Step-By-Step
Retrieve the fuselage and some 3 x 5mm wooden
strips. Cut the 3 x 5mm strips into three pieces and
glue them between the frames (arrows). Repeat
this on the other side of the fuselage.
Cut four pieces of 2 x 5mm strip to size and glue
them between frames of the fuselage, as shown.
1 2
This stages parts You will need
Stage 108
1 - Tail plate 2
2 - Tail plate 3
3 - Tail plate 4
4 - Template
Knife
Glue
12
3
4
377
Build the Spitfire: Step-By-Step
Take a 2 x 5 x 300mm strip and glue it above the
strip on the side of the fuselage, starting at the
point indicated in the photo and inset above.
5
Glue a 3 x 5 x 300mm strip in the area highlighted
in the previous step. When dry, cut it flush with
the end of the fuselage (inset). Then, repeat on the
other side of the fuselage (arrow).
4
Locate the strip along the side of the fuselage,
from Stage 25. Apply glue in line with this strip
(dotted lines), from the end of it to the end of
the fuselage.
3
Glue a 3 x 5 x 300mm strip below the one from
Stage 25.
6
378
Build the Spitfire: Step-By-Step
Glue another 2 x 5 x 300mm and a 3 x 5 x 300mm
behind the ones from Steps 5 and 6. Cut them
flush with the end of the fuselage. Repeat the
same steps on the other side of the fuselage.
Cut a 2 x 5mm strip to fit between the two lines
and glue into place.
Apply glue to the area below the lowest strip,
outlined above. See Step 9 to see where the strip
will be placed.
Glue a 2 x 5mm strip along the lower edge of the
rear section of the fuselage.
The fuselage should now look like this. Make sure
that all steps have been carried out on both sides
of the fuselage and store any unused parts.
7
9
8
10
11
379
Build the Spitfire: Step-By-Step
Cut two lengths of 2 x 5mm wooden strip to fit at
the points shown above. Shape them to fit and
then glue into place. Repeat for the other side.
Wrap some sandpaper around a cylinder or use a
half round file to smooth the curved edges at the
bottom of the fuselage.
1 2
This stages parts You will need
Stage 109
1 - Engine cover 3
2 - Engine cover 6
Knife
Glue
Sandpaper
Cylinder/half round file
1
2
380
Build the Spitfire: Step-By-Step
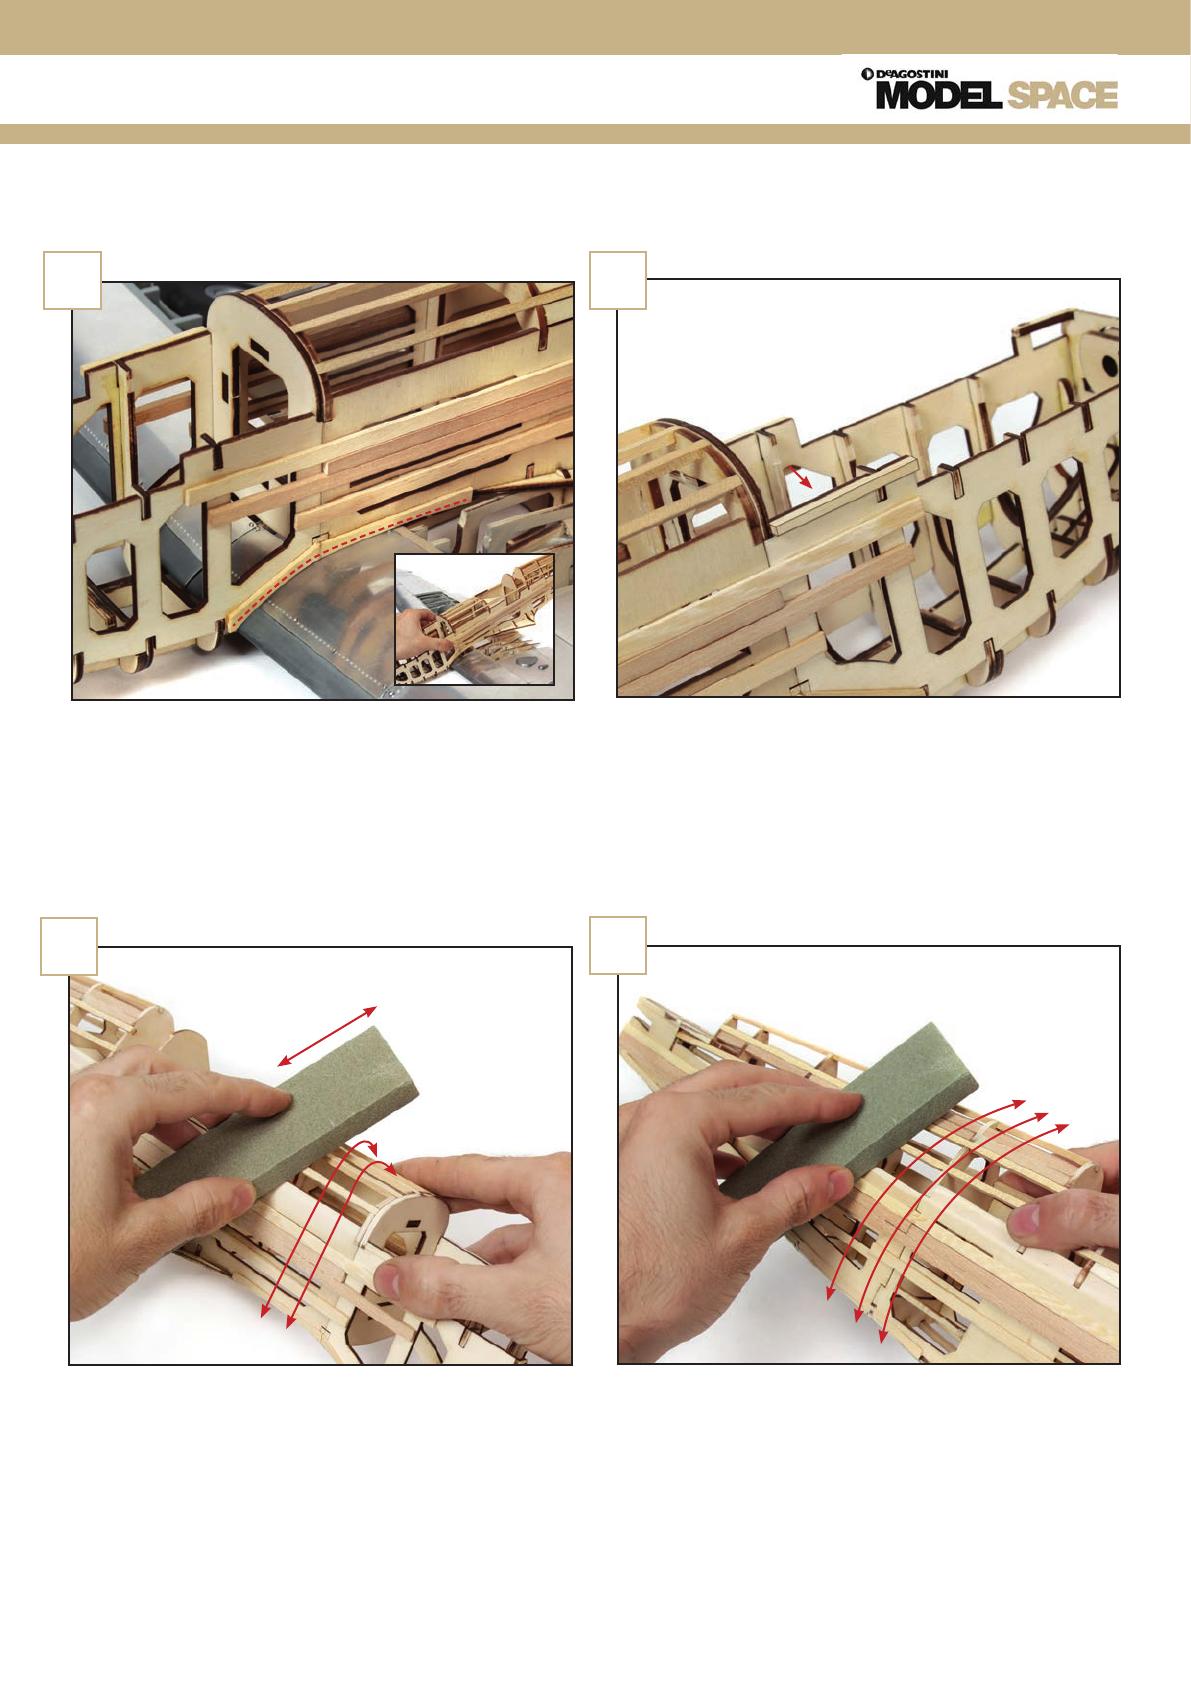
Smooth over the wooden strips around the
cockpit area of the fuselage. These will be covered
with plates like the wings, so cannot have steps or
angles between them.
5
Glue a length of 3 x 3mm strip onto the side of the
fuselage, as shown in the photo. Do the same on
the other side.
4
Test-fit the fuselage onto the wing, as shown in
the photo. Make a note of any gaps between the
curved section at the bottom of the fuselage and
the wing. Sand that area of the fuselage until it is
flush with the top of the wing.
3
Continue to sand over the entire length of
the fuselage. Look at the following steps to
understand the shape that it needs to be.
6
381
Build the Spitfire: Step-By-Step
As you sand, place a spare plate over the surface
to see where you need to smooth the strips more.
Cut two pieces of 3 x 3mm wooden strip and glue them on each
side of the fuselage at the tail (inset). Then sand the tail area of the
fuselage until the strips all taper in at the end.
The plate should be flush against the fuselage, in a
smooth curve, with no angles.
7
9
8
382
Build the Spitfire: Step-By-Step
Taper the ends of the strips at the front of the fuselage until they
are flush against the wall, as shown.
The fuselage should now look like this. Keep any unused parts to
one side.
10
11
383
Build the Spitfire: Step-By-Step
Sand the underside of the tail section of the
fuselage so there is a smooth curve.
Sand the underside of the nose to a smooth curve.
It is a good idea to look at the following steps to
see the kind of shape required.
1 2
This stages parts You will need
Stage 110
1 - Tail plate 2
2 - Tail plate 3
3 - Tail plate 4
4 - Template
Sandpaper
Glue
File
12
3
4
384
Build the Spitfire: Step-By-Step
Collect engine covers from the previous stage
and the front covers from Stage 73. Test-fit the
parts in place on the fuselage; the following steps
show where they go. Make any adjustments
necessary to ensure they fit. Glue the lower cover
in place, as shown.
5
Place the engine cover in position on the front
of the fuselage. Hold it in place and sand it to a
smooth curve, in the same way as the underside of
the nose.
4
The underside of the nose should now look like
this.
3
Glue engine plate 3 to the underside of the nose,
pressed up against the lower cover from the
previous step.
6
385
Build the Spitfire: Step-By-Step
Glue the top cover to the front of the engine cover,
as shown.
File the bottom of engine cover 6 flush with the
bottom edge of the engine cover structure below.
Take the engine cover 6 from the previous stage
and glue it onto the top of the engine cover. Make
sure that the plate is flush against the cover, and
up against the top cover.
Place the engine cover into position on the nose
of the fuselage to see how the parts fit together.
The fuselage and engine cover should now look
like this. Store any unused parts to one side.
7
9
8
10
11
  • Page 1 1
  • Page 2 2
  • Page 3 3
  • Page 4 4
  • Page 5 5
  • Page 6 6
  • Page 7 7
  • Page 8 8
  • Page 9 9
  • Page 10 10
  • Page 11 11
  • Page 12 12
  • Page 13 13
  • Page 14 14
  • Page 15 15
  • Page 16 16

Deagostini Spitfire User guide

Type
User guide

Deagostini Spitfire: Construct a detailed replica of the iconic World War II fighter plane with this engaging model kit. Immerse yourself in the history of aviation as you assemble the aircraft, piece by piece, following the step-by-step instructions. The kit includes intricate parts, allowing you to recreate the Spitfire's distinct shape and features. Enjoy the satisfaction of building a model that showcases your craftsmanship and passion for aviation.

Ask a question and I''ll find the answer in the document

Finding information in a document is now easier with AI