Deagostini Spitfire User guide

Type
User guide

Deagostini Spitfire, a step-by-step guide to building a detailed model of the iconic Spitfire aircraft, offers an immersive and educational experience for model enthusiasts. With its precise instructions, detailed diagrams, and high-quality materials, this comprehensive kit allows users to construct a stunning replica of the legendary fighter plane, fostering creativity, attention to detail, and an appreciation for aviation history.

Deagostini Spitfire, a step-by-step guide to building a detailed model of the iconic Spitfire aircraft, offers an immersive and educational experience for model enthusiasts. With its precise instructions, detailed diagrams, and high-quality materials, this comprehensive kit allows users to construct a stunning replica of the legendary fighter plane, fostering creativity, attention to detail, and an appreciation for aviation history.

1
Build the Spitfire: Step-By-Step
Pack 19
Stages 72-75
2
Build the Spitfire: Step-By-Step
75 260-263
Stage PagesParts
72 250-252
1 - Upper wing plate 28
2 - Fuselage plate 3
3 - Template
74 257-259
1 - Upper wing plate 1
2 - Upper wing plate 3
3 - Upper wing plate 5
4 - Upper wing plate 7
5 - Upper wing plate 11
6 - Template sheet
73 253-256
1 - Lower front cover
2 - Upper front cover
3 - Lower wing antenna
Contents
1 - Upper wing plate 2
2 - Upper wing plate 9
3 - Upper wing plate 12
4 - Template sheet
www.model-space.com
250
Build the Spitfire: Step-By-Step
Retrieve the suspension struts and joints provided
with Stage 70. Sand the parts smooth. Test-fit the
cylindrical projection of the joints into the end of
the struts, as shown.
This is how the joint should look when correctly
positioned in the strut.
1 2
This stages parts You will need
Stage 72
1 - Upper wing plate 28
2 - Fuselage plate 3
3 - Template
Sandpaper
Glue
Tweezers
Screwdriver
1
2
3
251
Build the Spitfire: Step-By-Step
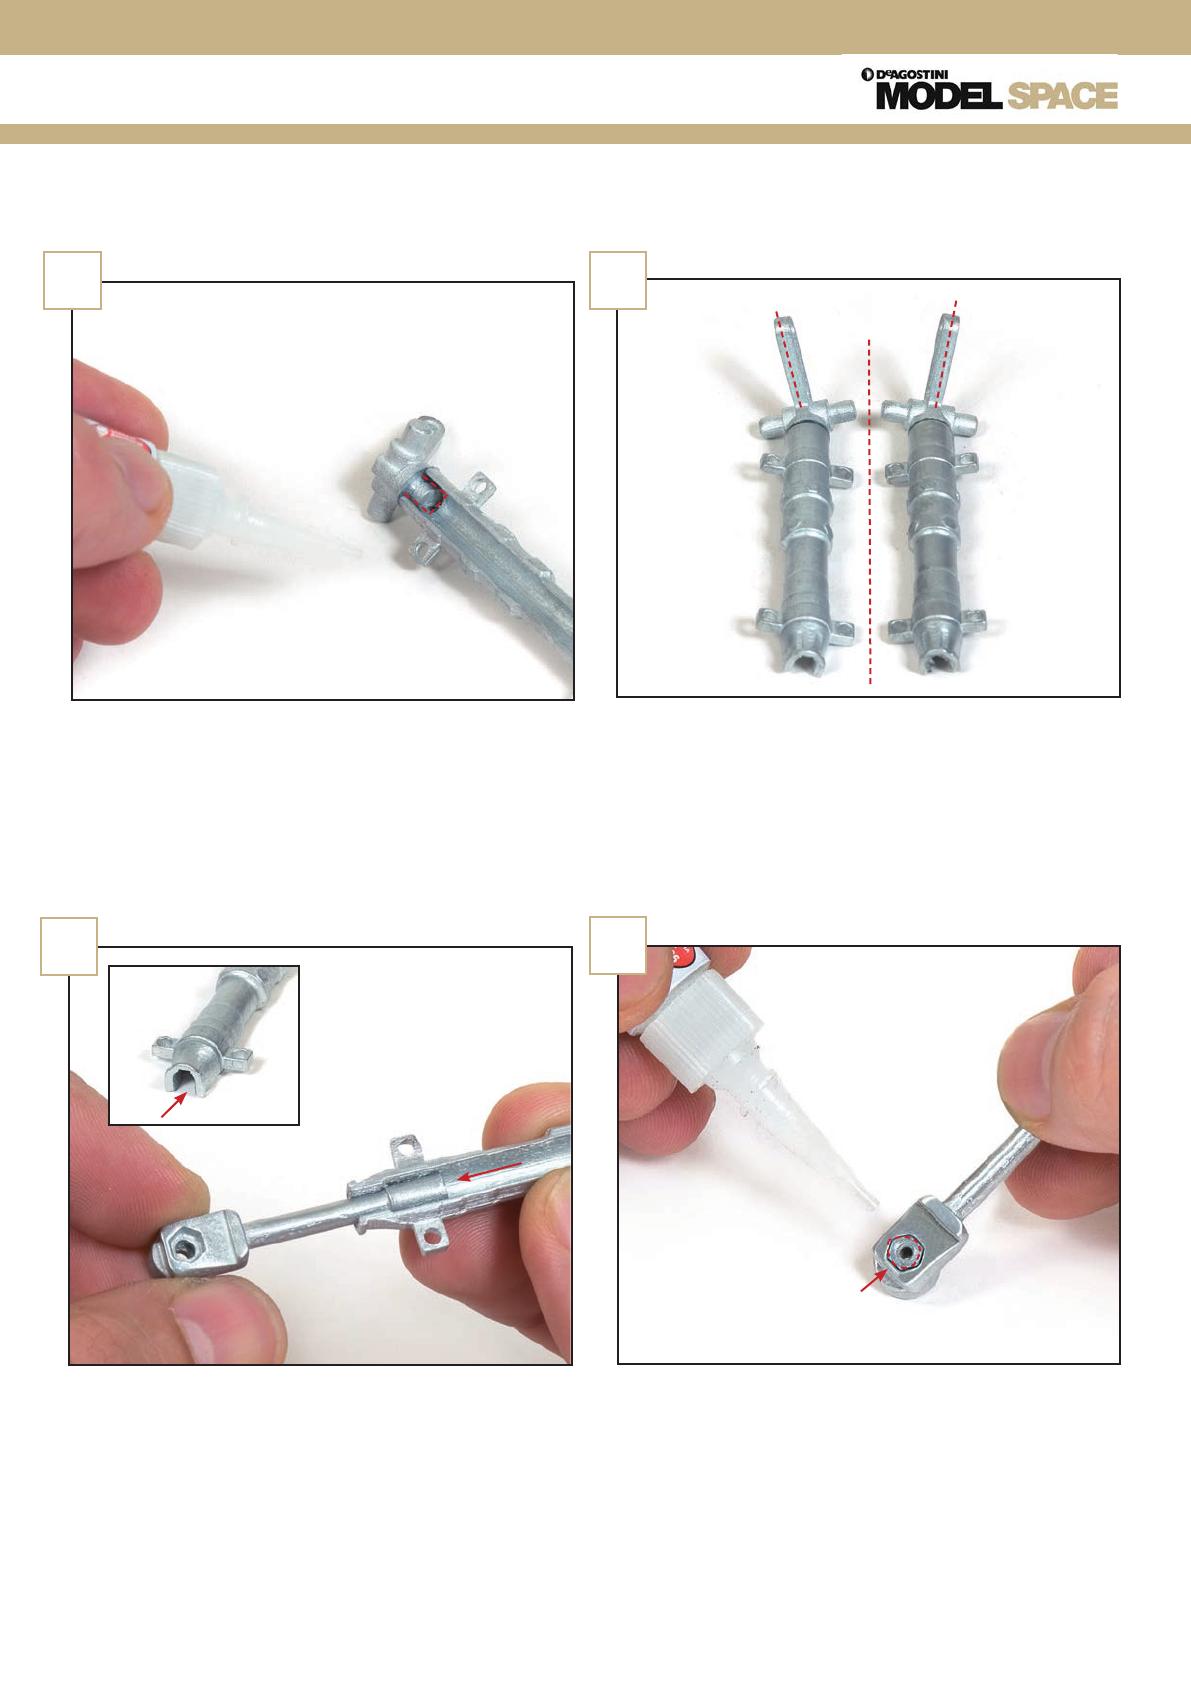
Retrieve the struts supplied with the previous
stage. Sand them smooth and test-fit in the open
end of the struts from Stage 70, as shown.
5
Repeat for the other joint and strut. Position
the two assemblies as shown to check that the
positions of the parts are correct.
4
Apply glue to the inside of the strut to secure the
joint in place.
3
Place one of the M2 nuts from Stage 65 into the
hole at the end of the strut (Stage 71). Then apply
glue to the gap between the parts to secure the
nut. Avoid getting glue on the inside of the nut.
6
252
Build the Spitfire: Step-By-Step
Hold the wheel from Stage 2 or 5 in one hand and
a 20mm screw (Stage 65) with a washer (Stage 71)
on it in the other. Insert the screw into the hole in
the centre of the wheel.
Place the hole of the strut over the end of the
screw with the nut facing away from the wheel.
Place a second washer over the end of the screw.
Tighten the screw into the nut. Repeat this process
(Steps 6-9) for the second wheel.
Here is how the assemblies should look. Keep any
unused parts to one side for later.
7
9
8
10
11
253
Build the Spitfire: Step-By-Step
Look at Stage 71 to see how to remove the circular
section from the tops and bottoms of the ribs.
Take a cylinder or any object that has an
approximate diameter of 55mm and wrap
sandpaper around it.
1 2
This stages parts You will need
Stage 73
1 - Lower front cover
2 - Upper front cover
3 - Lower wing antenna
Saw
Cylinder
Sandpaper
Glue
Wooden strip
3
1
2
254
Build the Spitfire: Step-By-Step
The plate won’t hold its shape, but this is fine as
long as it is curved.
5
Wrap the plate from Stage 64 around the same
cylinder used for the sanding block, as shown.
4
Insert the cylindrical sanding block into the hole
created in Step 1. Move it up and down to ensure
this hole is circular.
3
Hold the plate in a circle and insert it into the hole
in the wing. With the cutout section aligned with
the landing gear housing, see Step 8.
6
255
Build the Spitfire: Step-By-Step
Apply glue to the contact point between the
landing gear housing and the plate (dotted line).
Hold a wooden strip along the ribs above and
below the plate to ensure it doesn’t project above
or below the ribs. The plate will be secured at a
later stage.
This shows how the plate and the landing gear
housing should look.
Apply glue to the contact points between the
plate and the ribs.
7
9
8
10
256
Build the Spitfire: Step-By-Step
The wing should now look like this. Keep any unused material to one side for later.
11
257
Build the Spitfire: Step-By-Step
Place upper wing plate 3 onto the corresponding
shape on the template and mark the ends of the
dotted lines onto the surface of the plate.
Place the wing plate on some card, align a ruler
with the line marked in the previous step and roll
the marker along the line, applying light pressure.
1 2
This stages parts You will need
Stage 74
1 - Upper wing plate 1
2 - Upper wing plate 3
3 - Upper wing plate 5
4 - Upper wing plate 7
5 - Upper wing plate 11
6 - Template sheet
Pen
Card
Rivet marker
Spray can
Ruler
Sandpaper
Glue
Awl
Hammer
65
1
2
3
4
6
2
258
Build the Spitfire: Step-By-Step
Place upper wing plate 1 on the template and
mark the lines at either end.
5
Shape the plate to fit the wing by bending it over
something like a spray can. Test-fit against the
wing again and bend it more if necessary.
4
Turn the plate over to check the rivets. Before
proceeding, make sure the plate is flat. Then,
roughen the back side with sandpaper.
3
Mark the rivets onto plate 1.
6
1
259
Build the Spitfire: Step-By-Step
Upper wing plate 1 should now look like this.
Test-fit the plates in place and make any necessary
adjustments. Then glue them into place.
Roughen the underside of the plate with
sandpaper to improve adhesion.
Once dry, use the awl to create holes at the
highlighted points, then gently hammer a nail into
each of the holes.
The wing should now look like this. Keep any
unused parts to one side.
7
9
8
10
11
2
1
260
Build the Spitfire: Step-By-Step
Place upper wing plate 5 onto the corresponding
shape on the template and mark the ends of the
dotted lines onto the surface of the plate.
Plate 5 will fit onto the top of the wing at the point
shown. Test-fit the plate in place, ensuring that it
fits flush with the curvature of the wing.
1 2
This stages parts You will need
Stage 75
1 - Upper wing plate 2
2 - Upper wing plate 9
3 - Upper wing plate 12
4 - Template sheet
Spray can
Knife
Ruler
Sandpaper
File
Glue
Awl
Hammer
41
32
261
Build the Spitfire: Step-By-Step
Glue plate 5 in place. Create holes at the indicated
points and then gently hammer a nail into each of
them.
5
Apply adhesive to the contact areas between the
plate and the wing.
4
Shape the plate over a spray can to fit the section
on the wing.
3
Identify upper wing plate 7 against the template
(both from the previous stage).
6
262
Build the Spitfire: Step-By-Step
Prepare plate 7 in the same way as the previous
plates. Then, apply glue to the parts of the wing
that will be in contact with the plate.
Wait for the glue to dry before proceeding and
check that it looks the same as the one pictured.
Glue the plate into position, aligned with the
leading edge and the spar.
Make a small hole in the locations shown on the
picture, then hammer a nail into each of them.
7
9
8
10
263
Build the Spitfire: Step-By-Step
The wing should now look like this. Keep any unused parts to one side.
11
  • Page 1 1
  • Page 2 2
  • Page 3 3
  • Page 4 4
  • Page 5 5
  • Page 6 6
  • Page 7 7
  • Page 8 8
  • Page 9 9
  • Page 10 10
  • Page 11 11
  • Page 12 12
  • Page 13 13
  • Page 14 14
  • Page 15 15
  • Page 16 16

Deagostini Spitfire User guide

Type
User guide

Deagostini Spitfire, a step-by-step guide to building a detailed model of the iconic Spitfire aircraft, offers an immersive and educational experience for model enthusiasts. With its precise instructions, detailed diagrams, and high-quality materials, this comprehensive kit allows users to construct a stunning replica of the legendary fighter plane, fostering creativity, attention to detail, and an appreciation for aviation history.

Ask a question and I''ll find the answer in the document

Finding information in a document is now easier with AI