M2M SERVICES MiNi-LTE-M-AV Installation guide

Type
Installation guide

M2M SERVICES MiNi-LTE-M-AV is a cellular communicator that allows remote monitoring and control of alarm systems. It connects to the alarm panel using a dial capture interface and communicates with the monitoring station or end users via the cellular network. Features include remote arming/disarming via a mobile app, keypad, or keyswitch, event reporting, and status updates. It supports popular alarm panels from Honeywell, DSC, Napco, and Interlogix. The device requires registration in the M2M Dealer Portal and a compatible cellular service plan.

M2M SERVICES MiNi-LTE-M-AV is a cellular communicator that allows remote monitoring and control of alarm systems. It connects to the alarm panel using a dial capture interface and communicates with the monitoring station or end users via the cellular network. Features include remote arming/disarming via a mobile app, keypad, or keyswitch, event reporting, and status updates. It supports popular alarm panels from Honeywell, DSC, Napco, and Interlogix. The device requires registration in the M2M Dealer Portal and a compatible cellular service plan.

Device Registration
in the M2M Dealer Portal
Register your company at www.m2mdealers.com or use your existing
account to login.
Adding preferred monitoring station
Contact your monitoring station and request your M2M Dealer Code.
Specify your preferred monitoring station during your initial registration in
section Additional Information > “Preferred Monitoring Station list.
Provide your Dealer code in the corresponding field, OR
Add preferred monitoring station/s after registration from
My Devices > Monitoring Stations > Add CMS
Add a new device and choose cellular service monthly billing method:
Use the device Serial Number and the Config Key provided with this manual.
Go to My Devices > Devices > Add New Device.
Select monitoring station (optional)
Select preferred cellular service monthly billing method.
From Monitoring Station – You will be billed for cellular service by the
monitoring station.
From M2M Services – You will be billed for cellular service by M2M Services.
MiNi-LTE-M-AV
Cellular Communicator with Dial Capture interface
Quick Installation Manual
* Optional - wire only if interactive features will be used. Panel compatibility list for Keybus
integration is available at support.m2mservices.com
WARNING: The wiring should be done only when the panel and the
communicator are disconnected from the powerline!
WARNING: PRIMARY USE ONLY  NOT TO BE USED WITH LANDLINE!
Having a phone line connected will damage the unit!
Connect the antenna and place it outside of the alarm panel’s box.
Connect + and – of the communicator to a max of 12V - 15V DC power supply.
WARNING: THE USB PORT TO BE USED WITH M2M ADDON MODULES ONLY.
Find configuration guides for popular panels at support.m2mservices.com
LED Indicator
Slow flashing – trying to establish connection
Constantly On – connection established at good signal level
Constantly On, blinking every 5 sec. – connection established at low signal level
Fast flashing – transferring data
Configuring the alarm panel
Refer to the panel’s installation manual to configure the following options:
Enable the PSTN dialer of the panel.
Select DTMF mode (Tone Dialing).
Select Contact ID Full communication format or SIA.
Enter a telephone number for dialing (you can use any number, e.g. 9999999).
Enter a 4-digit account number in the panel.
Troubleshooting the DTMF communication
If you have issues receiving the events, try the following additional settings of the panel:
Disable Telephone line monitoring”.
Disable Wait for dial tone option.
Use A” instead of “0” in the account number.
If there is more than one partition, enter an account number for each partition.
For certain panels, you might need also to specify an account number for the main partition 0
(sometimes referred as system account number).
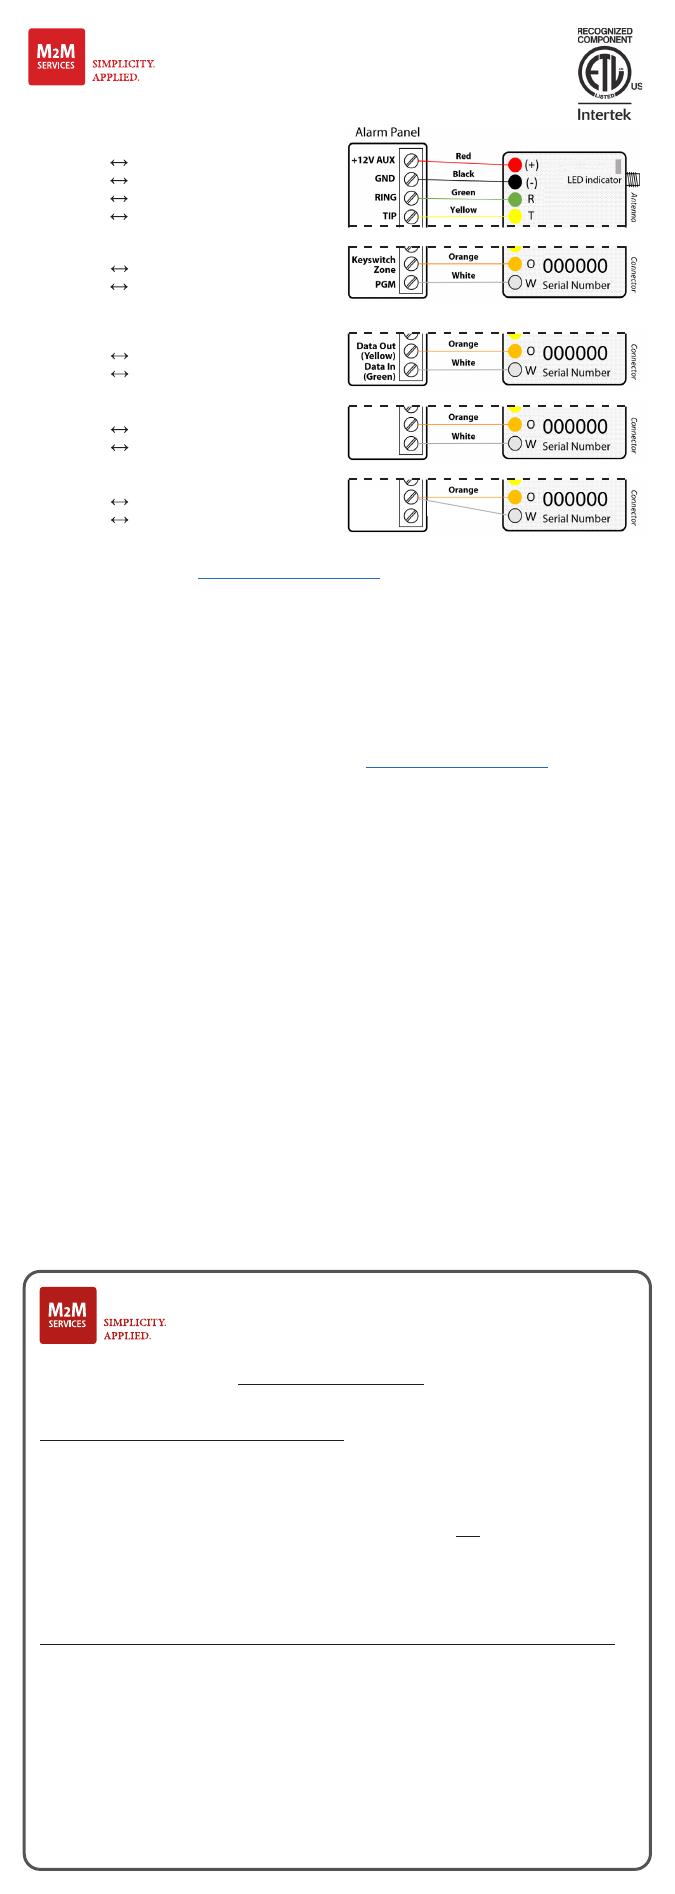
Wiring the Communicator to
the Alarm Panel
Keyswitch Wiring*
Keybus Wiring*
Honeywell Vista and DSC Power Series Panels
Napco Panels
Interlogix NX Panels
Red (+): 12-15V DC Power Supply
Black (-): Ground
Green (R): RING
Yellow (T): TIP
Orange (O): to Keyswitch zone
White (W): to Armed status output
Orange (O): to Yellow (Data Out)
White (W): to Green (Data In)
Orange (O): to TX (Green)
White (W): to RX (Yellow)
Orange (O): to DATA
White (W): to DATA
v.06-2022-12-02_10000
TX (Green)
RX (Yellow)
DATA
White
IMPORTANT NOTE:
Do not power the device before registering it in the M2M Dealers Portal
because the cellular service will be deactivated.
Serial Number and Config Key:
Device Registration
in the M2M Dealer Portal
MiNi-LTE-M-AV
Quick Installation Manual
Remote Arming/Disarming via Keyswitch (Optional)
Configure a zone as a momentary keyswitch (refer to the panel’s installation manual).
Configure a PGM output of the panel to activate (switch to ground), when the
panel is armed, and to deactivate, when disarmed (refer to the panel’s installation
manual).
Wire the device to the panel according to the Keyswitch wiring diagram (Page 1).
For panels that don’t have a status PGM, the status can be received through the
OPEN/CLOSE reporting.
Guidelines for configuring the keyswitch and the output for popular panels are available
at support.m2mservices.com
Initial pairing procedure for Remote Arming/Disarming via Keyswitch:
Enable Open/Close reporting (at least during the initial pairing procedure).
Log in to the RControl App and press Sync with Panel
Ask the end user to enter a Remote PIN code of his/her choice.
Disarm (or Arm) from the keypad within 2 minutes to complete the pairing.
Download the RControl mobile application on your
Android or iOS device by scanning the QR codes.
RControl App (end user) Credentials
v.06-2022-12-02_10000
v.04-2021-08-12
Remote Arming/Disarming via Keybus for supported Honeywell, DSC, Napco and
Interlogix Alarm Panels (Optional)
Panel compatibility list for Keybus integration is available at support.m2mservices.com
Wire the device to the panel according to the Keybus wiring diagram (Page 1).
Log in to the RControl App, press Sync with Panel, and follow the instructions in the App.
For Honeywell panels ONLY: Program an alpha keypad address on the panel
for each partition in use, starting from address 21 to 28 (21 for partition 1, 22 for
partition 2, etc.).
The addresses should be reserved for the M2M communicator use only.
For Napco panels ONLY: Program a wizzard keypad address on the panel for each partition
in use, starting from keypad 2 (21 for partition 1, 22 for partition 2, etc.).
The address should be reserved for the M2M communicator only.
Having a physical keypad on the first address is mandatory.
NOTE: If panel programming is changed after the initial synchronization you
need to:
Go to RControl App Settings >> Remote Arming/Disarming >> Press Sync and
follow the instructions in the App
Unless prompted in the app, DO NOT operate the keypad during the sync process.
  • Page 1 1
  • Page 2 2

M2M SERVICES MiNi-LTE-M-AV Installation guide

Type
Installation guide

M2M SERVICES MiNi-LTE-M-AV is a cellular communicator that allows remote monitoring and control of alarm systems. It connects to the alarm panel using a dial capture interface and communicates with the monitoring station or end users via the cellular network. Features include remote arming/disarming via a mobile app, keypad, or keyswitch, event reporting, and status updates. It supports popular alarm panels from Honeywell, DSC, Napco, and Interlogix. The device requires registration in the M2M Dealer Portal and a compatible cellular service plan.

Ask a question and I''ll find the answer in the document

Finding information in a document is now easier with AI