Deagostini Spitfire User guide

Type
User guide

The Deagostini Spitfire is a detailed model kit that allows you to build a replica of the iconic World War II fighter aircraft. With this kit, you'll embark on a journey of constructing a historical masterpiece. The step-by-step instructions guide you through the assembly process, providing insights into the aircraft's intricate design. As you progress, you'll develop modeling skills and gain a deeper appreciation for the engineering behind this legendary plane.

The Deagostini Spitfire is a detailed model kit that allows you to build a replica of the iconic World War II fighter aircraft. With this kit, you'll embark on a journey of constructing a historical masterpiece. The step-by-step instructions guide you through the assembly process, providing insights into the aircraft's intricate design. As you progress, you'll develop modeling skills and gain a deeper appreciation for the engineering behind this legendary plane.

1
Build the Spitfire: Step-By-Step
Pack 12
Stages 44-47
2
Build the Spitfire: Step-By-Step
44 152-154
47 162-165
Stage PagesParts
1 - Control box
2 - Undercarriage control
3 - Sight
4 - Brass wire ø 1.5 mm
46 159-161
1 - Aileron parts fret
2 - Wooden strip 3 x 3 x 300mm
45 155-158
1 - Aileron parts fret
2 - Wooden strip 3 x 3 x 300mm
Contents
1 - Engine side
2 - Frame 11 and reinforcement fret
152
Build the Spitfire: Step-By-Step
Retrieve the cockpit side (right) and castings from
the previous stage. Smooth with sandpaper. Then,
temporarily place parts 1 and 2 from this stage,
and the two castings from Stage 43 into the holes
in the cockpit side, as shown.
Take the 2 x 3mm wooden strip supplied with
Stage 42 and place it onto the cockpit side. Mark
the end of the side on the strip, as shown.
1 2
This stages parts You will need
Stage 44
1 - Control box
2 - Undercarriage control
3 - Sight
4 - Brass wire ø 1.5 mm
Pencil
Knife
Sandpaper
Clamp
Drill
Scouring pad
Cutters
Ruler
Tweezers
12
4
3
2
1
153
Build the Spitfire: Step-By-Step
Then, using a scouring pad, polish the wire. Move
the scourer in one direction to avoid bending the
wire.
5
To straighten the brass wire: secure one end into
the chuck of a drill, attach the other end to a fixed
point (such as the clamp shown above) and pull
taut. Rotate the drill by two rotations. The wire
should now be straight.
4
Cut the wooden strip at the marked line. Glue into
place on the cockpit side in the position shown in
the previous step. Then remove the castings and
smooth with sandpaper.
3
Cut five pieces of wire of each 12mm in length.
6
12mm
154
Build the Spitfire: Step-By-Step
Glue one 12mm length up against the wooden
strip, placed centrally on the cockpit side (long
dotted line). Then glue another piece on either
side of it, spaced an equal distance apart.
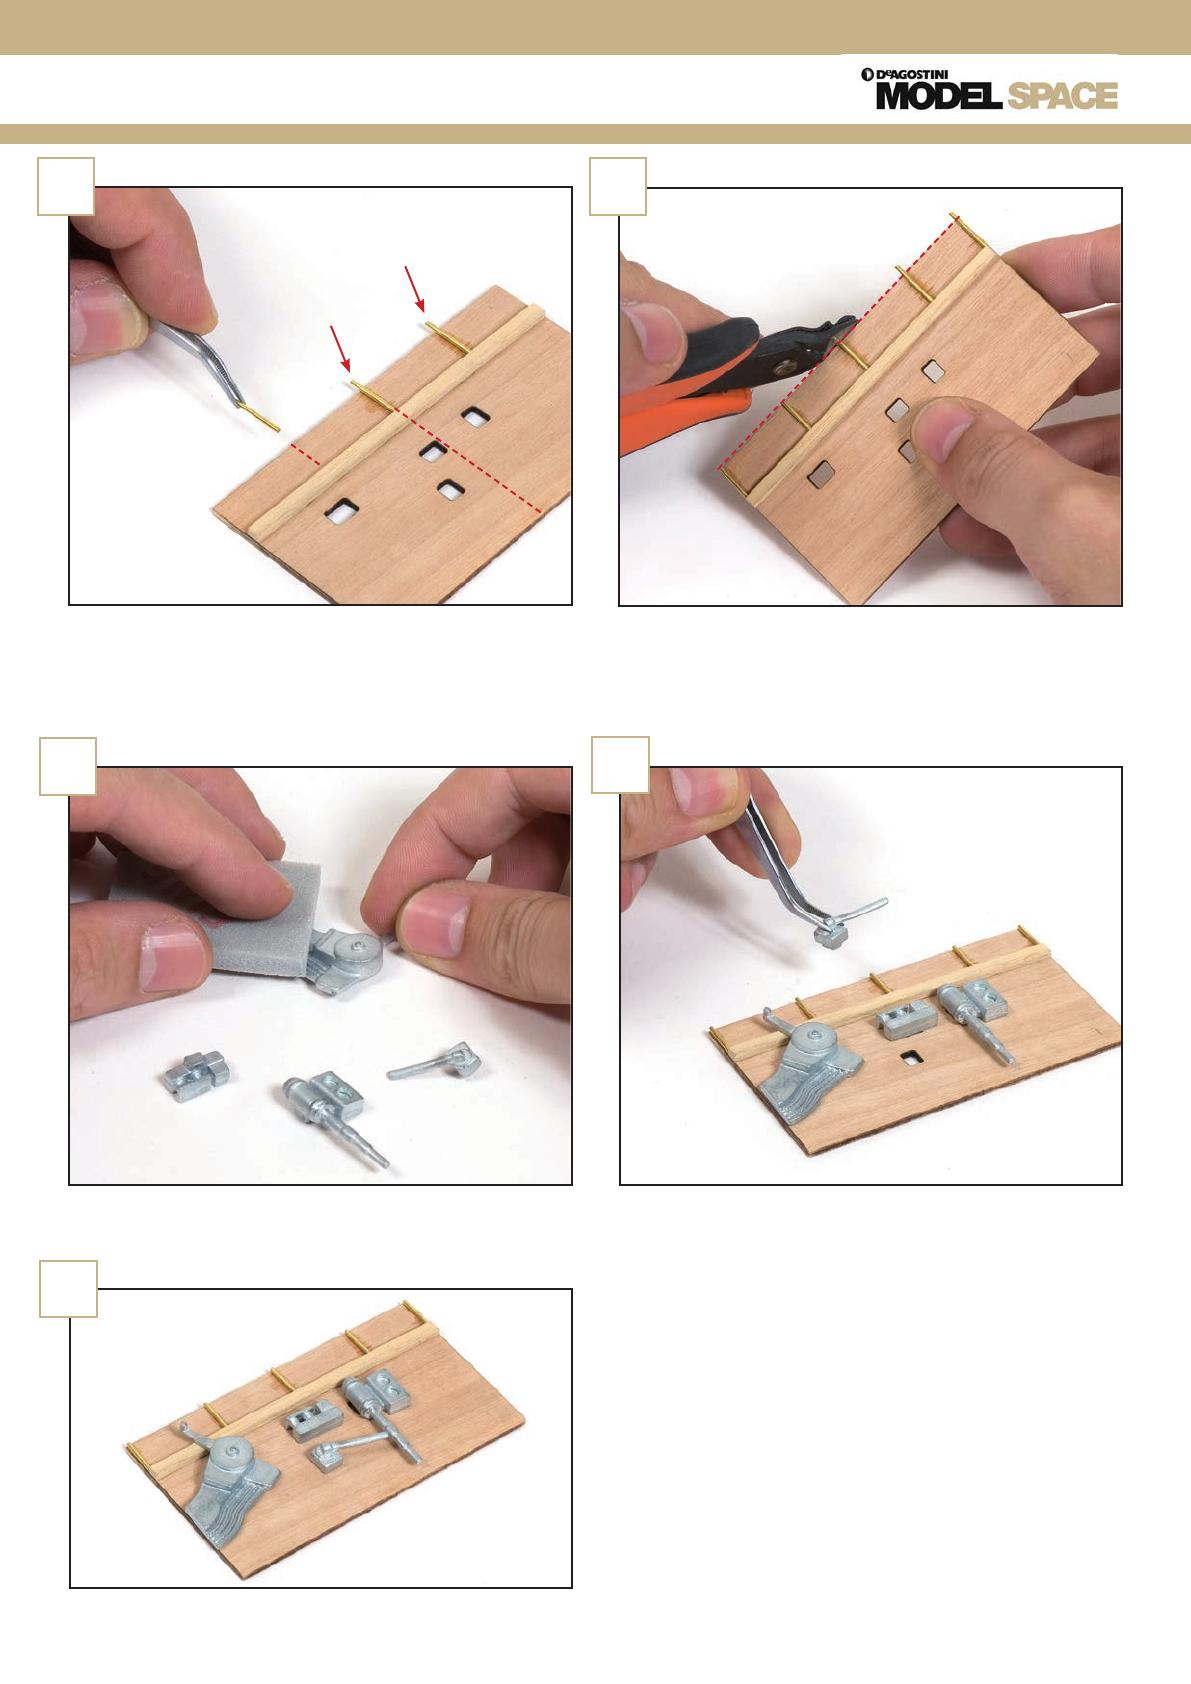
Prepare the castings by removing any remaining
flash and brushing off any residue.
Glue another two pieces of wire at either end of
the cockpit side. Then, when dry, adjust the length
of these pieces so they are in line with the edge of
the side.
Glue the four castings into place on the side.
The cockpit side should now look like this.
Remember to store any unused parts.
7
9
8
10
11
155
Build the Spitfire: Step-By-Step
You will now sand the top of the wing from Stage
41. With your sanding block, lightly sand the tops
of the ribs starting at the wide end. Move the
block in a straight line (dotted lines) to prevent
distorting the shape of the ribs.
Sand to the end of the wing. Remember not to
sand the curved ends of the ribs, only the straight
section on top.
1 2
This stages parts You will need
Stage 45
1 - Aileron parts fret
2 - Wooden strip 3 x 3 x 300mm
Sanding block
Saw
2
1
156
Build the Spitfire: Step-By-Step
At the wider end of the wing, use your sanding
block to smooth the wooden strips placed in the
ribs to the same level as the spar and ribs.
5
Now take the other wing and position it so that
the projections of the ribs are pointing upwards.
As with the first wing, use a saw to remove these
projections from the ribs.
4
Sand from the end of the wingtip towards the
other end of the wing (arrows). This will create a
more level surface on top of the wingtip ribs.
3
Lightly sand along the wing to remove any
unevenness from the ribs, reinforcements
and spars.
6
157
Build the Spitfire: Step-By-Step
Sand the underside of the ribs, moving the
sanding block in the same direction as the ribs
(arrows).
Sand the wingtip so that it is in line with the rest
of the wing, as shown.
Sand the curved area at the front of the ribs.
Check that the surface of the ribs has been
smoothed properly by placing a wooden strip on
each rib and seeing if it rests perfectly flush. If it
doesn’t, then sand the rib more.
7
9
8
10
158
Build the Spitfire: Step-By-Step
This is how the two wings should now look. Keep all unused parts to one side.
11
159
Build the Spitfire: Step-By-Step
Remove the two parts (arrowed) from the aileron
parts fret. Sand their edges smooth.
Apply glue along the dotted line on the aileron
spar.
1 2
This stages parts You will need
Stage 46
1 - Aileron parts fret
2 - Wooden strip 3 x 3 x 300mm
Knife
Sandpaper
Glue
Tweezers
1
2
1
160
Build the Spitfire: Step-By-Step
Apply glue to the rib, along the dotted lines. Place
up against the end of the spar and the bracket.
5
Now remove the largest rib from the aileron fret
and smooth with sandpaper.
4
Place the bracket into the outlined section at the
end of the aileron spar, positioned as shown in the
photo.
3
Test-fit the aileron into place up against the rear
spar of the right wing and adjust the angle of the
rib before it dries in position.
6
161
Build the Spitfire: Step-By-Step
Remove the smaller bracket from the fret and
sand smooth. Glue into place at the other end of
the aileron spar.
Here you can see how the spar, bracket and rib
should look from another angle.
Remove and sand the smallest rib. Glue it into
place at the end of the spar, resting against the
bracket.
Place the aileron spar back into its position in the
right wing to check that the angles of the ribs are
correct.
The aileron should now look like this. Keep any
unused parts to one side, for use later on.
7
9
8
10
11
162
Build the Spitfire: Step-By-Step
Take the aileron fret from the previous step and
identify and label the remaining ribs.
Remove all ribs from the fret and smooth them
with sandpaper.
1 2
This stages parts You will need
Stage 47
1 - Engine side
2 - Frame 11 and reinforcement fret
Pencil
Knife
Sandpaper
Glue
2
1
E
F
D
C
B
A
C
B
A
163
Build the Spitfire: Step-By-Step
Glue the remaining ribs (D, E and F) into position.
5
Glue ribs B and C into place, to the right of rib A,
as shown. Make sure they are positioned at a right
angle to the spar.
4
Retrieve the aileron from the previous stage.
Apply glue to the front of rib A and fit into
position, at a right angle to the spar.
3
Place the aileron assembly on a flat surface. All
the ribs should be flush against it if correctly
positioned.
6
A
C
B
E
F
D
164
Build the Spitfire: Step-By-Step
Place the aileron into position on the
right wing, as shown, to check that it still
fits correctly. Store the two parts to one
side for now.
Make sure the engine side fits properly on the side
of frame 11. Then apply glue to the contact points
and glue the two parts together, at a right angle.
Remove the fret from the centre of frame 11, then
sand smooth.
7
98
2
2
1
165
Build the Spitfire: Step-By-Step
This photo shows where frame 11 and the engine side will fit
with the fuselage.
Here is how the parts assembled in this stage should now
look. Keep the fret removed in Step 8 to one side for later
use.
10
11
  • Page 1 1
  • Page 2 2
  • Page 3 3
  • Page 4 4
  • Page 5 5
  • Page 6 6
  • Page 7 7
  • Page 8 8
  • Page 9 9
  • Page 10 10
  • Page 11 11
  • Page 12 12
  • Page 13 13
  • Page 14 14
  • Page 15 15
  • Page 16 16

Deagostini Spitfire User guide

Type
User guide

The Deagostini Spitfire is a detailed model kit that allows you to build a replica of the iconic World War II fighter aircraft. With this kit, you'll embark on a journey of constructing a historical masterpiece. The step-by-step instructions guide you through the assembly process, providing insights into the aircraft's intricate design. As you progress, you'll develop modeling skills and gain a deeper appreciation for the engineering behind this legendary plane.

Ask a question and I''ll find the answer in the document

Finding information in a document is now easier with AI