Page is loading ...

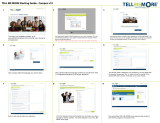
Quick Start Guide P1
Quick Start Guide
TELL ME MORE® Homeschool version
Creating a student account ........................................................... 2
Choosing a lesson mode ............................................................... 4
Getting familiar with the Learning Path........................................... 6
Starting learning with “Dialogue Explore”........................................ 8
Using the translation features ....................................................... 9
Tracking Results (Performance)................................................... 11
Printing .................................................................................... 15
Exporting audio content into a CD or MP3 player ........................... 16
Accessing other tools and options ................................................ 17
Accessing the software content ................................................... 19

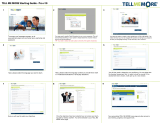
Quick Start Guide P2
Creating a student account
When you first use TELL ME MORE®, you have to create student
accounts.
You can create as many usernames and passwords as you want on the
same computer. In that sense, your entire family can use TELL ME
MORE® Homeschool and keep track of the progress for each account.
Choose your username, and then choose a password. It is not
necessary to create a password; you can leave that field blank and
just use your username to log in.

Quick Start Guide P3
The user language is the language in which the explanations and
translations will be given. You can choose English by default and
change it later into the studied language to benefit from a complete
immersion environment.

Quick Start Guide P4
Choosing a lesson mode
With TELL ME MORE®, three different learning modes are
available.
It is recommended to begin in the Guided Mode- this will be most
helpful if your homeschooler is a beginner or is new to TELL ME
MORE®.
• GUIDED MODE
Different Learning Paths are offered in this lesson mode. The lessons
and activities are already organized in a pedagogical way by teachers.
Most options cannot be changed from the default settings. It is also
from this mode that you can export the audio content to play them on
a CD or MP3 player

Quick Start Guide P5
• FREE-TO-ROAM MODE
This mode is organized by workshops according to the skills or topics
to be worked on:
- Lesson Workshop
- Vocabulary Workshop
- Grammar Workshop
- Oral Workshop
- Cultural Workshop
- Written Workshop
The Free-to-Roam Mode gives you more freedom in navigation and
allows you to change the options of different activities, such as the
level of difficulty for speech recognition.
•
DYNAMIC MODE
In this mode, TELL ME MORE® selects the activities it proposes to you
in accordance with your original objectives and the results you obtain
in each activity. TELL ME MORE® supervises your progress, offering
you the activities best adapted to your needs in order to help you
improve.

Quick Start Guide P6
Getting familiar with the Learning Path
Once you selected the Guided Mode, the learning path screen will
appear
The learning path screen is full of information.
The lessons are listed horizontally on this page (6 for the first CD-
ROM) and the different activities vertically (24 for the first CD-ROM).
This screen corresponds to a total of 144 exercises for the first CD-
ROM. Each exercise is one box.
For each lesson, the easiest activity is on the top left and the hardest
one at the bottom right.
You should go through each activity for each lesson, starting with the
first square and moving towards the last one.
Once you are finished with an entire lesson, you can move on to the
next one.

Quick Start Guide P7
To begin the first activity of the first lesson, click on the first top left
square called “Dialogue Explore” (see orange arrow).
The principle of TELL ME MORE® is immersion, which is the proven
best way to learn a language. It is the same as if you were to go
abroad to learn the language.
At first, you will listen to words/sentences to get familiar with the
sounds of the language, and look at the translation of these
words/sentences. Then you will be given the opportunity to speak
these words/sentences using our state-of-the-art speech recognition
technology.
After listening and practicing these words, you will improve your
comprehension of the language.

Quick Start Guide P8
Starting learning with “Dialogue Explore”
The instructions are always on the top left for each activity.
The first activity is the Dialogue Explore.
In that first activity, there are no right or wrong answers. It is just
a matter of spending time listening to the words and sentences. The
aim here is to familiarize yourself with the intonation of the new
language and try to practice your pronunciation slowly.
It is not that important at that stage to have a perfect understanding
of what you say. Click on the “speaker” icon next to each
word/sentence so you can repeat them. Once again, the purpose here
is to get familiar with the sounds of the language.
Once you feel you know the words/sentences, click on one of the three
proposed answers to move to the next dialogue.
This first activity is very important as it will teach you words and
sentences that will appear again in the next activities, thus reinforcing
the learning. In the next activities, you will discover some new words
as well.

Quick Start Guide P9
Using the translation features
You have the choice between 2 translation features
You can either way click on the “red circle” icon or the “flag” icon, on
the top left of your screen.

Quick Start Guide P10
The “red circle” icon is called “Find out more about a word”.
When you click on that icon, several words/sentences will be
highlighted on the screen.
You can click on each highlighted word and will be able to: get the
translation, listen to the word, pronounce it, pronounce the sentence
(when appropriate), have a link to the conjugation or glossary (when
appropriate).
Or you can click on the “flag” icon. You will have then the full
translation of the dialogue.

Quick Start Guide P11
Tracking Results (Performance)
To track students’ results, you should access the learning path page
(click on the “house” icon at the bottom left of the screen).

Quick Start Guide P12
Passing your mouse through the “light” icon, you can track the
completed exercises, the correct answers and the next suggested
exercise to do.
You can also see from that screen that 13% of the first lesson and 2%
of the first CD-ROM has been completed.

Quick Start Guide P13
You can also get a more detailed overview by lesson by clicking on the
lesson of your choice (for instance “Presentaciones”, the 1
st
lesson of
1
st
CD-Rom of Spanish).

Quick Start Guide P14
You can see for each of the 24 activities of the selected lesson, the
percentage of right answers (1
st
figure) and the percentage of the
activity completed (2
nd
figure).
When you are finished, you can click on the arrow to go back to the
learning path screen.

Quick Start Guide P15
Printing
This detailed tracking screen, as well as each single screen of TELL ME
MORE® can be printed. You need to click on the top right arrow and
select print on the box that appeared

Quick Start Guide P16
Exporting audio content into a CD or MP3 player
(in Guided Mode only)
You can export the audio content of TELL ME MORE® (dialogues,
videos,…) onto your hard drive, and then burn your own audio CDs or
import the files onto your MP3 players (if you have the ability to
convert our audio files onto MP3).
Click on the arrow icon on the top right of your screen.
Then select Audio CD at the very bottom.
Select the lesson containing the audio files you would like to copy to
your hard drive.

Quick Start Guide P17
Accessing other tools and options
The tools and info icon is located on the top right of your screen.
It is available on every page.
It enables you to have access to:
• Reference Tools:
- Grammar Explanations
- Conjugation Tool
- Glossary
- Cultural Texts and Maps
• Help:
It will provide you with detailed advice on how to use the current
screen, navigating, using speech recognition…

Quick Start Guide P18
• Functions:
- Lessons Modes: change lesson modes between Guided, Free-to-
roam and Dynamic modes
- Options: you can adapt the level of difficulty or the duration of
the exercises from this function
- Print: every page of TELL ME MORE® is printable
- Audio CD: see above (only in Guided mode)

Quick Start Guide P19
Accessing the software content
As a complement, here is a link to all the content of TELL ME MORE®,
with and without the solutions:
http://www.auralog.com/Tellmemorehomeschool_parentguide/
These documents will enable you to use TELL ME MORE® even more
effectively. You can for instance print them to make your own
workbooks, tests and study guide.

Quick Start Guide P20
You are now on your way to become fluent in a foreign language.
Auralog wishes you great success in your TELL ME MORE learning
experience!
Auralog is committed to making your learning as easy and convenient
as possible, and answer all your potential questions. If you have
additional questions after reading this guide, or need technical
support, please contact us:
Auralog
3710 E University Drive #1
Phoenix, AZ 85034
Toll-free: 1-888-388-3535 (ext. 618)
Phone: 602-470-0300
Fax: 602 470 0311
www.tellmemorestore.com
/