Page is loading ...

Copyright 2003 Auralog S.A. All rights reserved.
TELL ME MORE
®
EDUCATION
Admin Tools
User Guide

Copyright 2003 Auralog S.A. All rights reserved. 2
TELL ME MORE
®
EDUCATION
Admin Tools
Contents
TELL ME MORE
®
Education: system set-up ............................................................................................................3
INTRODUCTION.............................................................................................................................................................4
T
O RUN ADMIN TOOLS....................................................................................................................................................4
THE ‘TUTORS’ WINDOW.............................................................................................................................................6
T
O CREATE A TUTOR ACCOUNT.......................................................................................................................................6
‘Languages’ tab.........................................................................................................................................................7
‘Access rights’ tab .....................................................................................................................................................7
T
O MODIFY A TUTOR ACCOUNT.......................................................................................................................................7
T
O REMOVE A TUTOR ACCOUNT......................................................................................................................................8
THE ‘LANGUAGE GROUPS’ WINDOW.....................................................................................................................9
T
O ADD A LANGUAGE GROUP ..........................................................................................................................................9
T
O MODIFY A LANGUAGE GROUP...................................................................................................................................10
T
O REMOVE ONE OR MORE LANGUAGE GROUPS.............................................................................................................10
THE ‘STUDENT GROUPS’ WINDOW.......................................................................................................................11
T
O ADD A STUDENT GROUP ...........................................................................................................................................11
T
O MODIFY A STUDENT GROUP......................................................................................................................................11
T
O REMOVE ONE OR MORE STUDENT GROUPS................................................................................................................12
S
TUDENT GROUP TYPES.................................................................................................................................................12
To add a student group type ....................................................................................................................................12
To add a predefined student group type ..................................................................................................................13
To modify a student group type ...............................................................................................................................13
To remove one or more student group types............................................................................................................13
THE ‘STUDENTS’ WINDOW ......................................................................................................................................14
A
UTOMATIC CREATION OF STUDENT ACCOUNTS ...........................................................................................................14
T
O ADD A STUDENT ACCOUNT .......................................................................................................................................15
Lesson language......................................................................................................................................................16
Student group...........................................................................................................................................................17
T
O ADD A STUDENT ACCOUNT BY DUPLICATING ANOTHER STUDENT ACCOUNT ............................................................18
T
O IMPORT A STUDENT FILE ..........................................................................................................................................18
Format and contents of file to be imported..............................................................................................................18
Some basic rules for creating a valid file to be imported........................................................................................20
To import the file .....................................................................................................................................................20
T
O EXPORT ONE OR MORE STUDENT ACCOUNTS ............................................................................................................21
T
O MODIFY A STUDENT ACCOUNT .................................................................................................................................22
T
O REMOVE ONE OR MORE STUDENT ACCOUNTS ...........................................................................................................23
TECHNICAL SUPPORT...............................................................................................................................................24

Copyright 2003 Auralog S.A. All rights reserved. 3
TELL ME MORE
®
EDUCATION
Admin Tools
Paramétrages
du serveu
r
TELL ME MORE
®
Education: system set-up
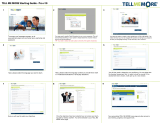
This diagram displays the standard TELL ME MORE
®
Education system set-up for a multi-workstation licence.
sdfqsdfqsdf
Http protocol server connection, most frequently used for
identification purposes
Network access to data and files
Local connection
Server workstation: designated workstation for the technical administrator to configure the system and the File and
Data Server.
Administrator workstation
: designated workstation for the Administrator to organise the structure of the Tutoring
Service (students, Tutors, language and student groups) using the Admin Tools application.
Student workstation
: designated workstation for students to work in TELL ME MORE
®
.
Tutor workstation
: designated workstation for the Tutor to organise, follow and personalise student training using the
Tutor Tools application.
Auxiliary lesson server
: designated workstation for the technical administrator to copy the lesson content of TELL
ME MORE
®
onto an auxiliary server. According to the needs and configuration of the network on which TELL ME
MORE
®
Education is installed, the installation of this workstation is optional.
Note:
Depending on the network configuration, all applications can be installed on the same workstation.
Administrator
workstation (2)
A
dmin Tools
Tutor Tools
TELL ME MORE
Lesson Copier
Lesson Copier
A
uxiliary
Lesson Serve
r
Lessons
Student
workstation
(
3
)
Tutor
workstation
(
4
)
A
uxiliary lesson
server (5)
Server workstation (1)
TELL ME
MORE
Server
System data
Shared data
Users
Lessons
File and Data
Server
Lessons
Lessons
TELL ME MORE
Server
Manager

Copyright 2003 Auralog S.A. All rights reserved. 4
TELL ME MORE
®
EDUCATION
Admin Tools
Introduction
Before running Admin Tools, you must install TELL ME MORE Education and define the server parameters.
To know more about installation and defining the parameters of TELL ME MORE Education, refer to the
Installation Guide.
Admin Tools allows the training structure within TELL ME MORE Education to be organised according to
individual contexts.
The application enables the organisation of:
§ Tutor accounts
(creation, modification and removal)
A ‘Tutor’ is a teacher, training course leader or the organiser of a language group (a group of students all learning the
same language). The Tutor can track students’ progress and communicate with them using Tutor Tools.
§ language groups
(creation, modification and removal)
A ‘language group’ is a group of students with the same ability level learning the same language with the same Tutor.
This facilitates the Tutor’s consultation of the student tracking, as well as the sending of options files and individual
Learning Paths. To know more about this, refer to the Tutor Tools manual.
§ student groups
(creation, modification and removal)
A ‘student group’ groups students irrespective of the language being learnt. This enables administrative management of
the groups, particularly important for year groups within an educational establishment. These groups can be identified
according to predefined types (e.g. ‘Class’ and ‘Group’) or names designed to suit the needs of the environment in
which the program is being used. A student can only belong to one student group type.
§ student accounts
(creation, copying, importation, export, modification and removal).
Note:
The administration of TELL ME MORE Education is optional when the automatic creation of student accounts option
has been activated (selected during the installation of the server and modifiable using Server Manager).
To run Admin Tools
Caution!
You must run the TELL ME MORE Server application to run Admin Tools.
Ø Go into the Start menu.
Ø Select Programs.
Ø Select TELL ME MORE Education.
Ø Select Admin Tools.
The user name ‘Administrator’ is defined by default and is not modifiable.
Enter the Administrator password if one was defined during installation.
You can check and/or modify the server name and the port number by clicking on the icon Define server connection
parameters
.
Confirm by clicking on the green tick.

Copyright 2003 Auralog S.A. All rights reserved. 5
TELL ME MORE
®
EDUCATION
Admin Tools
The Admin Tools application comprises four windows.
The Tutors window
This window allows you to create, modify or remove Tutor accounts.
The Language groups window
This window allows you to create, modify or remove language groups.
The Student groups window
This window allows you to create, modify or remove student groups.
The Students window
This window allows you to create, duplicate, import, export, modify or remove student accounts.
Note:
To suit TELL ME MORE Education’s parameters, it is recommended to follow the order in which the windows are
displayed when typing in the corresponding data.
You must, therefore:
- create the Tutor account(s);
- create the language groups;
- create the student group(s);
- create the student accounts.

Copyright 2003 Auralog S.A. All rights reserved. 6
TELL ME MORE
®
EDUCATION
Admin Tools
The ‘Tutors’ window
This section enables you to create, modify or remove Tutor accounts.
Click on the Tutors icon
.
To create a Tutor account
Ø Click on the icon Add a Tutor account .
Ø Type in the surname and the name of the Tutor (max. 50 characters for each text box).
Ø Type in any useful additional information in the Description text box (e.g. Tutor’s title, availability etc.). This is
optional.
Ø Select the Tutor’s interface language for the Tutor Tools application from the drop-down menu.
Ø Type in a user name (between 2 and 50 characters) and a password (optional - max. 16 characters). This data is
necessary to access Tutor Tools.

Copyright 2003 Auralog S.A. All rights reserved. 7
TELL ME MORE
®
EDUCATION
Admin Tools
Note:
Only the following information is necessary to create a Tutor account: name, user name and languages taught.
‘Languages’ tab
Ø Select the language(s) taught by the Tutor by clicking on the icon Add a language .
Ø Choose the language from the drop-down menu, then confirm by clicking on the green tick.
When the Tutor has been assigned to a language group, the name of this group appears under the heading
Language Group.
‘Access rights’ tab
Tutors have 3 tools at their disposal in the Tutor Tools application.
• The Learning Path management tool: to create and modify the Learning Paths.
• The Option management tool: to create options files (options for the Free-to-Roam Mode in TELL ME MORE
and options not specified in the Learning Paths).
• The Linguistic and pedagogical content printing tool: to print the linguistic and pedagogical content of TELL
ME MORE.
Tutors have access to all these tools by default. However, an individual Tutor only has access to the account(s) of their
own students. To provide Tutors with access to all student accounts, click on the box All student accounts.
The TELL ME MORE Education system administrator can also be declared as a Tutor thus providing them with
access to all the accounts and tracking of all the students on the system.
If you want to block a Tutor’s system access (e.g. due to holidays or the end of the training programme) while retaining
their account, you must remove the tick from the Activate account box by clicking on it.
Note:
You cannot deactivate a Tutor account if the Tutor is responsible for a language group.
Confirm by clicking on the green tick. The line corresponding to the new Tutor is added to the Tutors window.
To modify a Tutor account
In the Tutors window, select the Tutor whose account you want to modify. You can then do this either by double-
clicking on the corresponding line or on the icon Modify a Tutor account
.
You can also select the menu Tutor/Modify a Tutor account.
The Modify a Tutor account window opens: it contains the same tabs as the window used to add a Tutor account.
Carry out the modifications, then confirm the changes by clicking on the green tick. For more details on the tabs in this
window, refer to the To create a Tutor account section.

Copyright 2003 Auralog S.A. All rights reserved. 8
TELL ME MORE
®
EDUCATION
Admin Tools
To remove a Tutor account
Caution!
You cannot remove a Tutor account if the Tutor is responsible for a language group. You must first remove the
language group before you can remove the Tutor account. For more details, refer to the section entitled The
‘Language groups’ window/To remove one or more language groups.
In the Tutors window, select the Tutor(s) whose account(s) you want to remove. You can then do this either by clicking
on the icon Remove Tutor account(s)
, or select the menu Tutor/Remove Tutor account(s).
A message will ask you to confirm the removal of the account concerned. If you confirm this choice, the account will be
definitively removed.

Copyright 2003 Auralog S.A. All rights reserved. 9
TELL ME MORE
®
EDUCATION
Admin Tools
The ‘Language groups’ window
A ‘language group’ is a group of students learning the same language with the same Tutor, who is assigned to the group
when it is created. The student accounts created thereafter can be allocated to one or several language groups or indeed
not allocated to any language group.
Caution!
There can only be one Tutor per language group.
Click on the icon Language groups .
Caution!
Check the Tutor account you want to assign to the language group has already been created. If this is not the case,
refer to the To create a Tutor account section.
To add a language group
In the Language groups window, click on the icon Add a language group or select the menu Language
groups/Add a language group.
Ø Type in a name for the language group (e.g. language taught and level).
Ø Type in a description of the group. This is optional, but does allow more details about the language group to be
given (e.g. the group’s ability level, the date of the group’s creation).
Ø Select the lesson language from the drop-down menu.
Ø Select a Tutor from the drop-down menu (only the Tutors whose accounts are active appear in the list).
Ø Confirm by clicking on the green tick.
Caution!
Once you have confirmed the addition of a language group, you can no longer modify the lesson language.

Copyright 2003 Auralog S.A. All rights reserved. 10
TELL ME MORE
®
EDUCATION
Admin Tools
To modify a language group
You may need to modify the name, description or Tutor assigned to a language group.
Caution!
You cannot modify the lesson language of a language group. If you want to change the lesson language, you must
remove the existing language group and create a new one choosing the new lesson language.
In the Language groups window, select the language group you want to modify. You must then either double-click on
the corresponding line or click on the icon Modify a language group
.
You can also select the menu Language groups/Modify a language group.
Carry out the modifications and confirm by clicking on the green tick.
To know more about this, refer to the To add a language group section.
To remove one or more language groups
In the Language groups window, select the language group(s) you want to remove. You can then do this either by
clicking on the icon Remove one or more language groups
, or select the menu Language groups/Remove one
or more language groups.
Caution!
You cannot remove a language group containing students. You must first move or remove the student accounts before
removing the language group. For more details, refer to The ‘Students’ window section.

Copyright 2003 Auralog S.A. All rights reserved. 11
TELL ME MORE
®
EDUCATION
Admin Tools
The ‘Student groups’ window
The ‘student groups’ concept allows students to be grouped together, thus enabling easy system administration.
A student can be allocated to one or several student groups or indeed not allocated to any student group.
Click on the icon Student groups
.
To add a student group
In the Student groups window, click on the icon Add a student group or select the menu Student groups/Add a
student group.
Ø Type in a name for the student group you are creating (e.g. class name, level/year).
Ø Type in a description. This is optional, but does allow more details about the student group to be given (e.g. number
of students, year, level).
Ø Select a student group type. This is optional, but does allow the group you are creating to be classified. To know
more about this concept, refer to the Student group types section.
Ø Confirm by clicking on the green tick.
To modify a student group
In the Student groups window, select the student group you want to modify. You must then either double-click on the
corresponding line or click on the icon Modify a student group
.
You can also select the menu Student groups/Modify a student group.
Carry out the modifications and confirm by clicking on the green tick.
To know more about this, refer to the To add a student group section.
Caution!
You cannot modify the group type of a student group which already contains students.

Copyright 2003 Auralog S.A. All rights reserved. 12
TELL ME MORE
®
EDUCATION
Admin Tools
To remove one or more student groups
This function enables you to remove definitively one or more student groups.
Caution!
You cannot remove a student group containing students. You must first move or remove the student accounts before
removing the student group. For more details, refer to The ‘Students’ window section.
In the Student groups window, select the student group(s) you want to remove.
You can then do this either by clicking on the icon Remove student group(s)
, or select the menu Student groups/
Remove student group(s).
A message will ask you to confirm the removal of this group. Confirm this choice by clicking on the green tick.
Student group types
A ‘student group type’ is an extra piece of information allowing the student groups to be more specifically categorised,
thus facilitating their organisation. TELL ME MORE Education proposes two predefined student group types: ‘Class’
and ‘Group’. You can also create your own student group types.
Caution!
A student can only be allocated to one student group of one type.
In the Student groups window, select the menu Student groups/Student group types.
To add a student group type
This function allows you to create your own student group types.
Ø Click on the icon Add a student group type
Ø Type in the name of the new student group type (max. 50 characters), then confirm by clicking on the green tick.
Note:
You must also click on the green tick in the Student group types window to add the new student group type to Admin
Tools.

Copyright 2003 Auralog S.A. All rights reserved. 13
TELL ME MORE
®
EDUCATION
Admin Tools
To add a predefined student group type
This function is only useful in the case where you have removed all of the default predefined student group types and
you want to return them to the list. In TELL ME MORE Education, the predefined student group types are ‘Class’
and ‘Group’.
Ø Click on the icon Add a predefined student group type
.
Ø Select the predefined student group type you want to add from the list.
Ø Confirm by clicking on the green tick.
Note:
You must also click on the green tick in the Student group types window to add the predefined student group type to
Admin Tools.
To modify a student group type
Caution!
You cannot modify a predefined student group type (i.e. ‘Class’ and ‘Group’).
Ø Select the student group type you want to modify, then click on the icon Modify a student group type .
Ø Modify the name, then confirm by clicking on the green tick.
Note:
You must also click on the green tick in the Student group types window to modify the student group type in Admin
Tools.
To remove one or more student group types
Caution!
A student group type currently in use cannot be removed.
Ø Select one or more student group types, then click on the icon Remove student group type(s) .
Note:
You must also click on the green tick in the Student group types window to confirm the removal of the student group
type(s) from Admin Tools.

Copyright 2003 Auralog S.A. All rights reserved. 14
TELL ME MORE
®
EDUCATION
Admin Tools
The ‘Students’ window
You can now create student accounts. There are 2 methods of doing this:
1. The Automatic creation of student accounts option is activated.
In this case, it is not necessary to create student accounts using Admin Tools. An account is created when the student
uses TELL ME MORE. To know more about this, refer to the Automatic creation of student accounts section. It is
then possible to modify the default values of these accounts.
Note:
To view newly-registered students, select the menu Students/Update the list of student accounts.
2. The Automatic creation of student accounts option is not activated.
You must create student accounts using Admin Tools, either student by student (to know more about this, refer to the
To add a student account section), or by importing a student list (to know more about this, refer to the To import a
student file section).
Click on the icon Students
.
Automatic creation of student accounts
The student accounts created automatically during student registration in TELL ME MORE have the following default
values:
Name
Same as TELL ME MORE user name (see below)
First name
not given
Student group
no student group allocated
Language
TELL ME MORE Education system language
User name
TELL ME MORE user name (typed in by the student)
Password
password typed in by the student (optional)
Lesson language
Access to all lesson languages (and to all ability levels
installed)
Language group
no language group allocated
Tutor
no Tutor assigned
The values allow students to use TELL ME MORE without any restrictions and without being assigned to a Tutor,
language group or student group. The information concerning the languages, student groups, language groups and
Tutors can be subsequently modified using Admin Tools. To know more about this, refer to the To modify a student
account section.

Copyright 2003 Auralog S.A. All rights reserved. 15
TELL ME MORE
®
EDUCATION
Admin Tools
To add a student account
This function allows you to save all the information concerning an individual student to create their personal account.
In the Students window, click on the icon Add a student account
or select the menu Students/Add a student
account.
You must type in different types of information:
Ø Type in the surname and first name of the student (max. 50 in each text box).
Ø Select the TELL ME MORE default language. This is only valid while the account is being created as the Tutor
can subsequently modify this language in Tutor Tools.
Ø Type in a user name (between 2 and 50 characters) and a password (optional – max. 16 characters) to be used to
access TELL ME MORE (a password allows the student’s data on the network to remain confidential).

Copyright 2003 Auralog S.A. All rights reserved. 16
TELL ME MORE
®
EDUCATION
Admin Tools
Lesson language
To add a lesson language and define the associated parameters
Ø Select the lesson language(s). To do this, click on the icon Add a lesson language .
Ø Select a lesson language from the drop-down menu.
Ø You can also select a language group (optional). The name of the Tutor responsible for the selected language
group will be displayed.
Note:
A student does not have to be allocated a language group (select None from the drop-down menu). In this case, the
student will not have a Tutor.
To restrict access to Lesson Families
A ‘Lesson Family’ is a collection of lessons grouped according to either an ability level, a theme or both criteria.
By default, students have access to all Lesson Families of the selected lesson language.
Example: the Lesson Families for British English
Lesson Families
Complete Beginner
Beginner
Intermediate
Intermediate +
Advanced
Advanced +
Business
Business +
Business ++
You can restrict access to Lesson Families according to a student’s objectives.
Caution!
If access to certain Lesson Families is restricted, the pedagogical content contained within those Lesson Families will
be inaccessible to students.
Ø Click in the box Restrict access to Lesson Families.
Ø Click on the icon Add a Lesson Family
.

Copyright 2003 Auralog S.A. All rights reserved. 17
TELL ME MORE
®
EDUCATION
Admin Tools
Ø Select one or more Lesson Families to which you want to restrict access.
Ø Confirm by clicking on the green tick.
If you want to restrict access to Lesson Families already selected, select the Lesson Family from the list and click on the
icon Remove one or more Lesson Families
.
If you want to re-authorise access to all Lesson Families, remove the tick from the Restrict access to Lesson Families
box by clicking on it. The student will then have access to all Lesson Families.
Ø Confirm by clicking on the green tick.
To modify a lesson language
Ø Select the lesson language, then click on the icon Modify lesson language parameters or double-click on
the language.
Ø Carry out the modifications, then confirm by clicking on the green tick.
To remove one or more lesson languages
Ø Select the lesson language(s) you want to remove, then click on the icon Remove lesson language(s) .
Ø Confirm the modifications by clicking on the green tick.
Student group
This information is optional. A student can be allocated to one or several student groups or indeed not allocated to any
student group. To know more about this, refer to The ‘Student Groups’ window section.
To add a student group
Ø Click on the icon Add a student group .
Note:
A student cannot belong to two student groups of the same type (e.g. ‘Class’ or ‘Group’).
Ø Select the student group type from the drop-down menu. If the student is not to be allocated to a student group,
select None.
Ø Then select the student group name.
Ø Confirm by clicking on the green tick.
To remove one or more student groups
Ø Select the student group(s) from which you want to remove a student.
Ø Click on the icon Remove student group(s)
.
To deactivate a student account (e.g. at the end of their training programme), remove the tick from the Activate
account box by clicking on it. The student will no longer be able to use TELL ME MORE. If you reactivate the
account, the student will be able to use TELL ME MORE and will continue with the same tracking.

Copyright 2003 Auralog S.A. All rights reserved. 18
TELL ME MORE
®
EDUCATION
Admin Tools
Ø Confirm the creation of the student account by clicking on the green tick. All the information contained within the
various text boxes will not be taken into account until this moment.
To add a student account by duplicating another student
account
You can create a new student account based on an existing account, by copying the non-personal data (e.g. student
group, language group, lesson language).
Ø Select from the list the student whose account you want to duplicate.
Ø Click on the icon Add a student account by duplicating another student account
or select the menu
Students/Add a student account by duplicating another student account.
The window which appears contains all the non-personal information of the student account which has been duplicated
(student group, language group, lesson language and language).
Ø Select or type in the personal details of the student whose account you want to create (e.g. surname, first name, user
name, etc.).
To know more about this, refer to the To add a student account.
To import a student file
Format and contents of file to be imported
The file you want to import must be in text format (*.txt) comprising different columns of data separated by a comma.
As the file is being imported, Admin Tools will use the information contained within the columns to create the student
accounts.
The file must begin with the following lines:
#students (this indicates the importation of student accounts)
#number of columns separated by the character ‘;’. Refer to the table below for a description of the column format.
If the file to be imported contains characters such as speech marks, extra commas, etc., the importation cannot be
successfully completed.

Copyright 2003 Auralog S.A. All rights reserved. 19
TELL ME MORE
®
EDUCATION
Admin Tools
Name and description of column format
Column name Explanation
Surname* Student’s surname (by default, the entry in the UserName
column)
FirstName* Student’s first name
PupilsGroup or
IDPupilsGroup *
Student group name or ID
UserName
TELL ME MORE
®
user name
Password*
Password to access TELL ME MORE
®
LearningGroups or
IDLearningGroups
and/or
LessonLanguages
Language group name or ID (Tutor-led training)
If a student has been allocated to a language group, it is not
necessary to state the lesson language.
If a student has not been allocated to a language group
(training without a Tutor), you must only state the lesson
language.
Lesson language (3-letter code):
ANG = British English
FRA = French
ALL = German
ITA = Italian
ESP = Spanish
AME = American English
DUT = Dutch
Language* Language (3-letter code):
ANG = British English
FRA = French
ALL = German
ITA = Italian
ESP = Spanish
AME = American English
DUT = Dutch
* Optional
Caution!
The column names reproduced in the file to be imported must be exactly the same as those appearing in the table
above.
Examples of files to be imported
Example 1
File with the ‘UserName’ and ‘LearningGroups’ columns.

Copyright 2003 Auralog S.A. All rights reserved. 20
TELL ME MORE
®
EDUCATION
Admin Tools
Example 2
File with the ‘UserName’ and ‘LessonLanguages’ columns (with two lesson languages for each student).
Some basic rules for creating a valid file to be imported
§ The minimum any student import file must include is the ‘UserName’ column. The lesson language will be
subsequently asked for in order to complete the importation. You can, therefore, either add one of the columns
(‘Learninggroups,’ ‘IDLearninggroups’ or ‘lessonlanguages’), or wait for the conclusion of the importation. The
lesson language you add will be the same for all the students imported in the file. To know more about this, refer to
the To import the file section.
§ The Tutors, language groups and student groups must have first been created in Admin Tools for them to be
integrated into the file to be imported.
§ Certain fields represent the same element (‘PupilsGroup’ and ‘IDPupilsGroup’ or ‘LearningGroups’ and
‘IDLearningGroups’). The simultaneous presence of these fields in the same file could cause conflicts. You must,
therefore, choose either the name or the ID.
§ The columns can be arranged in any order.
§ If a student is learning multiple languages or belongs to multiple language groups and/or student groups, the
different codes must be separated by a comma.
Refer to example 2 of the files to be imported above (each student is learning two languages).
§ You can decide to put no data in a certain column. However, in this case, you must retain the semi-colons marking
out the column and put a space between them.
Example: durand; michel; ; fra
§ Do not forget to put #students at the beginning of the file and # before the name in the first column.
§ The file must be in text format (*.txt).
To import the file
Ø Select the menu Students/Import student accounts from a file.
Ø Select the file you want to import.
The file will be analysed during importation. There are several scenarios which may occur during this analysis:
§ The file contains no errors: the importation is completed successfully (the list of student accounts is updated) and
the following message will appear: ‘x student(s) added successfully.’
§ The file contains no errors, but some information is missing: a dialogue box will appear asking for the information
necessary to complete the importation.
/