Page is loading ...

Roanoake Class Aether Tug
B28-VSF-005
Please read these instructions fully before starting construction.
PVA or equivalent glue will be required to stick sections together.
Sand paper can be used to gently clean any joints.
A sharp modelling knife will be required to remove sections from the sprue. Please use knives with due care and remember
to cut away from yourself at all times.
During the construction of this model, you may find it convenient to use pegs / elastic bands to hold pieces in place while
you allow glue to dry.
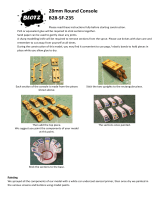
Take the long supports, cross pieces and inner
plate (shown above) from the sprue.
Stick the inner plate to the cross pieces.
Slide the long supports into place. Note the arrow
on the inner plate should point towards the
shorter section of the long supports (to the left in
the picture)
Attach the base plate.
Take the two front pieces (Note: these have a
double line of rivets in the centre)
And glue them into position on the front of the
model.
Each rudder support is formed from the four
pieces shown above.
Start by attaching one piece to the long support as
shown above.

Turn the model over and attach the other sections
as per the picture. This will form an open ended
tube. Repeat this on the other side of the model.
Take the rear plate supports.
And glue one to each side of the model.
The front section of each rudder is formed from
thes two pieces.
Glue the piece with the longer slots to the sudder
support with the curve facing forwards. Glue the
other piece on top.
Glue one rudder support to the base of the front
rudder, then attach the rear rudder to it before
gluing the top rudder support into position.
The front angle of each side is formed from the
pieces shown above.
Glue these into position as shown.
Then take the two side plates…
..and attach one on each side of the model.
We suggest you spray paint the framework at this point as it is much easier to do it now than once the
deck has been attached.
Likewise, it is easier to spray the (non-wood) pieces which form the control deck and the wheel now.
Glance through the remainder of the instructions to see whast has been painted before it is assambled.
The engine block and chimneys can be assemled before painting. Just paint them before sticking it into
position on the deck.

Take two fo the rail supports.
Attach one to each side of the main deck.
Then glue the deck to the base of the model.
The sides of the wheel and lower paddles.
Attach each side of the wheel to the lugs
provided. Note the flat edge of the wheel should
be towards the front of the model.
Turn the model over and slide the front and rear
paddles into place.
Then slide the rest of the paddles into place.
Take the top pieces of the wheel housing.
Turn the model right way up again and insert the
two end pieces and the central piece into place.
The end pieces are easiest if you keep them at 90
degrees to the deck when trying to get them into
the right place.
Take the side panels.
Put them into position either side of the wheel
housing.
The rear plates.

Attach them to the supports.
Take the rear handrails.
And glue them into place.
The front hailrail supports.
Start by attaching 3 more to the deck as shown.
Glue the handrail into place.
Then attach the remainder of the supports. This is
done by inserting the top lug into the handrail,
then easing the foot into place.
You will need to trim the point off the lower bit of
the foor to fit it in some of the positions.
The engine block is formed from the pieces shown
above.
Glue them together to form an oppen bottomed
box. Note the position of the holes in the top in
relation to the lugs on the base.
Take the four chinmey inserts and four chinmey
sides which have lugs on them.

Glue the insert with the etching by the spikey end
(etching facing the spikes) and the non-etched
insert at the lug end of one chinmey side. Glue
another side directly opposite.
Glue the rest of the chimney sides into place.
Glue the chimneys to the top of the engine block
using the holes to align them.
Paint the engine block now.
Glue the engine block to the deck.
The ships wheel is formed using tese pieces.
The wheel surround is formed from these pieces.
Glue the wheel to the deck, then attach the three
pieces of the surround.
The completed model.
We painted our model using a white car body undercoat spray, making sure the pieces were painted prior to attaching
them to the model (as mentioned above).
Any touch-ups that were required (i.e. to hide the deck lugs on the command deck) used model-painting acrylic.
The red highlights on the rudder and black sections of the chimneys are standard household DIY emulsion paint.

The gold highlights on the rudder supports and wheel housing is model-painting acrylic.
The base was covered in chinchilla dust then painted in various shades of brown (DIY Emulsion) before flock was
added.
/