Page is loading ...

Zen Box
Owner’s Manual
INSTALLERS: PLEASE LEAVE THIS MANUAL WITH THE OWNER.
with ShyZip® Tracks and Cable Guide

Screen Innovations warrants its products, to the original purchaser only, to be free from defects in
materials and workmanship for a period of one (1) year from the date of purchase by the original
purchaser provided they are properly operated according to Screen Innovations' instructions and are
not damaged due to improper handling or treatment after shipment from the factory.
This warranty does not apply to equipment showing evidence of misuse, abuse, or accidental damage,
or which has been tampered with or repaired by a person other than authorized Screen Innovations
personnel.
Screen Innovations’ sole obligation under this warranty shall be to repair or to replace (at Screen
Innovations’ option) the defective part of the merchandise. Returns for service should be made to
your Screen Innovations' dealer. If it is necessary for the dealer to return the screen or part to Screen
Innovations, transportation expenses to and from Screen Innovations are payable by the purchaser and
Screen Innovations is not responsible for damage in shipment. To protect yourself against damage or
loss in transit, insure the product and prepay all transportation expenses.
This warranty is in lieu of all other warranties, express or implied, including warranties as to tness
for use and merchant ability. Any implied warranties of tness for use, or merchantability, that may be
mandated by statute or rule of law are limited to the one (1) year warranty period. This warranty gives
you specic legal rights, and you may also have other rights, which vary from state-to-state. No liability
is assumed for expenses or damages resulting from interruption in operation of equipment, or for
incidental, direct, or consequential damages of any nature.
In the event that there is a defect in materials or workmanship of a Screen Innovations product, you
may contact our Sales Partners at 9715-B Burnet Road Suite 400, Austin, TX 78758, (512) 832-6939.
Important: this warranty shall not be valid and screen innovations shall not be bound by this warranty if
the product is not operated in accordance with screen innovations' written instructions.
Keep your sales receipt to prove the date of purchase and your original ownership.
Limited 1 year warranty
on Screen Innovations products
Technical Support: 512.832.6939 screeninnovations.com
Hours of Support: 7:30am - 5pm CST suppor[email protected]
Please use this QR Code
to access the updated
installation instructions
and related documents.

Operating And Maintaining Your Shade � � � � � � � � � � � � � � � � � � � � � � � � � � � � � � � � � � � � � � � � � � � � � � � � � � � � 1
Before Proceeding � � � � � � � � � � � � � � � � � � � � � � � � � � � � � � � � � � � � � � � � � � � � � � � � � � � � � � � � � � � � � � � � � � � � � � � � �2
Specifying Your Shade Dimensions � � � � � � � � � � � � � � � � � � � � � � � � � � � � � � � � � � � � � � � � � � � � � � � � � � � � � 3 - 4
ShyZip Parts List� � � � � � � � � � � � � � � � � � � � � � � � � � � � � � � � � � � � � � � � � � � � � � � � � � � � � � � � � � � � � � � � � � � � � � � � � � � �5
Ceiling Mount � � � � � � � � � � � � � � � � � � � � � � � � � � � � � � � � � � � � � � � � � � � � � � � � � � � � � � � � � � � � � � � � � � � � � � � � � � 6 - 7
Wall Mount � � � � � � � � � � � � � � � � � � � � � � � � � � � � � � � � � � � � � � � � � � � � � � � � � � � � � � � � � � � � � � � � � � � � � � � � � � � � � 8 - 9
Cutting Track To Length � � � � � � � � � � � � � � � � � � � � � � � � � � � � � � � � � � � � � � � � � � � � � � � � � � � � � � � � � � � � � � � � � � �10
Installing The Tracks � � � � � � � � � � � � � � � � � � � � � � � � � � � � � � � � � � � � � � � � � � � � � � � � � � � � � � � � � � � � � � � � � � � 11 - 14
Cable Parts List � � � � � � � � � � � � � � � � � � � � � � � � � � � � � � � � � � � � � � � � � � � � � � � � � � � � � � � � � � � � � � � � � � � � � � � � � � � � 15
Cable Mount Options � � � � � � � � � � � � � � � � � � � � � � � � � � � � � � � � � � � � � � � � � � � � � � � � � � � � � � � � � � � � � � � � � � � � � � 16
Installing The Cables � � � � � � � � � � � � � � � � � � � � � � � � � � � � � � � � � � � � � � � � � � � � � � � � � � � � � � � � � � � � � � � � � 17 - 20
Power � � � � � � � � � � � � � � � � � � � � � � � � � � � � � � � � � � � � � � � � � � � � � � � � � � � � � � � � � � � � � � � � � � � � � � � � � � � � � � � � � � � � � 21
Control–Set Limits � � � � � � � � � � � � � � � � � � � � � � � � � � � � � � � � � � � � � � � � � � � � � � � � � � � � � � � � � � � � � � � � � � � � 22 - 24
Troubleshooting � � � � � � � � � � � � � � � � � � � � � � � � � � � � � � � � � � � � � � � � � � � � � � � � � � � � � � � � � � � � � � � � � � � � � � � � � � 25
TABLE OF CONTENTS

1
OPERATING AND CARE OF YOUR SHADE
• Operation of the shade systems should only be completed by responsible parties
• Always check the path of the Zen Shade before operating to ensure that the path is clear of furniture
or other obstacles that could prevent full operation. Also monitor the Zen Shade for smooth operation
through its entire range. Operating a Zen Shade unattended may lead to damage from obstructions
or other causes.
• DO NOT lower Zen Shades during high wind conditions (depends on fabric and site, but general rule is
20mph and higher gusts). Doing so could result in damage that will need to be repaired by a qualied
technician. If the shade system is currently in the down position, it is usually okay to operate the
shade and retract it. However, avoiding operation at any time when High Wind conditions are present
is considered proper operation.
• For Zen Zipper Guide - Side Track maintenance is important to ensure proper operation and trouble
free performance of the Zipper track system. It is recommended that an annual or bi-annual cleaning
of the side tracks be performed by clearing any debris and/or dirt/dust that has built up in the track
housing and zipper inserts. A light power washing and/or utilizing a air blower to “blow the debris”
out of the tracks. A periodic light spraying of the food based Silicone after said maintenance may be
necessary or preferred during this maintenance operation to ensure a smooth and proper operation
of the zipper track system but is not considered to provide any smoother operation over time
because it typically only lasts outdoors for 2-3 weeks.
• Fabric maintenance and cleaning - Zen Shade fabric is subject to weather, bugs, and debris under
normal use and storage that could create the occasional need for maintenance and cleaning.While
fading and wear over time are normal, debris and pests could accelerate this wear. Shade fabrics
can be rinsed with a hose to clean off debris. A pressure washer with a low pressure nozzle and light,
fabric-safe soap may also be used. Scrubbing with a bristle brush or pad is not recommended.
• Fabric maintenance - cable and no-guide - Cable guide and no-guide shades will require occasional
maintenance to the cut ends of the fabric. The frequency depends on the fabric, environment, and
use. Simply trim the edges with a blade or scissors, and cauterize the frays with a lighter or heat gun.
Careful not to leave the heat source on the material too long, or it could damage the material.

2
Preparing for your installation: It is crucial that all installations are planned out carefully
before specifying a shade order.
• For new construction or dicult installations it is advised to order and install the tracks rst. Then
take the measurement outside of track to outside of track, when possible, to specify your shade
width.
• If pre-installing tracks; make sure that tracks are sealed from construction materials during
construction.
• Measure the opening carefully and make sure that the correct shade width is ordered.
• Make sure that the tracks and the shade boxes can all be installed securely level and plumb. Add
appropriate blocking or carpentry work before installing tracks and shades.
• SI will not cover any warranty on systems that are installed without original brackets. Warranty will
be null & void if installation is performed by drilling directly through the box, both on ceiling and
wall mount.
• Electrical work should be performed using appropriate electrical codes and regulation, by a
licensed electrical professional.
• Specify fasteners appropriate for the location the tracks and shade boxes will be mounted to.
• Before removing the screen from the packaging, check for damage and to make sure all parts are
included.
• Do not use any sharp blades when opening the screen packaging. Open by hand.
• Care in mounting and correct operation will result in long and satisfactory service from the SI
screen.
• Make sure to acquire appropriate mounting hardware for your installation as mounting hardware is
not provided due to the need for the installer to identify mounting surface requirements.
Read the instructions in their entirety before proceeding. Actions contrary to the
instructions invalidate the warranty and may result in serious damage and/or injury.
BEFORE PROCEEDING

3
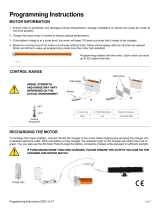
SPECIFYING YOUR SHADE DIMENSIONS
Use this formula for specifying shades where the case and guide tracks can be seen from the inside
of the installation opening.
For new construction or dicult installations it is advised to order and install the tracks rst. Then
take the measurement between the two tracks to specify your shade width.
Width - Measure the total width at the top, middle, and bottom of your opening. Take the smallest
measurement of the three and deduct a total of 1/4". This will give you the TOTAL UNIT WIDTH of
your shade.
Drop - Measure the total height of your opening. That will be your TOTAL UNIT DROP for your shade.
We do manufacture the tracks or guides for your system 5" longer than your TOTAL UNIT HEIGHT so
you can have a little adjustment on site. There is also extra fabric rolled on the tube just in case.
Between Columns (Inside Opening) Mount
The measurements written on the order form
will be the measurements produced. No
deductions are taken on submitted order form.
MINIMUM OPENING WIDTH - 1/4'' = TOTAL UNIT WIDTH = W
TOTAL HEIGHT OF OPENING = TOTAL UNIT HEIGHT = H
Top opening width
Right opening height
Middle opening
height
Left opening height
Bottom opening width
Middle opening width
Width
Top
Middle
Bottom
As Built
Height
Left
Middle
Right
As Built

4
The measurements written on the order form
will be the measurements produced. No
deductions are taken on submitted order form.
Use this formula for specifying shades where the case and guide tracks can NOT be seen from the
inside of the opening.
For new construction or dicult installations it is advised to order and install the tracks rst. Then
take the measurement between the two tracks to specify your shade width.
Ensure opening is plumb & parellel. If not, order extra width to keep all track out of view from the
inside.
LARGEST OPENING WIDTH + 3 1/2'' = TOTAL UNIT WIDTH = W
TOTAL HEIGHT OF OPENING + 9 1/2'' = TOTAL UNIT HEIGHT = H
Width - Measure the total width at the top, middle, and bottom of your opening. Take the largest
measurement and add 3 1/2''. This will give you the TOTAL UNIT WIDTH of your shade and allow
only the fabric to be seen from inside your opening.
Drop - Measure the total height of your opening. If you don't want the cassette and bottom bar to be
visible when the unit is completely retracted, please add 9 1/2" inches to your opening's height. We
do manufacture the tracks or guides for your system 5" longer than your TOTAL UNIT HEIGHT So
you can have a little adjustment on site. There is also extra fabric rolled on the tube just in case.
SPECIFYING YOUR SHADE DIMENSIONS
Wall Surface Mount (Outside Opening)
Top opening width
Right opening height
Middle opening
height
Left opening height
Bottom opening width
Middle opening width
Width
Top
Middle
Bottom
As Built
Height
Left
Middle
Right
As Built

5
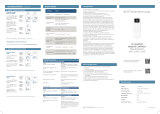
Or
2X- 4X Ceiling Mounts
1X Case and Shade Assembly
1 Left and 1 Right ShyZip Track Assemblies
Mounting Bracket Options Accessories Options
2X- 4X Wall Mounts
1X Foldable Crank Handle (For Manual Shades Only)
ZEN BOX - SHYZIP PARTS IN THE BOX
Shades
Telis Remotes
Channel 1 or 4
(Purchased separately)

6
CEILING MOUNT -
2 13
16
"
2 15
16
"
2X
1
4
"
1
15
16
"
2X
1
4
"
15
16
"
7
16
"
5
16
"
1
16
"
1
NOTE: Zen XL instructions begin on page 10.
Ensure top corners of opening have a sharp 90° corner, if not, you may have interference with
case.
Use appropriate fasteners to mount the ceiling brackets to structural supports. Mount brackets
2'' to 6'' from the opening ends. If 4 brackets are included then mount them 4'' to 8'' from the outer
brackets. Make absolutely sure that all brackets are on a level line and are are plumb. Note that
all weight is held towards the ends there is no need for brackets towards the middle. Also, When
shade is under 108" wide only 2 brackets are necessary. When the shade is wider than 108", then 4
brackets will be necessary.
Level Plumb
2” - 6”
Sharp Corner Required
4” - 8”
(if 4 brackets are included)

7
First make sure that the set screws on the brackets are turned out. Then, lift the case up onto the
hook on the back of the brackets. Then rotate case up to flush with the bracket and secure with the
set screws on the mounting brackets.
Installation requires two or more people. Please use safe lifting and
rigging techniques.
2+
2
CEILING MOUNT -

8
WALL MOUNT -
Use appropriate fasteners to mount the wall brackets to structural supports. When a shade is under
108” wide only 2 brackets are necessary, when the shade is wider than 108”, 4 brackets will be
necessary. Mount brackets 2'' to 6'' from the case ends. If 4 brackets are included then mount them
4'' to 8'' from the outer brackets. Make absolutely sure that all brackets are on a level line and are
are plumb. Note that all weight is held towards the ends there is no need for brackets towards the
middle.
2 15
16
"
0"
3
16
"
4 3
8
"
4 1
2
"
4 5
8
"
5 3
8
"
0"
11
16
"
1 1
2
"
2 5
16
"
4 5
8
"
5 5
16
"
3 9
16
"
1
2” - 6” 4” - 8”
(if 4 brackets are included)
Level
Plumb
(To hide weight bar when retracted)
"
74
3

9
Losely install all brackets screws leaving enough play to allow clearance for the cassette. Next,
lift the cassette onto the hook on the back of the brackets and rotate the cassette flush with the
bracket and secure with the front wall bracket plate.
WALL MOUNT - 2

10
ZEN XL CASSETTE MOUNTING -
Wall Mount Ceiling Mount
5�25"
5�25"
Score Line
4�2" 1"
Score Line
4�3"
Score Line Score Line
1�2"
Note: Be careful not to over torque or aggressively drill retention hardware when mounting
the cassette because deformation to the case could occur, this is especially important when
ceiling mounting as cassette deformation will make it dicult or impossible to attach the front
removable section. The structure behind the mounting points should be at and level
WARNING! – Select a screw or anchor type that has a shallower head prole to eliminate the
risk of contact with the shade material roll. Damage to the material caused by anchoring is not
covered under warranty. Before you start, ensure the screws or anchors being used are of a
quantity, size, and type compatible with the structural substrate you are mounting to, and rated
for the weight being carried. Weight can be found on the shipping documents, or on the box label.
• Remove the front cassette piece by removing the screws at either end, then remove the
material roll from the cassette. Careful not to damage the motor cord or material.
• Depending on mounting conguration (see images below) identify the score lines inside the
cassette. There are two in the inside-top of the cassette (ceiling mount), and two in the inside-
back of the cassette (wall mount).
• Test t the cassette back to the mounting location, and mark the optimal locations for
anchoring, based on job specic structural conditions and building materials. During this step
you are checking for t, position, and level/plumb.
NOTE: You may need to address out of level, out of plumb, or other jobsite conditions with
shims. The cassette must be level and plumb, without twist or distortion for long term
service life and to maintain warranty.
1

11
• 2 screws or anchors should be installed at either end, between 1” and 8” from the end caps.
See Warning about regarding screw heads and contact with the shade material.
• Additional anchors should be added at an interval no greater than 72” apart to help support
the wider ZEN XL cassette span. A single anchor can be used for these mid supports, using
the score line closest to the angled corner of the cassette.
• Reinstall the material roll once the cassette has been properly secured, feeding the power/
control cabling through the pre-drilled hole in the cassette. Make sure to seat the provided
grommet to prevent damage to the cabling by the sharp edge of the metal cassette.
• Reinstall the cassette front, and go to steps for installing track or cables, wiring, and setting
limits.
ZEN XL CASSETTE MOUNTING - 2

12
CUTTING TRACK TO LENGTH -
Carefully measure the distance from the indent in the back bottom of the case to the ground
on both ends.Then cut the bottom end of each assembled track to 1/4’’ less than the measured
length. DO NOT cut the top of the track as denoted by the plastic portion sticking out of the top.
You can cut through the assembled track all at once. Make sure to save the cap installed on the
bottom end and reinstall it after track assembly is cut.
1
L - 1/4”
Top Left
Cut this end
Top Right
R - 1/4”
RL

13
INSTALLING THE TRACKS -
Dissasemble the track by removing the screws holding the removeable extrusion cover and
removing the plastic zipper track on the inside. Make sure the bottom cap is installed before
proceeding.
Fixed Track Zipper Track Removeable Cover
1

14
Position the larger xed track up against the indent in the box. The outside of the track should
be exactly flush with the end of the box. Notches for mounting from the front or side have been
provided to guide fastener installation. Use appropriate fasteners to secure the track to the
installation location.
Make sure that the tracks are mounted level and plumb in all directions. As a nal check make
sure that the left and right tracks are the same distance apart from top to bottom within 1/8''.
INSTALLING THE TRACKS -
Plumb
Plumb
Front Mount or Side Mount
2

15
Angle the zipper track up into and behind the upper most spring. The top of the track is the side with
the notches cut out. Then slide it up into the zipper on the shade material until it is pushed all the
way up to the track top cap. Finally use a flat head screw driver or card to compress the springs and
make sure they are all pushing back on the plastic track.
INSTALLING THE TRACKS - 3

16
INSTALLING THE TRACKS -
Do not use powered screw driver to avoid stripping screws.
4
Place the removeable cover onto the xed track and and hold into place while securing with the
retaining screws.

17
1X Case and Shade Assembly
1X Telis Remote
(For Motorized Shades Only)
1X Foldable Crank Handle
(For Manual Shades Only)
my
Or
2X-4X Ceiling Mounts 2X-4X Wall Mounts
Accessories Options
2X Cables 2X Cable Tensioners
2X Floor Mounts 2X Wall Mounts
ZEN BOX - CABLE PARTS IN THE BOX
Cable Mounting Options Mounting Bracket Options
/