Page is loading ...

Zen 2 Pocket
Installation Instructions
INSTALLERS: PLEASE LEAVE THIS MANUAL WITH THE OWNER.
Zipper Tracks and Cable Guides
Doc. # 400163 | v. 1.5 | 10 July 2022

Screen Innovations warrants its products, to the original purchaser only, to be free from defects in
materials and workmanship for a period of one (1) year from the date of purchase by the original
purchaser provided they are properly operated according to Screen Innovations' instructions and are not
damaged due to improper handling or treatment after shipment from the factory.
This warranty does not apply to equipment showing evidence of misuse, abuse, or accidental damage,
or which has been tampered with or repaired by a person other than authorized Screen Innovations
personnel.
Screen Innovations’ sole obligation under this warranty shall be to repair or to replace (at Screen
Innovations’ option) the defective part of the merchandise. Returns for service should be made to
your Screen Innovations' dealer. If it is necessary for the dealer to return the screen or part to Screen
Innovations, transportation expenses to and from Screen Innovations are payable by the purchaser and
Screen Innovations is not responsible for damage in shipment. To protect yourself against damage or
loss in transit, insure the product and prepay all transportation expenses.
This warranty is in lieu of all other warranties, express or implied, including warranties as to tness
for use and merchant ability. Any implied warranties of tness for use, or merchantability, that may be
mandated by statute or rule of law are limited to the one (1) year warranty period. This warranty gives
you specic legal rights, and you may also have other rights, which vary from state-to-state. No liability
is assumed for expenses or damages resulting from interruption in operation of equipment, or for
incidental, direct, or consequential damages of any nature.
In the event that there is a defect in materials or workmanship of a Screen Innovations product, you may
contact our Sales Partners at 9715-B Burnet Road Suite 400, Austin, TX 78758, (512) 832-6939.
Important: this warranty shall not be valid and screen innovations shall not be bound by this warranty if
the product is not operated in accordance with screen innovations' written instructions.
Keep your sales receipt to prove the date of purchase and your original ownership.
Limited 1 year warranty
on Screen Innovations products
Technical Support: 512.832.6939 screeninnovations.com
Hours of Support: 7:30am – 5pm CST suppor[email protected]
Please use this QR Code
to access the updated
installation instructions
and related documents.

Operating and Care of Your Shade � � � � � � � � � � � � � � � � � � � � � � � � � � � � � � � � � � � � � � � � � � � � � � � � � � � � � � � � � � 1
Before Proceeding � � � � � � � � � � � � � � � � � � � � � � � � � � � � � � � � � � � � � � � � � � � � � � � � � � � � � � � � � � � � � � � � � � � � � � � � �2
Parts in the Box � � � � � � � � � � � � � � � � � � � � � � � � � � � � � � � � � � � � � � � � � � � � � � � � � � � � � � � � � � � � � � � � � � � � � � � � � � � �3
Installation – Mount the Brackets � � � � � � � � � � � � � � � � � � � � � � � � � � � � � � � � � � � � � � � � � � � � � � � � � � � � � � � � � � 4
Installation – Mount the Cassette � � � � � � � � � � � � � � � � � � � � � � � � � � � � � � � � � � � � � � � � � � � � � � � � � � � � � � � � � � �5
Installation – Material Roll � � � � � � � � � � � � � � � � � � � � � � � � � � � � � � � � � � � � � � � � � � � � � � � � � � � � � � � � � � � � � � 6 – 7
Installation – Zipper Tracks � � � � � � � � � � � � � � � � � � � � � � � � � � � � � � � � � � � � � � � � � � � � � � � � � � � � � � � � � � � � � 8 – 11
Installation – Cable Guides � � � � � � � � � � � � � � � � � � � � � � � � � � � � � � � � � � � � � � � � � � � � � � � � � � � � � � � � � � � � �13 – 14
Line Voltage (110v AC/ 60 Hz) wiring � � � � � � � � � � � � � � � � � � � � � � � � � � � � � � � � � � � � � � � � � � � � � � � � � � � � � � � 15
Line Voltage (AC - 485 Control) wiring � � � � � � � � � � � � � � � � � � � � � � � � � � � � � � � � � � � � � � � � � � � � � � � � � � � � �16
Controls Guide Reference � � � � � � � � � � � � � � � � � � � � � � � � � � � � � � � � � � � � � � � � � � � � � � � � � � � � � � � � � � � � � � � � �17
TABLE OF CONTENTS

1
OPERATING AND CARE OF YOUR SHADE
Operation of the shade systems should only be performed by responsible parties.
Always check the path of the Zen 2 Shade before operating to ensure that the path is clear of furniture
or obstacles that could prevent full operation. Monitor the Zen 2 Shade for smooth operation through its
entire range. Operating a Zen 2 Shade unattended may lead to damage from obstructions or other causes.
DO NOT lower Zen 2 Shades during high wind conditions (depends on fabric and site, but general rule is
the shade system is currently in the down position, it is usually okay to operate the shade and retract it.
However, avoid operation at any time high wind conditions are present for proper operation.
For Zen 2 Zipper Guide– Side Track maintenance is important to ensure proper operation and trouble-
free performance of the Zipper track system. An annual or bi-annual cleaning of the side tracks is
recommended, clearing any debris and/or dirt/dust that has built up in the track housing and zipper
spray inside the track.
Fabric maintenance and cleaning– Zen 2 Shade fabric is subject to weather, bugs, and debris under normal
use or in storage, requiring occasional maintenance and cleaning. While fading and wear over time are
normal, debris and pests could accelerate this wear. Shade fabrics can be rinsed with a hose to clean
off debris. A pressure washer with a low pressure nozzle and light, fabric-safe soap may also be used.
Scrubbing with a bristle brush or pad is not recommended.
Fabric maintenance– Cable and No-guide– Cable guide and No-guide shades require occasional
maintenance to the cut ends of the fabric. The frequency depends on the fabric, environment, and use.
Simply trim the edges with a blade or scissors and cauterize the frays with a lighter or heat gun. Be careful
not to leave the heat source on the material too long, or it may damage the material.

2
Preparing for installation– It is crucial that all installations are planned out carefully before
specifying a shade order.
channels.
Make sure that the tracks and the shade boxes can be installed securely, level, and plumb. Add
appropriate blocking or carpentry work before installing tracks and shades.
poor operation.
Electrical work should be performed following appropriate electrical codes and regulations by a licensed
electrical professional.
Use fasteners appropriate for the structure the Zen 2 shade will be mounted to.
Do not use any sharp blades when opening the packaging.
We recommend a pocket size of 7” W x 12” H.
Read the instructions in their entirety before proceeding. Actions contrary to the instructions invalidate
the warranty and may result in serious damage and/or injury.
BEFORE PROCEEDING
12”

3
(2) Pocket
Brackets
(6) Spacer Blocks
Longer Screws
Case Assembly
Mounting Bracket Options
Motor Slider
PARTS IN THE BOX - ZEN 2 POCKET
Shades
(6) Mounting
Screws
Accessories Options Required
Hardware
Programming
Remote (RTS
shades)
RJ 45 Coupler
(485 shades)
Cable Guides
Only
Zipper Tracks
Only
(2) L
Brackets
Quick
Release Tool
(2) Steel Anchor
(2) Cables
Thread size

4
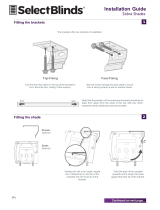
INSTALLATION – MOUNT THE BRACKETS
Ceiling MountJam Mount
1Use appropriate fasteners to mount to the ceiling or wall 1.5” less than the ordered shade width.
BEFORE INSTALL– check upper corners of the pocket as necessary to ensure no interference issues
with brackets.
NOTE: Ensure the fasteners used are adequate for the weight of the Zen 2 Shade and the structure.

5
Avoiding sharp tools, remove the roll from its packaging on a soft, clean surface. Discard any foam
or excess packaging.
Installation requires two or more people and/or hoisting equipment.
Please use safe lifting and rigging techniques.
2+
2
INSTALLATION – MOUNT THE CASSETTE

6
After pocket brackets are mounted, slide in the material roll along with the mounting plates on
each end.
3
4
INSTALLATION – THE MATERIAL ROLL

7
INSTALLATION – THE MATERIAL ROLL
Use the thumb screws to secure both ends.
Fasten the thumb screws on the mounting plates to secure the material roll.
5

8
Disassemble the track by removing the screws holding the zipper track assembly to the mounting
side of the track.
Pull the zipper track assembly away from the mounting side.
For the next step, use xed track side “a” for inside mounting; use xed track side “b” for wall
mounting.
Note: For cable guide, see page 13.
1
INSTALLATION – ZIPPER TRACKS
b
a
Zipper Track
Housing
Fixed Track

9
Note: Make sure that the tracks are mounted square to the bracket and plumb from all directions.
INSTALLATION – ZIPPER TRACKS
2

10
Use appropriate fasteners to secure the tracks against the mounting surface.
INSTALLATION – ZIPPER TRACKS
3
Note: Pre-drilling for anchors along the score line will expedite and simplify the installation process.
Refer to side “a,” side “b” on page 8.

11
Angle the top of the zipper track housing and align under material path. Feed the zipper into the
4
INSTALLATION – ZIPPER TRACKS

12
5
INSTALLATION – ZIPPER TRACKS

13
INSTALLATION – CABLE GUIDE MOUNTS
a. Run the cable through the hem bar end cap and position the crimped end just above the
cable mount.
1
b
a

14
TENSIONING – THE CABLE GUIDES
Screw the tensioner to the mounting surface, cut the cable to the appropriate length (see note
A below), and insert the cable to the tensioner. See note B, to tighten the cable. Set tension by
The wall anchor should be mounted 0.5” to 0.75” above the ground.
Note A: Make sure that the cables are mounted plumb from all directions, and the cassette is level. As a
nal check, ensure the left and right cables are the same distance apart from top to bottom, within 1/4.’’
Measure from the cable mount to the tensioner mounting hole and take appropriate deduction to cut
the cable.
Note B: Turn clockwise to tighten and counterclockwise to loosen. Follow appropriate instructions for
anchoring into the substrate.
Note: Cable guides comes along with a Quick Release tool kit, please refer to the
instructions on the back of it, or you can scan the QR code to see a video to use it, to
release the cable guides incase needed to.
Note: Measure from the bottom of
the cassette to the cable tensioner
mounting hole, deduct 2⅞,” and cut
the cable to length.
For concrete oors only, drill a
1.5” deep hole into the oor for
the anchor, which attaches to
the oor mount.
Note: Measure from the bottom of
the cassette to the cable tensioner
mounting hole, deduct 3½,” and cut
the cable to length.
Wall Mount
Floor Mount
2
0.5”– 0.75”
Locknut
Locknut

15
LINE VOLTAGE (110v AC/ 60Hz) – WIRING
’
Length of the wire: 10’ or 18
(Can be cut to a min. 18”)
Pigtail
L (Black)
N (White)
(Green)
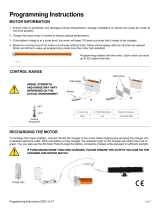
Adjusting the limits in User mode
To change the lower limit
Send the motor to it’s current lower limit.
my
my
Press both and at the same time
until the motor jogs. Adjust to a new lower
limit position.
Press until motor jogs.
my
To change the upper limit
Send the motor to it’s current upper limit.
my
my
Press both and at the same time until
the motor jogs. Adjust to a new lower limit
position.
Press until motor jogs.
my
Installation must follow all local electrical codes when working with 110v AC power, use a certied
electrician when neccessary.
limits, follow the steps below:
-
ferred position, then Scan the QR code, alternately use the link below, go to the guides tab to
access
motor-commisioning-guide.pdf

16
LINE VOLTAGE (AC - 485 CONTROL) – WIRING
Terminate the data wires into the provided terminal block shown below for 485 control wiring.
Motor Quick Commissioning Guide:
Based on your order, refer the motor (485/ RTS) your screen/shade uses. Scan the QR code,
RS485 (+) - White
RS485 (-) - Orange
-
Power 7v DC - Red
-
-
-
Ground - Brown
Pin 1
Pin 8
Service Loop
Note: Red Service loop, can be cut to disable the DC output from an AC 485 motor.

17
CONTROLS GUIDE REFERENCE
With each screen order, you will receive one of the Control Guides below, detailing integration with the
control system.
Fontus Motor Conversion Instructions:
Connectivity/fontus-motor-conversion-installation-instructions.pdf
TRO.Y Installation Instructions (RS232, IP Control, 3rd party Control system):
Connectivity/troy-installation-instructions.pdf
LinkPro Z Installation Instructions (IP Control, 3rd party Control system):
Connectivity/LinkProZ-installation-instructions.pdf
Technotes (For all popular Control systems):
Go to the ”Technotes” tab under the Accessory (connectivity) product - support page to access the most
relevant technote for your control system.
issues surrounding installation and operation, contact the Screen Innovations Technical Service team at
512.832.6939.
Tahoma Installation Instructions (IP Control, 3rd party Control system):
Connectivity/tahoma-installation-instructions.pdf
/