Screen Innovations Zen® 2 Installation guide
- Category
- Projection screens
- Type
- Installation guide
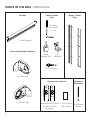
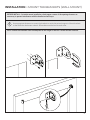
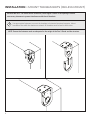
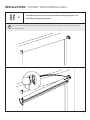
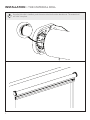
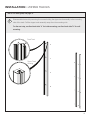
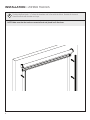
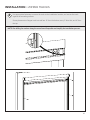
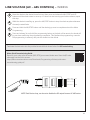
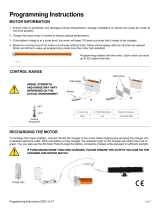
Screen Innovations Zen® 2 is a motorized roller shade system designed for both indoor and outdoor use. It features a durable aluminum cassette and side tracks that protect the fabric from the elements. The shade can be operated via a remote control, wall switch, or mobile app, and it can be programmed to open and close at specific times. The Zen® 2 is available in a variety of fabrics, colors, and sizes, making it a versatile option for any home or business. With its sleek design and advanced features, the Zen® 2 is the perfect way to add style and convenience to your life.
Screen Innovations Zen® 2 is a motorized roller shade system designed for both indoor and outdoor use. It features a durable aluminum cassette and side tracks that protect the fabric from the elements. The shade can be operated via a remote control, wall switch, or mobile app, and it can be programmed to open and close at specific times. The Zen® 2 is available in a variety of fabrics, colors, and sizes, making it a versatile option for any home or business. With its sleek design and advanced features, the Zen® 2 is the perfect way to add style and convenience to your life.


-
 1
1
-
 2
2
-
 3
3
-
 4
4
-
 5
5
-
 6
6
-
 7
7
-
 8
8
-
 9
9
-
 10
10
-
 11
11
-
 12
12
-
 13
13
-
 14
14
-
 15
15
-
 16
16
-
 17
17
-
 18
18
-
 19
19
-
 20
20
-
 21
21
-
 22
22
-
 23
23
-
 24
24


Screen Innovations Zen® 2 Installation guide
- Category
- Projection screens
- Type
- Installation guide
Screen Innovations Zen® 2 is a motorized roller shade system designed for both indoor and outdoor use. It features a durable aluminum cassette and side tracks that protect the fabric from the elements. The shade can be operated via a remote control, wall switch, or mobile app, and it can be programmed to open and close at specific times. The Zen® 2 is available in a variety of fabrics, colors, and sizes, making it a versatile option for any home or business. With its sleek design and advanced features, the Zen® 2 is the perfect way to add style and convenience to your life.
Ask a question and I''ll find the answer in the document
Finding information in a document is now easier with AI
Related papers
-
 Screen Innovations Zen® 2 Installation guide
-
 Screen Innovations Solo 3 Outdoor Installation guide
-
 Screen Innovations Zen Box Installation guide
-
 Screen Innovations TaHoma switch Installation guide
-
 Screen Innovations Nano™ Box Installation guide
-
 Screen Innovations Nano™ Roll User manual
-
 Screen Innovations Solo 1 Ceiling Brackets Installation guide
-
 Screen Innovations Tahoma Installation guide
-
 Screen Innovations Short Throw Lift Installation guide
-
 Screen Innovations DecoSET Installation guide


Other documents
-
 SUN GLOW programming User manual
-
Somfy RTS Motorized Shades Owner's manual
-
-
Roller Shades 152733A User manual
-
 ALTA 15 Channel Remote Control User guide
-
 Select Blinds Zebra Shades Installation guide
-
SelectBlinds Zebra Shades Installation guide
-
SelectBlinds Classic Shoreline Cordless Woven Wood Shades User manual
-
 KEYSTONE SALES GROUP DM35F-S Automatic Curtain Control System Operating instructions
-
Altair AMP25B User guide


