Page is loading ...

User Manual

TABLE OF CONTENTS
SECTION 1: 3 Important safety instructions
Overview 4 Standard system components
6 Optional components
7 Activate Pod: Controls and connections
8 Activate Station: Functions and indicators
SECTION 2: 10 1. Determine set-up locations
Initial Set-up 11 2. Plug in the charging station
12 3. Charge Activate components
13 5. Register new Activate components
13 6. Download Mobile App
14 7. Pair mobile device to Activate Station
15 8. Set up the Flexmike + earbud
16 9. Determine placement of the Pods
17 10. Test system operation
18 11. Setting system volume levels
19 Activate Station: Output to assistive Listening Device
SECTION 3: 20 Daily operation instructions
Daily Operation 20 1. Remove the microphone and put it on
20 2. Remove and place the Pods
20 3. Open the Activate app
21 4. Using the Activate app
SECTION 4: 22 Video + Audio recording
Record and Capture 23 Audio only recording
23 Photo capture
24 Recording library and playback
25 Auto upload to Google Drive
SECTION 5: 26 Additional Capabilities with Activate App
Additional Operation
Information
30 Operating + charging Pods #9-12
30 Tips and tricks to successful use
32 Daily operation with an optional remote control
SECTION 6: 34 Component registration overview
Maintenance and
Troubleshooting
34 Battery replacement
35 Troubleshooting
SECTION 6: 39 Warranty statement
Warranty, Safety and
Specifications
40 Safety warnings and certifications
45 System specifications
46 Compatibility Charts - IOS and Android

3
IMPORTANT SAFETY INSTRUCTIONS
1. Read these instructions.
2. Keep these instructions.
3. Heed all warnings.
4. Follow all instructions.
5. Do not use the apparatus near
water.
6. Clean only with dry cloth.
7. Do not block any ventilation
openings. Install in accordance with
the manufacturer’s instructions.
8. Do not install near any heat
sources such as radiators, heat
registers, stoves, or other apparatus
(including amplifiers) that produce
heat.
9. Do not defeat the safety purpose
of the polarized or grounding-type
plug. A polarized plug has two
blades with one wider than the
other. A grounding- type plug has
two blades and a third grounding
prong. The wide blade or the third
prong is provided for your safety. If
the provided plug does not fit into
your outlet, consult an electrician
for replacement of the obsolete
outlet.
10. Protect the power cord from being
walked on or pinched particularly at
plugs, convenience receptacles, and
the point where they exit from the
apparatus.
11. Only use attachments/ accessories
specified by the manufacturer.
12. Use only with a cart, stand, tripod,
bracket or table specified by the
manufacturer, or sold with the
apparatus. When a cart is used,
use caution when moving the cart/
apparatus combination to avoid
injury from tip-over.
13. Unplug this apparatus during
lightning storms or when unused for
long periods of time.
14. Unplug this apparatus during
lightning storms or when unused for
long periods of time.
15. Refer all servicing to qualified
service personnel. Servicing is
required when the apparatus has
been damaged in any way, such
as power-supply cord or plug is
damaged, liquid has been spilled
or objects have fallen into the
apparatus, the apparatus has been
exposed to rain or moisture, does
not operate normally, or has been
dropped.
16. When the mains plug or appliance
coupler is used as the disconnect
device, it shall remain readily
operable.
17. Please keep the unit in a good
ventilation environment.
18. WARNING: To reduce the risk of fire
or electric shock, do not expose this
apparatus to rain or moisture.
19. Apparatus shall not be exposed to
dripping or splashing and no objects
filled with liquids, such as vases, shall
be placed on the apparatus.
20. Warning - battery pack shall not be
exposed to excessive heat such as
sunshine, fire or the like.

4
1. Overview 2. Initial Set-up 3. DaiIy Operation
4. Additional
Information
5. Maintenance &
Troubleshooting
6. Safety &
Specifications
SECTION 1:
OVERVIEW
SYSTEM COMPONENTS AND UNPACKING
The standard configuration of the Activate System will contain:
Flexmike + Earbud Lanyard
Activate Station with Power
Supply
Small Group Pods
1 2
PLEASE NOTE: Activate Station and Pods may be purchased as additions to an Access
Classroom System for small group instruction. All Access components are registered
together at the factory and are labeled as such. Please keep all components together as
a system. Moving them from one system, or room, to another will result in the need to re-
register them in order to function.
Activate Mobile App

5
1. Overview 2. Initial Set-up 3. DaiIy Operation
4. Additional
Information
5. Maintenance &
Troubleshooting
6. Safety &
Specifications
Standard Components
ACT Activate Station with power supply
POD Activate Pod with rechargeable battery pack
FM-EBL Flexmike pendant transceiver with earbud lanyard and battery
pack
NH2.5V 2.5V NiMH rechargeable battery pack for Pods
NH2.4V 2.4V NiMH rechargeable battery pack for Flexmike
24V-1.75-NA 24V/1.75A power supply for ACT
USB-MCB Charging cable for Pods 9-12
MSCC3535 (2) 3.5mm to 3.5mm patch cables
ACTCVR Pod charging slot cover for systems with less than 8 Pods

6
1. Overview 2. Initial Set-up 3. DaiIy Operation
4. Additional
Information
5. Maintenance &
Troubleshooting
6. Safety &
Specifications
OPTIONAL COMPONENTS
Equipment which may be part of your system:
Additional Pods
2nd Flexmike + Earbud
Lanyard for Team Teaching
Vol
Vol
Mute
6
5
1
3
2
4
UP DN
1 2
Optional Accessories
POD Activate Pod with rechargeable battery pack
FM-EBL Flexmike pendant transceiver with earbud lanyard and
battery pack
FCHRC1 Handheld remote control with battery pack
SM Sharemike handheld transceiver with battery pack
USBDC Charging cable for Sharemike
NH2APK AA NiMH rechargeable battery pack for Sharemike
NH2.4V 2.4V NiMH rechargeable battery pack for remote control
Remote Control
Sharemike
Handheld
Microphone

7
1. Overview 2. Initial Set-up 3. DaiIy Operation
4. Additional
Information
5. Maintenance &
Troubleshooting
6. Safety &
Specifications
POD CONTROLS AND CONNECTIONS
1. CHARGING INDICATOR: this light
is red when charging, and green to
indicate charging complete. During
operation, this light will blink green
when the call button is pressed.
2. POWER/LOW BATTERY INDICATOR:
this light blinks blue when powered
on, turns solid blue when ready for
operation and turns red when the
battery is low.
3. POD NUMBER: the number will
light as a clear visual indicator for
the teacher to determine which Pod
represents which group number.
4. VOLUME: up/down buttons adjust
the volume of the Pod speaker. The
volume level (-5 to 5) will be shown in
the LED window.
5. CALL BUTTON: students can press
this button to notify the teacher they
need assistance.
6. LOUDSPEAKER: the internal
loudspeaker distributes the teacher’s
voice.
7. MICROPHONES: the internal
microphones that pick up the
student’s voice are located at each
end of the Pod.
8. HEADPHONE OUT: connect
headphones for private listening.
The Pod speaker is muted when
headphones are connected.
9. USB CHARGING/POWER INPUT: for
systems with more than 8 Pods, plug
the charging cable from the Activate
station or other USB power source
into this jack.
10. POWER: press to power on. Press
and hold for 3 seconds to power o.
5
4
1
2
3
6
7
8
7
9
10

8
1. Overview 2. Initial Set-up 3. DaiIy Operation
4. Additional
Information
5. Maintenance &
Troubleshooting
6. Safety &
Specifications
ACTIVATE STATION: CONTROLS, CONNECTIONS
AND INDICATORS
1. POWER/SLEEP: press and hold
to place the Activate Station and
classroom audio system into sleep
mode. The Activate Station will
continue to charge devices when in
sleep mode.
2. POWER INDICATOR: the light will
turn blue when powered on, amber
when placed in sleep mode.
3. LINK INDICATOR: this light is
solid green to indicate Activate is
connected to the audio system and
ready for operation. It will blink green
for several seconds when initially
plugged into power.
4. MICROPHONE VOLUME: adjusts
the volume level of the classroom
speaker for all connected
microphones. The indicator lights
to the right change to show volume
level.
5. AUDIO INPUT VOLUME: adjusts the
level of multimedia devices plugged
into the 3.5mm audio input ports.
6. AUDIO OUTPUT VOLUME: adjusts
the level of ALD or recording devices
plugged into the 3.5mm audio output
ports.
7. VOLUME LEVEL INDICATORS: shows
the volume level of the source that is
being adjusted (Microphone, Input,
Output). The source level will be
updated once a new volume button
is pressed.
8. FLEXMIKE CHARGING SLOTS (2):
place your Flexmike(s) in these slots
for nightly charging.
9. POD CHARGING SLOTS (8): place
your Pods in these slots for nightly
charging.
10. CHARGING COVERS: covers are
included to protect unused Pod
charging slots from dust and debris.
11. AUDIO INPUTS (1-4): connect
5
41
2
3
6
7
8 9 10

9
1. Overview 2. Initial Set-up 3. DaiIy Operation
4. Additional
Information
5. Maintenance &
Troubleshooting
6. Safety &
Specifications
ACTIVATE STATION: CONTROLS, CONNECTIONS
AND INDICATORS
a multimedia audio source to
wirelessly send the audio to be
played through the whole classroom
speaker(s).
12. AUDIO OUTPUT (ALD): connect
Assistive Listening Device to send
the whole classroom audio to an
individual student’s device.
13. AUDIO OUTPUT (REC): connect
recording device to send the teacher’s
selected audio source - whole
classroom speaker or individual Pod
- to a recording device or installed
camera.
14. BLUETOOTH PAIRING (1-2):
press this button to pair Activate
to a mobile device. Download the
Lightspeed Activate app from the
iOS App Store or Google Play for
complete instructions.
15. ACCESS REGISTRATION: this button
is used to pair the Activate Station
with the classroom audio system. If
purchased together this is done by
default at the factory.
16. USB CHARGE OUTPUTS (PHONE/
PODS): use the first two USB ports to
charge a mobile phone or additional
Pods.
17. USB CHARGE OUTPUTS (PODS/
REMOTE/SHAREMIKE): use these
two USB ports to charge additional
Pods, Sharemike or optional remote
control.
18. AUX POWER INPUT: 5V USB power
from a laptop or USB power pack can
be used in a portable application to
power the Activate Station wireless
audio functions (in place of the
standard 24V power supply). Note :
Charging is disabled when auxiliary
power is used.
19. DC POWER INPUT: plug the primary
24V/1.75A power supply into this jack.
11
19
18
17
16
15
14
12
13

10
1. Overview 2. Initial Set-up 3. DaiIy Operation
4. Additional
Information
5. Maintenance &
Troubleshooting
6. Safety &
Specifications
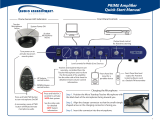
Activate Station:
The Activate Station organizes and charges the Pods and microphone(s) and also
wirelessly connects audio to the classroom audio system and your mobile device. Set
it up in a convenient place near a power source, and that is highly accessible for both
teachers and students. If plugging in multimedia audio sources, it should be located in
close proximity to minimize cable runs.
Key considerations:
• Close proximity to AC power outlet
• Accessible for daily charging of all components
• Near multimedia audio sources if desired
• Do not place in a fully enclosed metal cabinet
Pods
The Pods are designed to be highly portable and move around the room with the student
group. For optimum audio quality, they should be placed in the center of a table or group.
Pods can be taken out of the room up to about 100 feet before communication is lost.
SECTION 2:
INITIAL SET-UP
1. DETERMINE SET-UP LOCATION
Speaker Pods
Charging
Station
Shown with Redcat Access

11
1. Overview 2. Initial Set-up 3. DaiIy Operation
4. Additional
Information
5. Maintenance &
Troubleshooting
6. Safety &
Specifications
2. PLUG IN THE ACTIVATE STATION
1. Locate the 24V power supply and power cable.
2. Connect the AC power cord into the DC power supply.
3. Insert the DC connector into the DC Power jack on the back.
4. Plug the AC power cord into an electrical outlet.
5. The blue power light on the front of Activate Station will glow.
6. The green link light will begin blinking as it searches for its paired classroom audio
base station (Redcat, Topcat, 955 or Access Link).
Note: If Activate System is being added to an existing Lightspeed audio system, please
refer to the Registration Procedure at www.lightspeed-tek.com/accessregistration for
proper pairing instructions.

12
1. Overview 2. Initial Set-up 3. DaiIy Operation
4. Additional
Information
5. Maintenance &
Troubleshooting
6. Safety &
Specifications
1. Insert all Pods into the Activate Station. If your system has more than 8 Pods, the
additional Pods can be plugged into the USB charging ports on the back with the
included cables.
2. Each Pod will power on and the charge light will turn red to indicate normal charging.
When fully charged, they will turn green.
3. Insert the Flexmike(s) into the Activate Station.
4. The Flexmike(s) will power on and charging light will turn red to indicate normal
charging. When fully charged, it will turn green. The blue microphone 1 or 2 light will
blink for several seconds as it establishes a link, then turn solid.
5. For systems with optional handheld remotes, those can be plugged into the rear USB
Pods/Remote/Sharemike charging ports. The charging light will turn red to indicate
normal charging. When fully charged, it will turn green.
If your Activate System was purchased together with a Lightspeed audio system (Redcat,
Topcat, 955 or Access Link), all components were registered (paired) together at the
factory.
The components are registered and ready for operation when:
• Microphone(s) has a solid blue #1 or #2 light
• Pods have a red LED number and solid blue power light
• Activate Station has a solid green link light
3. PLACE THE COMPONENTS IN THE ACTIVATE
STATION
Prior to full operation, all system components should be fully charged (at least 8 hours)
to ensure optimum performance. In most cases, there should be enough battery life for
initial setup and testing.

13
1. Overview 2. Initial Set-up 3. DaiIy Operation
4. Additional
Information
5. Maintenance &
Troubleshooting
6. Safety &
Specifications
5. REGISTER ANY NEW ACTIVATE SYSTEM
COMPONENTS
If the Activate Station and Pods were purchased separately from the Lightspeed
classroom audio system, the new components will need to be registered (paired) with the
audio system for operation.
Please visit the Lightspeed website at www.lightspeed-tek.com/accessregistration to
obtain registration instructions.
6. DOWNLOAD THE MOBILE APP
With your iOS or Android device, visit the App Store or
Google Play to download the “Lightspeed Activate” mobile
app.
Trademark Attribution: Apple, iPhone, iPad and iPod touch are registered trademarks of Apple Inc., registered in the U.S.
and other countries.

14
1. Overview 2. Initial Set-up 3. DaiIy Operation
4. Additional
Information
5. Maintenance &
Troubleshooting
6. Safety &
Specifications
7. PAIR YOUR MOBILE DEVICE TO ACTIVATE
STATION
1. Open the Activate App on your device and make sure Bluetooth is turned on.
2. You will see a set of instructions that will take you through the two pairing
processes.
Activate
3. Begin by pressing the Bluetooth 1 pairing button on the back of your Activate Station
to connect to the Lightspeed system for remote control functionality. Once paired,
any registered Pods, if purchased, will appear on the mobile app.
4. You can now pair to Bluetooth audio. The app will take you through a pairing guide
and will instruct you to go to your mobile device Settings>Bluetooth. Choose your
Activate Station number (ACT_XXXX_BT1) from the list of unpaired devices.
5. Next enter the pin #0000 to complete the pairing process.
6. Press the pair button within the app when prompted. The device should now show as
connected.
7. Return to the Activate mobile app. It will take you through a tutorial on how to use
the various functions, including some additional functions available only through the
app.
8. If there is a second Flexmike for team teaching, repeat the above process with a
second mobile device and press the Bluetooth 2 button on the back of the Activate
Station.
Bluetooth 1 pairing button

15
1. Overview 2. Initial Set-up 3. DaiIy Operation
4. Additional
Information
5. Maintenance &
Troubleshooting
6. Safety &
Specifications
Initial Setup
• Locate the earbud lanyard
• Hang your Flexmike on the lanyard opposite the
magnetic clasp.
8. SET UP THE FLEXMIKE + EARBUD
1 2
• Plug the earbud into the headphone connection on
the Flexmike.
• NOTE: if you prefer to wear the earbud in your le
ear:
- Turn the lanyard around so the earbud goes up
to your le ear.
- Route the plug around the back side of the
microphone to plug into the headphone jack.
Wearing the Flexmike + Earbud Lanyard
• The earbud can be worn in either ear depending on
how the lanyard is connected to your Flexmike.
• Place the lanyard and microphone around your
neck, connecting the magnetic clasps behind your
neck.
• Insert the earbud into your ear
• If the earbud cable does not seem long enough to
comfortably fit your ear, unwind it from the lanyard
2-3 coils.

16
1. Overview 2. Initial Set-up 3. DaiIy Operation
4. Additional
Information
5. Maintenance &
Troubleshooting
6. Safety &
Specifications
The Pods should be placed in the middle of student groups or learning stations as
follows:
• Placed on a stable, flat surface
• Within 3-6 feet of all students in that group
• Top surface of the speaker should be clear with nothing set on top to ensure
optimum sound quality and microphone pickup.
9. SET THE PODS OUT IN THE CLASSROOM

17
1. Overview 2. Initial Set-up 3. DaiIy Operation
4. Additional
Information
5. Maintenance &
Troubleshooting
6. Safety &
Specifications
1. From your mobile device, open the Lightspeed Activate App.
2. Select the classroom speaker and begin speaking into your microphone. You should
hear your voice at a comfortable, but not loud volume level. Tap the mute button to
ensure that is working properly. The microphone icon on the app and the power light
on the Flexmike will both turn red.
3. Select Pod #1. Note that it takes approximately 1.5-2 seconds to connect - the button
will blink and you will hear a tone in your earbud to confirm that Pod is live. Begin
speaking and confirm that your voice is coming through that Pod. You should also
be able to hear audio in your earbud. If possible, have another person sit next to and
speak into the Pod. Try muting your microphone to just monitor the conversation.
4. Try selecting each of other Pods to make sure they are all properly connected to the
system.
5. Enable Pod to Class sharing by swiping one of the Pods to the class speaker icon. This
allows a student to pick up the Pod and speak into it like a microphone to present
to the class. The student’s voice will be amplified by the class speaker, allowing all
students to clearly understand. Note that the teacher’s microphone can also be live
or muted during student sharing.
6. Try capturing a video. Press the Record tab. The camera on your device will be
activated. You should see a headphone icon on the lower le hand side of the screen
to indicate a bluetooth audio connection is active. To record just your microphone,
select the class icon. To record a student conversation, select the specific Pod to
record that audio.
7. Press the red recording button to start the recording. Make sure you or another
individual is speaking into the microphone and/or selected Pod. Aer several
seconds, press the red stop button to end the recording
8. Review the video. You can either click on the thumbnail for the video you just
recorded, or click on the Library tab to pull up a list of your recordings. Select the
video and press play. By default, the audio will play back directly to your earpiece. If
you wish to play the audio back through the class speaker or an individual Pod, un-
mute the microphone and select the desired audio source from the control arc. Make
sure you can hear the appropriate audio you were attempting to record.
9. That covers the general functionality of the system. Please refer to the tutorial in the
mobile app and additional sections in this user manual for more detailed operation.
10. TEST GENERAL SYSTEM OPERATION

18
1. Overview 2. Initial Set-up 3. DaiIy Operation
4. Additional
Information
5. Maintenance &
Troubleshooting
6. Safety &
Specifications
11. SETTING SYSTEM VOLUME LEVELS
To allow for maximum flexibility, the Flexmike, Pods and classroom audio system all have
independent volume controls. To set the proper volume for your classroom, place the
microphone around your neck and take the following steps:
Flexmike Volume (classroom speaker and Pods)
To adjust, use the up/down buttons on the Flexmike.
1. Select an individual Pod and begin speaking in a normal voice.
2. The volume should be at a level that the kids seated around the Pod can clearly hear,
but not so loud that other nearby groups could hear.
3. Press the class button to turn on the classroom speaker and speak in a normal voice.
4. The volume should be at a level that the kids can clearly hear from the other side of
the room. You should just barely be able to hear your
own voice.
NOTE: at proper volume levels, there should not be
any “feedback” or squealing from the speaker outside
of 2-3 feet. If there is, turn the Flexmike volume down
slightly.
Pod Speaker Volume
Volume
up/down
1. The speaker volume of each individual Pod can be
adjusted using the up/down buttons on the Pod.
2. The default volume setting is at the center point or “0”.
The Pods can be adjusted 5 “steps” up or down to a
maximum of 5 and a minimum of -5.
3. Press the up/down buttons to adjust the speaker volume
level as desired.
Pod to Class Volume
1. Enable “Pod to Class” sharing mode by swiping Pod #1 to
the class icon on the mobile app.
2. With the teacher’s Flexmike muted, hold Pod #1 and
begin speaking, keeping it 3-4” from your mouth.
3. The volume should be at a level to just hear your own
voice, but loud enough to enable kids on the other side
of the room to clearly hear you (it is helpful to have
another person in the room to verify).
4. Press the volume tab and adjust the Pod to class volume
on the app to optimize the level.
NOTE: Check the Pod sharing volume level at the Pod
nearest the classroom speaker to verify there is no
“feedback” or squealing. If there is, turn down the volume
slightly.

19
1. Overview 2. Initial Set-up 3. DaiIy Operation
4. Additional
Information
5. Maintenance &
Troubleshooting
6. Safety &
Specifications
ACTIVATE STATION: OUTPUT TO ASSISTIVE
LISTENING DEVICE (ALD)
1. Turn the Audio Out volume control
on the Activate front panel all the way
down.
2. Determine the size and type of audio
input jack on the device as many
manufacturers’ products
dier in connector size and shape.
Most personal FM transmitters
require a 3.5mm to 3.5mm patch
cable (part# MSC3535).
3. Connect a patch cable from the ALD’s
microphone jack or AUX input to the
3.5mm audio jack labeled “ALD” on
the back of the Activate.
4. With the Access system and ALD
turned on, speak into the Flexmike
and slowly adjust the AUDIO OUT
volume control on the Activate
until the appropriate audio level
is attained in the ALD receiver’s
headphones.
5. It may be necessary to adjust the
volume on the Personal FM receiver
to achieve appropriate volume level.
ALD Transmitter

20
1. Overview 2. Initial Set-up 3. DaiIy Operation
4. Additional
Information
5. Maintenance &
Troubleshooting
6. Safety &
Specifications
2. Remove the Pods from Activate Station and
place them on the group tables.
• Note the location of the Pod numbers.
3. Open the Lightspeed Activate app on your
mobile device and begin instruction. Use the
app to:
• Address the whole class
• Monitor and Instruct small groups
• Activate student group sharing
• Capture an audio/video recording
• Take classroom photos
• Adjust volume levels
SECTION 3:
DAILY OPERATION
INSTRUCTIONS
1. Remove the Flexmike from the charger and put it on.
• The microphone will default to the Mute position; the
microphone status light will turn to red.
• Place the microphone around your neck and insert the
earbud.
• Press the power/mute button. The microphone status
light will turn blue, indicating the microphone is active.
Power /
Mute
/