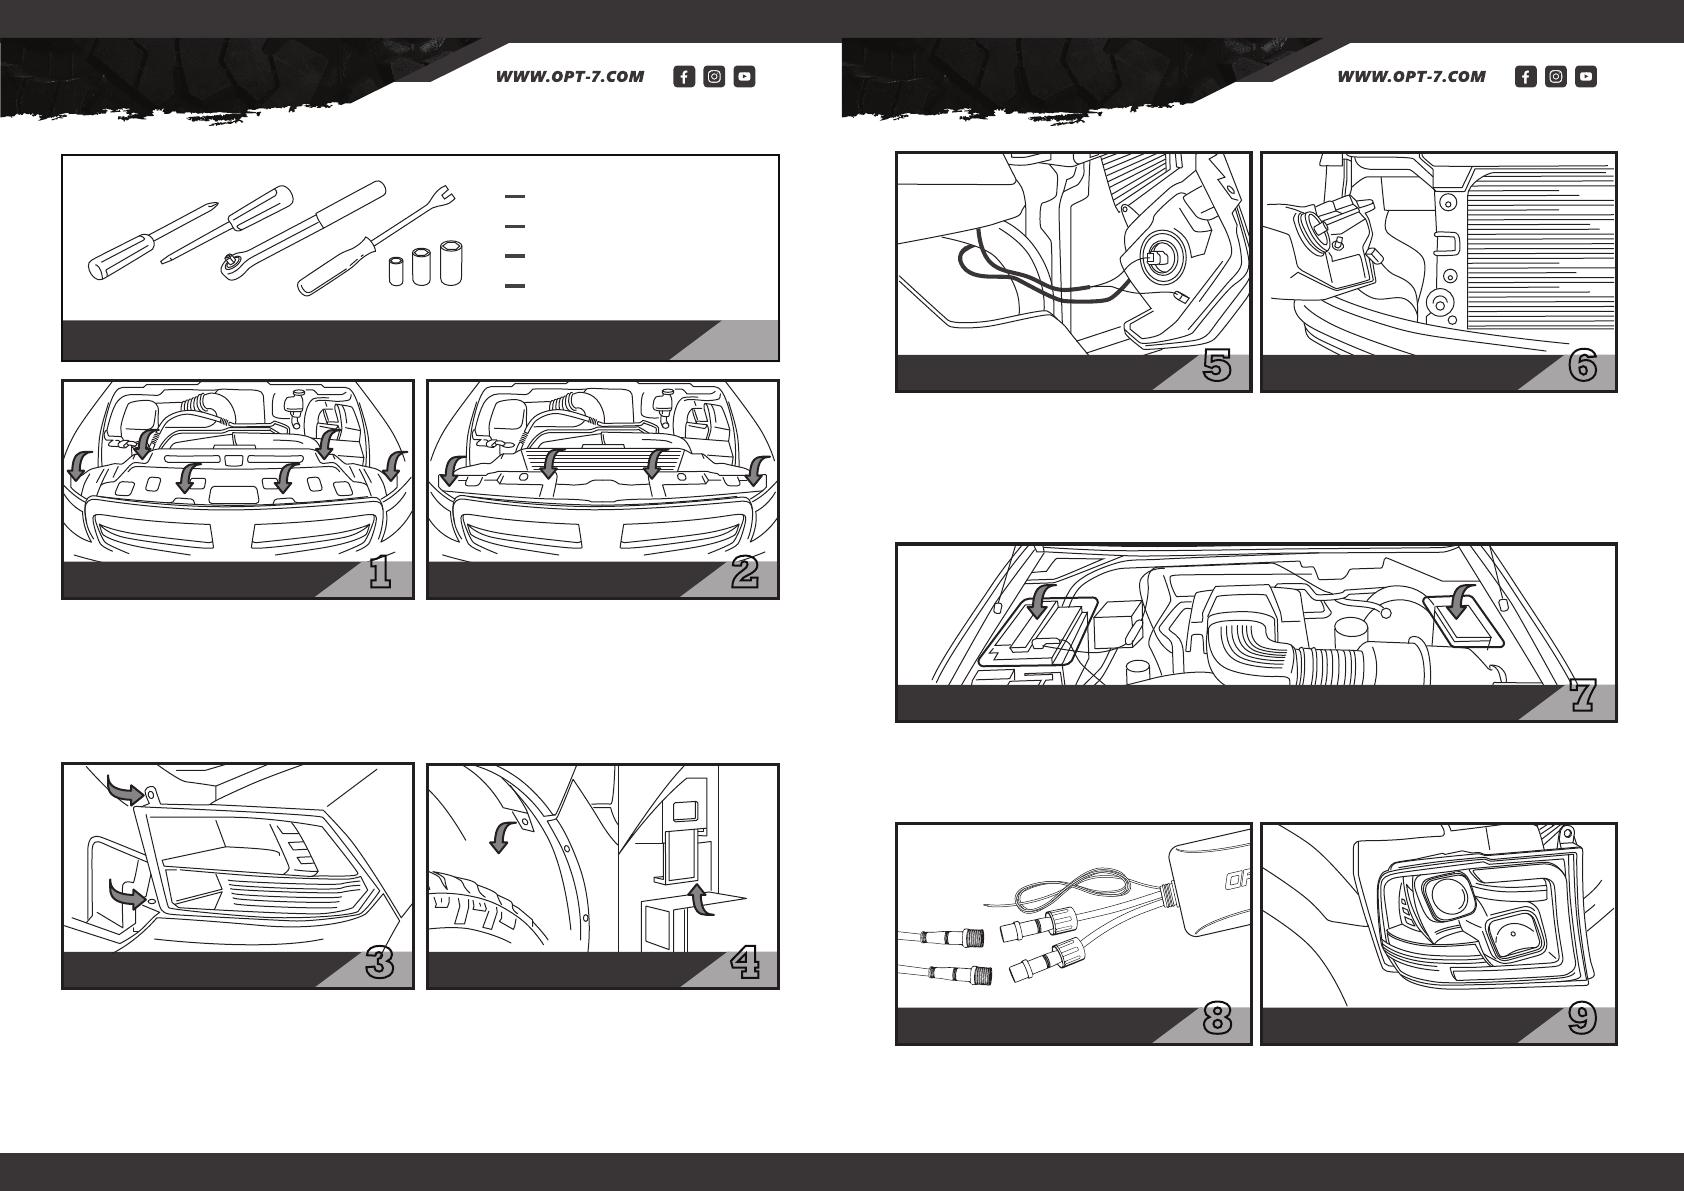
2009 to 2018 Dodge Ram RGBW Bluetooth Headlights

OPT7 2009 to 2018 Dodge Ram RGBW Bluetooth Headlights Installation guide

  • Hello! I've reviewed the Installation Manual for OPT7 RGBW Bluetooth Headlights designed for 2009-2018 Dodge Ram vehicles. This manual provides step-by-step instructions for installing the new headlights, connecting the Bluetooth control box, and testing the functionality. The manual also includes a list of necessary tools and components. I'm ready to answer any questions you have about the installation or the product's features.
  • What is included in the package?
    What tools are needed for installation?
    Where do I connect the control box's power wire?
CONNECTED
ON
WHITE
RANDOM
BRIGHTNESS
SOLID
DOOR
ASSIST
OFF
STEP 10 STEP 11
INSTALLATION
Reinstall the 10mm bolts (2X) to secure
the new headlight as shown in Figure 10.
Test out your headlights using the OPT7
App.
OPT7 Lighting is not liable for damages or personal injuries while installing this
product. The Installation Guide is intended as assistance to reduce setup time.
OPT7 Lighting assumes no responsibility for improper installation.
If you are unfamiliar with your vehicle or inexperienced with aftermarket upgrades,
please seek professional assistance.
DISCLAIMER
RGBW BLUETOOTH
HEADLIGHTS
2009-2018 DODGE RAM
INSTALLATION
MANUAL
COMPONENTS
HEADLIGHT
HOUSINGS
X2
10FT EXTENSION
CABLE
X1
BLUETOOTH
CONTROL BOX
X
1
HARDWIRE
POWER HARNESS
X1
ACCESSORY KIT
INCLUDING SCOTCHLOKS,
FUSE TAPS, ZIP-TIES
STEP 5STEP 6
STEP 8
STEP 7
STEP 9
REMOVE
PUSH
Remove the plastic fastener to open the
access flap.
Now , let's push the white latch up to
unlock and release the OEM headlight.
Unclip the electrical connectors on the
back of the headlight housing.
Connect the round connector from
the headlight housings to the
control box.
Reattach the electrical connectors to
the new headlight housing.
Ensure the wires are tied up securely
to ensure wires are organized and
store away from any metal surface.
Line up the headlight housing
mounting tabs and push rearward to
seat it in place.
Install the Aura Control Box by connecting the positive wire for a constant on functionality
(always on when battery is on) or an accessory wire (only on when the vehicle is on) which
can be found in the Fuse Box. Connect the negative wire to a ground wire.
INSTALLATION INSTALLATION
SCREWDRIVERS (+ AND -)
SOCKET WRENCH
SOCKETS
PANEL POPPER
Open the hood.
Please find the 6 points marked in
Figure 1 and remove the plastic
fasteners (6x) from the filler panel.
Remove the filler panel.
STEP 1STEP 2
STEP 3STEP 4
TOOLS NEEDED
Remove the 10mm bolts (4x) from the
grille as shown in Figure 2.
Next, removethegrilleby lifting and
pulling forward.
Remove the 10mm bolts (2X) from the
OEM headlight as shown in Figure 3.
/