Page is loading ...

TracPhone V7
1
PCB Replacement Instructions
TracPhone
®
V7 PCB Replacement Instructions
The following instructions explain how to replace the PCB in a
TracPhone V7.
Tools Required
• #2 Phillips screwdriver
• 7/64" allen wrench or hex driver
• 3/8" nut driver or wrench
• 7/16" open-end wrench
To perform the calibration step in this procedure, the vessel must
remain stationary in calm seas.
IMPORTANT!
Be sure to avoid causing sharp bends in cables when securing or
routing cables in the following procedure. Sharp bends or kinks
in cables can degrade antenna performance.
IMPORTANT!
The PCB is static-sensitive. Be sure to take proper grounding
precautions before handling (for example, use an ESD wrist
strap).
IMPORTANT!
CAUTION
For your own safety, be sure to disconnect power from all wired
components before performing this procedure.
54-0519 Rev. A

TracPhone V7
2
PCB Replacement Instructions
Step 1 - Replace the PCB
a. Turn off and unplug the modem and control unit.
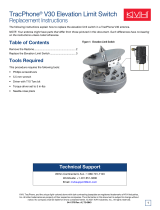
b. Using a #2 Phillips screwdriver, remove the #10-32
screws securing the radome to the baseplate. Carefully
lift the radome straight up until clear of the antenna
assembly and set it aside in a safe place.
Figure 1 Removing the Radome
c. Using a 7/16" open-end wrench, carefully disconnect
the two RF cables from the PCB. To avoid stressing the
cables, hold the top of the connector while loosening.
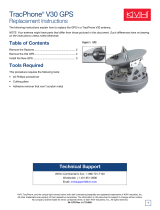
Figure 2 Detaching the PCB Cover
d. Disconnect the GPS cable (RJ11) from the PCB.
e. Using a #2 Phillips screwdriver, remove the three
#10-32 screws securing the top of the PCB cover to the
antenna frame.
#10-32 Screw
RF Cable (x2)
#10-32 Screw (x3)
GPS Cable
#10-32 Lock Nut and
Flat Washer (x3)
Right-angle
connector

TracPhone V7
3
PCB Replacement Instructions
f. Using a 3/8" nut driver or wrench, remove the three
#10-32 lock nuts and flat washers securing the bottom
of the PCB cover to the antenna frame. Remove the
cover.
NOTE: Be sure to handle the cover carefully to avoid damaging or
dislodging PCB components.
g. Carefully disconnect the eight wire connectors from the
PCB.
Figure 3 Removing the PCB
h. Using a 7/64" allen wrench or hex driver, remove the
nine #6-32 socket-head cap screws securing the PCB to
the antenna frame (see Figure 3). Remove the PCB.
i. Attach the replacement PCB with nine new #6-32
screws (supplied in the kit).
j. Reconnect all eight wire connectors.
k. Carefully reattach the PCB cover.
l. Reconnect the GPS and RF cables. Be sure to connect
the cable with the right-angle connector to the left-hand
connector on the PCB (see Figure 2 on page 2).
m. Reinstall the radome.
n. Plug in the modem and control unit.
#6-32 Socket-head
Cap Screw (x9)
Wire Connector (x8)

TracPhone V7
4
PCB Replacement Instructions
Step 2 - Calibrate the Gyro
Follow the steps below to calibrate the gyros for use with the new PCB.
a. Apply power to the TracPhone V7 modem and control
unit and turn on the system. Wait five minutes for
system startup.
b. Using the control unit, press MENUS until the
display shows “DIAGNOSTICS.”
c. Press ACCEPT to enter the Diagnostics menu.
d. Press CHANGE until the display shows “CAL
GYRO= YES.”
To perform this calibration, the vessel must remain stationary in
calm seas.
IMPORTANT!
DIAGNOSTICS
NEXT MENU ACCEPT
ENTERING DIAGNOSTICS
CAL GYRO= NO
NEXT ITEM CHANGE
CAL GYRO= YES?
CHANGE ACCEPT

TracPhone V7
5
PCB Replacement Instructions
e. Press ACCEPT to start gyro calibration.
f. Verify that the azimuth (AZ), elevation (EL), and skew
gyros all pass (“P”). If any gyro fails (“F”), retry the
calibration. If it continues to fail, please contact KVH
Technical Support.
g. Once the gyros are calibrated, the antenna restarts. Wait
five minutes for system startup.
The PCB replacement process is complete!
DO NOT MOVE VESSEL
DURING CALIBRATION
CALIBRATING GYROS
AZ: EL: SKEW:
CALIBRATING GYROS
AZ:P EL:P SKEW:P
/