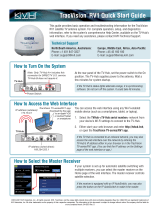
TracVision M3/M2 User’s Guide
16
Chapter 2 - Operation
Switching Satellites
If your TracVision system is set up to track multiple satellites, you can
easily switch between them. For normal operation, keep the system set
to Automatic satellite switching (factory default). If you wish to
manually switch between satellites, see “Changing the Satellite
Switching Mode” on page 49.
You can identify the current satellite
switching method by the format of the status screen:
TIP: Use Automatic switching for normal operation. Manual switching is
generally used for troubleshooting only.
Automatic Satellite Switching
If your system is set up for automatic switching, the antenna
automatically switches satellites as you change channels using the
receiver’s remote control. The antenna also automatically selects the
correct signal polarization and band for the selected channel.
Manual Satellite Switching
If you selected Manual switching, follow the steps below to use the
interface box to switch between satellites. You will also need to select
the correct polarization and band for the desired channel.
1. Press CHANGE until the display shows the desired
satellite.
Status Screen Example Satellite Switching Method
Automatic
Manual
ASTRA1 HH
PUSH TO SWITCH SAT
SATELLITE= HOTBIRD?
CHANGE ACCEPT