Page is loading ...

www.swellpro.com
User Manual V2.2

Thank you for purchasing the SwellPro Spry. We have designed and manufactured the Spry
to the highest quality standards. With proper care and maintenance you should enjoy your
drone for many years.
It is important to familiarize yourself with the features of this unique drone by carefully
studying this manual and particularly the prioirity sections indicated in the Table of Contents.
Please Note: Check www.swellpro.com for the latest manuals, software and tips. Refer to the
Version Information section at the end of this manual which details additions and corrections
to this manual.
Icons Used in This Manual
Prohibited Important Notice Operating Tip
Reading Notes
Register your Product Warranty
Other Information
Visit and subscribe to SwellPro’s YouTube channel for instructional videos and product
information
Please ensure you register your product as soon as
possible to ensure warranty coverage.
www.swellpro.com/
Read first
www.facebook.com/swellpro/

©2018 SwellPro All Rights Reserved
03
Contents
Reading Notes
Product Overview
Brief Introduction
Highlighted Functions
Safety Operation Guidelines
Disclaimer And Warning
Drone Illustrations
Remote Controller Illustrations
FPV Screen
About the Drone
Flight Modes
Return Home
Drone Indication Lights
Propellers
Micro SD Card Installation
Battery
Battery Installation
Low Battery Alarm
Low temperature precautions
Remote Controller
Charging Remote Controller Battery
Low Battery Alarm
Remote Controller Operation
Remote Controller Pairing
Camera
Camera
Camera Settings and Use
05
05
05
06
06
07
08
09
09
10
11
12
12
13
14
14
15
15
15
15
16
16
18
02
19
19
19

©2018 SwellPro All Rights Reserved
04
Flight
Introducing you to Flying a Drone
Flying the Spry
Flight Restrictions
Preparation Before your First Flight (or in a new location)
Accelerometer (Gyroscope) Calibration
Compass Calibration
Starting / Stopping the Motors
Basic Flight Steps
Water Take-ofs and Landings
Power-Flip
Take-ofs and Landings from a Boat
APP Control
How to Use
Tap to Fly
Flight Path Setting
Appendix
Specifications
Warranty Information
FLIGHT BATTERY -Safety Guideline
Safety Operation Guideline & Disclaimer and Warning
Safe Operation Guidelines
Disclaimer and Warning
Version Information
21
21
21
21
22
22
23
23
24
25
25
25
26
26
27
28
29
29
30
31
34
34
37
38

©2018 SwellPro All Rights Reserved
05
Brief Introduction
Spry is the first-ever compact & portable waterproof sports drone.
Its fully waterproof fuselage and built-in camera helps you capture photos and 4K/30fps video
in all weather conditions. The competitive power system allows you to experience high speed
flight over water - enjoying true freedom.
1. The Spry fuselage and remote controller are waterproof and suitable for all-weather,
all-terrain cruising.
2. The aerodynamic shape of the whole drone is designed to effectively minimize wind
resistance and improve flight speed.
3. Spry's camera uses a Sony 1 / 2.3 inch CMOS sensor matched to a lens that minimizes fisheye
distortion to obtain natural-looking scenes. Use your Spry to record stunning 4K video at 30
frames per second or take high-definition 12MP photos.
4. Adjustable lens angle: The Sprys camera can be tilted up and down with the remote controller
to frame your videos better.
5. Optional electronic stabilization system helps ensure smoother footage.
6. The Spry 4K waterproof camera is sealed in an optical glass dome to protect the camera lens
from damage. The specially designed dome has high transparency without distortion and also
helps avoid excessive glare.
7. Intelligent Follow Me: The Spry uses a built-in motion algorithm to follow the position of the
remote controller. The follow me functions supports leading or following camera positions.
8. Target orbit: the Spry can perform an autonomous orbit around a moving object.
9. Auto return: The Spry constantly monitors the location of the remote controller so that it can
return to the last-known position of the pilot in case of radio interference or a return-home
command.
10. APP smart control: One Key Take Off | Point to Fly | Orbit Fly | Auto Return | Flight Path
Settings
11. Easy to use.
This section introduces the various drone functions, how to assemble the drone, the various part
names of the drone, and its remote controller.
Product Overview
Highlighted Functions

©2018 SwellPro All Rights Reserved
06
- Please make sure you have a comprehensive understanding of the Spry and all the necessary
measures required to implement a successful return home function in the event of an
emergency.
- Please be well prepared before each flight, charge batteries and understand the flying area.
- Please follow local laws and be aware of NO-FLY ZONES and other restrictions.
- It is your duty to comply with the local laws regarding privacy protection.
- Do not fly around objects that may emit strong magnetic fields such as radio masts, electricity
towers, high-voltage transmission lines, transformer substations, radar and large metal
structures.
- Do not fly the Spry under the influence of alcohol, drugs or any other physical or mental
impediment.
- Don't fly the drone if it is damaged or malfunctioning.
- Always fly a drone away from crowds.
Safety Operation Guidelines
This product is not a toy, and should only be operated by persons over the
age of 18. Please keep it out of reach of children, and pay particular
attention to the possible scenarios of children unexpectedly appearing
during ight operations.
Disclaimer and Warning
Be sure to read this document carefully before using the product to fully understand your
legal rights, responsibilities and safety instructions. Failure to do so may cause property
damage, accidents and personal injury. Once this product is used, it is deemed that you have
understood, recognized and have accepted all the terms and conditions of this statement.
The user is responsible for all the consequences of his actions and the use of the product. The
user agrees to use the product for his sole & legal purpose, and agrees with the terms &
conditions of this agreement, and other relevant policies & guidelines that may be specified
by SwellPro.
Under the maximum permission by law and approved circumstances, SwellPro is exempt of
liability for any indirect, punitive, consequential, special or criminal damages, including the
purchase cost, or for loss of income due to the loss of use of the drone.

©2018 SwellPro All Rights Reserved
07
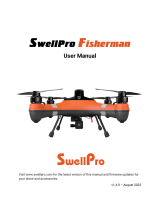
[01] Camera Lens Cover
[02] Rubber Feet
[03] Drone Nose Lights
[04] CCW Propeller
[05] CCW Motor
[06] CCW Propeller Nut
[07] Drone Status Lights
[08] CW Motor
[09] CW Propeller Nut
[10] CW Propeller
[11] Power Button
[12] GPS pod
Drone Illustration
[01]
[03]
[04]
[05]
[06]
[07]
[08]
[09]
[10]
[12]
[11]
[02]
[02]
[02]
[04]
[06]
[14]
[13]
[15]
[16]
[05]
[07]
[02]
[03]
[08]
[10]
[09]
[13] Battery Cover
[14] Ventilate Film
[15] Battery Cover Lock
[16] Battery Cover Mount
SwellPro reserves all rights for final interpretation.
SwellPro is exempt from the user's liabilities for damage(s) to person/s or property, or
injuries incurred directly or indirectly from the use of this product.

©2018 SwellPro All Rights Reserved
08
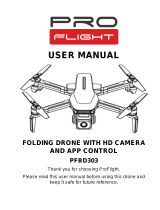
[01] 2.4G Remote Antenna
For drone control signal
[02] Return-Home Switch
Commands the drone
to return automatically
[03] Camera Tilt Down Button
Tilts the camera down
[04] Follow Me Button
Controls the drone o follow
the remote controller
[05] Power Button + Controller
Status Light
Press and hold to power on
the remote controller.
The button will glow to indicate
remote controller status.
[06] Left Joystick
Control the drone’s ascent (up),
descent (down) and/or to rotate
the aircraft nose left or right.
[07] FPV Channel Button
Press and hold to search for the
best FPV channel
[08] FPV Screen
Displays flight data and FPV video
[09] Hanger Ring
Attachment point for neck
lanyard
[10]
[11] Camera Button
Used for controlling Video
and Photo functions.
[12] Camera Up Button
Tilts the camera up
[13] Flight Mode Switch
GPS / Circle / ATTI
[14] 5.8G FPV Antenna
Receives FPV live video
5.8GHz
[15] USB Port
For charging the remote
controller battery and
performing firmware
upgrades
Remote Controller Illustration
[01]
[03]
[02]
[04]
[05]
[06]
[07]
[15]
[09]
[08]
[10]
[11]
[12]
[13]
[14]
Before powering on the controller, please be sure to put all the toggle switches on the controller in the up
position.
Note: The default remote control configuration is left hand as throttle. If you prefer to have right hand throttle, please
consult your local dealer.
Right joystick
Controls the drone direction
of flight

©2018 SwellPro All Rights Reserved
09
This section introduces the drone and its functions.
About the drone
P +02
R -01
M
O
D
T
:GPS
:049
:096
H
R
332
N
15
03.90
H
0000
+0.0
00.0
00.00
12.3
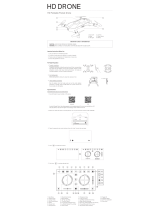
FPV Screen
Display Interface
If [04] and [09] both point in the same direction, the drone is flying towards to remote controller/home
point.
[01] GPS satellites tracked
[02] Angle of aircraft pitch
[03] Angle of aircraft roll
[04] Flight direction
[05] Flight speed
[06] Flight time
[07] Drone battery voltage
[08] Distance from the take off point
[09] Home point direction relative to drone
[10] Vertical height
[11] Vertical speed
[12] Remote controller signal strength
[13] Current throttle
[14] Flight mode
[15] Compass bearing
[16] Flight attitude
[01]
[04]
[05]
[06]
[07]
[10]
[11]
[12]
[13]
[14]
[15]
[9]
[8]
[16]
[03]
[02]

©2018 SwellPro All Rights Reserved
10
The Spry utilizes a brand new flight control system which incorporates 5 of the best flight modes.
GPS mode:
This mode uses the GPS module to achieve accurate and stabilized hovering, braking, intelligent
flight, intelligent return and other intelligent flight mode functions. In this mode, maximum flight speed is
10m/s, maximum ascent speed is 4m/s, and maximum descent speed is 4m/s.
Circle mode:
The drone moves 10m from its current location and begins to circle with a radius of 10m with
the nose always facing the origin. During circling, the right-hand joystick controls the speed and size of the
orbit. Push up to increase the radius of the orbit, push down to reduce the radius of the circle (minimum
radius 10m), push the joystick left to speed up the orbit or push it right to slow down the orbit. If you
continue to reduce the orbit speed, the drone with change the direction of orbit and start to increase the
orbit speed.
ATTI mode:
This is a more advanced flight mode which does not use the GPS positioning function but still
maintains altitude stabilization. The drone will drift with any wind when hovering and will not brake when
the joysticks are released.
Follow Me:
The remote controller has an inbuilt GPS module, and the Follow Me mode is based on the
relative position of this GPS module to the drone. The maximum Follow Me speed is 10 m/s (36 KM/H).
Auto-Return:
The aircraft has a one-key return function as well as an auto-return if radio contact with the
remote controller is lost. When the remote control and GPS signal are good, the aircraft can be commanded
to automatically return to the current remote control position.
Flight Modes
In the GPS mode, the drone will not arm unless there are sufficient satellites to establish the home
point. This point is used if the drone cannot establish the location of the remote controller.
In ATTI mode, the drone’s top speed is faster than in GPS mode. When flying in a calm environment, the
pilot should allow a minimum of 30 meters for braking distance to ensure flight safety.
In Follow Me mode, the joysticks are disabled. Press and hold the Follow Me button again to cancel
Follow Me - the Controller Status Light will flash red confirming Follow Me mode has been cancelled
and joystick function has been restored.
When the speed of the remote controller exceeds 10m/s in Follow Me mode, the Spry will stop
following the remote controller and remain hovering in place.
If the GPS module in the remote controller does not have an accurate fix the Controller Status light will
flash red, Follow Me cannot be started.

©2018 SwellPro All Rights Reserved
11
The drone has two return home modes - automatic and manual return home. Since the Spry remote
controller has a built-in GPS module, the remote controller constantly sends the Spry its location so that the
drone can return to the pilot even if they have moved from the take-off point. If the drone loses contact with
the remote control for any reason, then the drone will automatically return to the last known location of the
remote controller. Manual return home can also be initiated with the remote controller.
When returning home, the Spry will wait and hover 30m from the remote controller to allow the pilot to take
control of the landing if necessary.
Return Home
One Key Return Home Function
Description
Remote Control Operation
Press and hold the Return Home switch for 2 seconds, the system will
beep and start the return process. At this point, the aircraft will
auto-return to the remote controller . “RTH” is displayed in the upper
right corner of the remote control screen.
To cancel the Return Home process, press and hold the Return Home
switch for 2 seconds, the system will beep and cancel the return process
Vertical height > 20metres, the drone will maintain its altitude and
return to its home point.
Vertical height < 20metres, horizontal distance > 15metres, the drone
will ascend up to 20metres, and then return to its home point.
Return Process
Description
Flare Maneuver
Return Home
If the drone experiences a loss of GPS signal, the Return Home function is temporarily unavailable. The
aircraft will hover in place until either control is restored or automatic low-battery landing takes place.
During automatic Return Home, when the remote control signal is restored, switch the Flight Mode
briefly between GPS and ATTI mode to take control of the drone and cancel automatic return.

©2018 SwellPro All Rights Reserved
12
Propellers
The fuselage of the drone includes a pair of Drone Nose Lights and Drone Status Lights on the rear arms.
Their positions are shown below:
The Red Drone Nose Lights are used to indicate the direction of the nose of the drone, they will be solid red
when the drone is powered on. The rear Drone Status Lights are green and indicate the status of the current
flight control system. Please refer to the following table for the different flash modes for the Drone Nose and
Status Lights.
Drone Indication Lights
Drone Nose and Status Light Messages
Aircraft initialization / horizontal calibration:
Drone power on/o
Alternating Red, Green slow flashing Aircraft initializing / horizontal calibration
Red Drone Nose Lights
Green Status lights
Green Status lights
GPS Status
Green Slow Flashing
Green ON
Poor GPS signal
Good GPS signal
Compass Calibration
Green Fast Flashing
Green Slow Flashing
Horizontal calibration
Vertical calibration
Red Fast Flashing Remote control connected but still locked
Low Battery Warning
Red Fast Flashing Low battery warning
Red ON
Remote control connected and drone unlocked
Remote controller signal
Red Slow Flashing Remote controller signal lost
Spry comes standard with 6" 2-bladed propellers and is also compatible with 5” 3-bladed propellers. The 2
blade speed is relatively slow, but the flight time is longer than the 3 blade. You can choose the propellers
to suit your requirements.

©2018 SwellPro All Rights Reserved
13
Installing and removing the propellers:
When selecting a microSD card for use with your camera, for best results always ensure that the card is rated
for 4K video throughput.
To insert the card, place the microSD card face-up in the recess inside the battery compartment. Carefully
slide the card towards the nose of the Spry until it clicks and locks into place.
To remove the card, push the card gently towards the nose of the Spry until it clicks and then ejects. Take care
to prevent the card from ejecting too fast out of the slot.
Micro SD Card Installation
The blades are sharp. Be careful to avoid personal injury.
Before each fight, check that the propellers are in good condition and securely fastened
If a propeller becomes damaged, or broken, replace it before further flights. Propellers can be
purchased separately.
Please do not get too close to the rotating propellers and motors, to avoid cuts or injury
Drone nose
CW propeller 6045R
CCW propeller 6045 CW propeller 6045R
CCW propeller 6045
1. To facilitate the installation and removal of the propellers, use the included tools. (The large
wrench holds the motor and the small wrench is used for the propeller lock nuts.)
2. The arrows indicates the mounting direction of the propellers. Note, that the locking nuts
for each propeller are tightened in the opposite direction to the direction of the propeller.

©2018 SwellPro All Rights Reserved
14
The Spry is supplied with a high-voltage lithium battery (LiHV) and a corresponding charger.
To charge the drone battery: Plug in the charger. After 3 seconds, its four status lights will flash left and right
indicating the charger is ready. Connect the battery to the charger using the supplied adapter cable. The
larger plug on the cable is inserted into the top port of the charger. The plugs are designed to prevent them
being inserted incorrectly.
After the battery is connected, the four battery status indicators show the level of charge: 25%, 50%, 75%,
and 100%. When all 4 lights are solid ON, the battery is fully charged.
Battery
a) Twist open the battery hatch lock. Grasp the forward end of the battery cover with the
provided tool and pull the battery cover up.
b) Insert the battery vertically into the drone with the contacts towards the back of the drone
and press down until it is properly seated.
Battery Installation
Note: If the four indicators flash at the same time, the charger or battery is faulty. Stop
charging and check all connections.

©2018 SwellPro All Rights Reserved
15
This section introduces the remote controller functions, including the drone operation and the camera
operation.
Remote Controller
Charging Remote Controller Battery
Low Battery Alarm
c) Check that the seals on the cover are clean and lightly lubricated. Insert the back of the cover
first and then press down on the cover to seal the battery compartment. Twist the battery
hatch lock to secure the cover.
Note: During flight when the voltage warning appears on the remote controller screen, prepare to
return and land the drone as soon as possible.
When the drone battery voltage drops to a low level (10.9V), the Drone Nose Lights will fast-flash red. The
pilot will simultaneously receive warnings from the remote controller. The screen will display “Aircraft Low
Battery” and the controller will beep and vibrate. Find a suitable place to land as soon as possible. If the
aircraft voltage drops to 10.7V, the aircraft will slowly and automatically land in place.
During auto-landing, the pilot can use the remote controller to alter the landing site, but this should be done
within one minute or the battery will be over-discharged and the drone may crash.
1. In low temperature environments (-10C degrees to 5C degrees) , flight time will be reduced.
Ensure batteries are fully charged and kept warm (20~30C) before use.
2. Also be aware that the low battery warnings will provide less warning time, so land the drone
as soon as the first battery warning appears.
Low temperature precautions

©2018 SwellPro All Rights Reserved
16
Low Battery Alarm
The Spry remote controller has a built-in battery and charging circuit. Charge the controller using the
supplied micro-USB cable and a regular 5V /2A USB charger. Some USB ports cannot provide 2 amps (2A) of
power. These ports can still be used to charge but the charging time will be longer. Normal charging time is
~90 minutes.
During charging, the remote controllers power button will glow blue. When charging is complete the blue
light will turn off. Charging is possible during flight if necessary, but the remote must be connected to the
drone before connecting the charging cable.
The remote control has a built-in lithium battery and the operating time is about 2 hours. When the remote
controller battery is low, the remote control will beep and the battery power icon in the upper right corner
of the screen will be red. The remote control will then have approximately 10 minutes of power left. It is best
to return the drone and land as soon as possible or plug in the controller to charge the battery.
The Spry Remote Controller operates using two frequency bands, 2.4GHz and 5.8GHz. The 2.4GHz band is
used for drone control and 5.8GHz is for the FPV video signal. The remote control has a built-in 4.3-inch FPV
screen that displays real-time images and flight data of the aircraft.
Remote Controller Operation
Power ON and Power OFF
One Key Return Home
DescriptionRemote Control Operation
DescriptionRemote Control Operation
Power on: Long-press the power button for 3 seconds, the remote
controller will vibrate, beep and screen will turn on.
Power off:
Long-press the power button again for 3 seconds to turn off
the remote control.
On:
Long-press the Return Home switch until the the controller beeps.
The aircraft enters the return state, and the FPV screen will display “RTH”.
Cancel Return Home:
Long-press the Return Home switch until the
controller beeps.
Return Home

©2018 SwellPro All Rights Reserved
17
Please contact us if you need to change to right hand throttle.
Flight Modes
Follow Me Mode
Follow Me
DescriptionRemote Control Operation
DescriptionRemote Control Operation
Drone Control
Left hand throttle- (American/ European conguration)
GPSGPS mode
Circle FlightOrbit mode
AT TIATTI mode
GPS
Circle Flight
AT TI
In the Follow Me mode, the joysticks are disabled. Long-press the “F” button again to cancel Follow Me
and resume joystick operation.
When the speed of the remote controller exceeds 10m/s during Follow Me operation the Spry will
stop following and hover in place.
If the remote controller’s GPS does not have a fix, the Follow Me function cannot be activated.
Note: In circle mode, the aircraft can fly around a moving object as long as the speed of moving
objects is less than 4 m/s (15km/h).
When the Controller Status Light is solid green, this indicates that the
GPS of the remote control has a fix and the Follow Me function is
available.
To activate Follow Me
, Long-press the Follow Me button “F” for 2
seconds until a beep sounds. The Controller Status Light will change to
solid red, indicating that the aircraft enters the Follow Me mode.
Long-press the “F" button again for 2 seconds to cancel Follow Me.
Right Stick
Left Stick
U
p
T
u
r
n
R
i
g
h
t
D
o
w
n
T
u
r
n
L
e
f
t
U
p
T
u
r
n
R
i
g
h
t
D
o
w
n
T
u
r
n
L
e
f
t
F
o
r
w
a
r
d
R
i
g
h
t
B
a
c
k
w
a
r
d
L
e
f
t
F
o
r
w
a
r
d
R
i
g
h
t
B
a
c
k
w
a
r
d
L
e
f
t
Green Status light indicates good GPS fix.

©2018 SwellPro All Rights Reserved
18
Remote Controller Pairing
Always pair the remote controller and then select the FPV channel to match the best channels and
avoid interference.
DescriptionRemote Control Operation
FPV Channel Adjust
FPV Chennel Button
DescriptionRemote Control Operation
1. To pair the remote controller to the drone, hold the Return
Home switch down and simultaneously power on the
remote controller.
2. The remote controller will vibrate and beep twice. The
Controller Status Light will flash red and green.
3. Power on the drone. After pairing has completed, the
Controller Status Light will turn green.
4. Long-press the FPV channel button. The FPV screen will
display “RF SEARCHING” and automatically find the best
FPV channel.
There are 8 FPV channels available. Long-press the FPV channel button
(CH) and the system will automatically search for channels.
In the absence of obstacles and interference the flight height can reach >80m and FPV
transmission range can reach 800m.
DescriptionRemote Control Operation
Camera Gimbal Control
Camera up Camera down
Camera up: Tilt camera up
Camera down: Tilt camera down

©2018 SwellPro All Rights Reserved
19
This section introduces camera parameters and use.
Camera
Camera
APP installation: The SwellCam2 app is available for iOS and Andoid devices. Android systems can download
the APK from either the Android market or our website www.swellpro.com.
To connect the app to the Spry’s camera, power on the drone, then press the WiFi switch on the underside
of the drone. The switch will begin flashing Red-Green. Connect your mobile device to the SwellPro... WiFi
hotspot, the password is 00000000.
Spry's built-in camera can capture 4K videos and 12 megapixel still images. With its inbuilt WiFi function you
can also use a mobile app to change settings and download videos and photos.
The Spry will automatically save longer video files into chapter files of 4GB.
Camera Settings and Use
DescriptionRemote Control Operation
Camera Control
Photo/Video
In camera mode :
Long-press the camera button (three beeps) to change camera mode
between photo and video mode.
Short-press the camera button (one beep) to take a photo.
In photo mode, the card icon indicates the remaining number of
photos the
microSD card can hold.
In video mode
:
Long-press the camera button (three beeps) to start or stop video
recording.
With video recording stopped, short press the camera button (one
beep)
to change to photo mode.
In video mode, the card icon indicates the remaining hours and
minutes
(hh:mm) the microSD card can hold.

©2018 SwellPro All Rights Reserved
20
00:05:20
8.5G2016/05/03 17:08
Photo Settings
Picture Size
Burst Speed
Interval Shooting
Selfie-Timer
12M 16: 9 12M 4: 3
OFF 3P/S 5P/S 10P/S
OFF 3s 5s 10s 30s 60s
OFF 2s 10s
Video Settings
Resolution
Electronic Stabilization
Record Format
Video Format
3840x2160 30P 2704x1524 30P 1920x1080 120P/60P/30P 1280x720 240P
ON OFF
MP4 MOV
PAL NTSC
Picture Settings
Video Settings
Camera Settings
Picture Button
Record Button
Playback Button
Record Time
Time Stamp Memory card capacity
Using the APP: Open the camera APP, the screen will show the camera preview. With the APP, you can set the
parameters for photos and video, you can also control the camera on the ground and take photos or videos.
WiFi switch
Turn off the camera's WIFI before flight by pressing the WiFi button.
When the camera is recording video, turning off the drone without first stopping the video will cuase
corruption of the video file. Always stop video recording before powering off the drone.
/