Page is loading ...

1
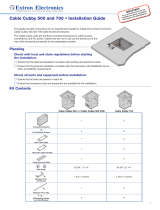
Cable Cubby 1252 MS Lid Tray Kit •
Installation Guide
This guide provides instructions for an experienced technician to install the Extron
Cable Cubby 1252 MS Lid Tray Kit onto the Cable Cubby 1252 MS enclosure. The lid tray
offers a clean nished edge for the lid insert material.
The surface-matching Cable Cubby 1252 MS is a furniture-mounted enclosure for cable access,
connections, and AC power. The Cable Cubby 1252 MS provides the freedom to either match the surface of
the table or use a unique lid design that complements your décor. Unused cables can be stored out of the way while remaining
connected to the presentation system.
Planning
Check all parts and equipment before installation
Ensure that all parts are present in the kit.
Ensure that necessary tools (Phillip’s head screwdriver and, potentially, shims or putty) are available for the installation.
Kit Contents
Part Quantity Part Quantity
Lid tray
1 #4-40 at head lid tray screws
4
#6 at head lid insert
wood screws
4
Preparing the Cable Cubby 1252 MS and Table
See the Cable Cubby 1252 MS Installation Guide for the steps necessary to prepare the Cable Cubby enclosure for installation of
the lid. The lid tray is to be installed in place of the fabricated lid in that guide.
NOTE: If you are surface-matching the table for the lid insert material:
• See “Cutting the Lid Insert Material,” below.
• Make the cut as accurate as possible, the cutout piece can be used for the lid insert to be attached to the lid tray.
Cutting the Lid Insert Material
8.375"
(212.7 mm)
4.25"
0.70" MA
X
(107.9 mm)
(17.75 mm)
(Varying
thickness)
(3.0 mm) Radius Corners
0.12"
(107
.
9
(
3.0 mm
)
Radius
C
orn
0.12"
0.12"
1. Cut a piece of lid insert material to the dimensions shown at
right, as accurately as possible.

2
68-3473-50 Rev. A
10 19
© 2019 Extron Electronics — All rights reserved. www.extron.com All trademarks mentioned are the property of their respective owners.
Worldwide Headquarters: Extron USA West, 1025 E. Ball Road, Anaheim, CA 92805, 800.633.9876
For information on safety guidelines, regulatory compliances, EMI/EMF compatibility,
accessibility, and related topics, see the Extron Safety and Regulatory Compliance
Guide on the Extron website.
Mounting the Lid Insert into the Lid Tray
NOTES:
• Test t the lid insert before securing it in the lid tray.
• The top of the surface material insert should be ush with the top of the lid tray. Shims or putty may be necessary to
level and ush the surface material.
Option 1b: Mount the fabricated lid without
screws
Secure the lid onto the Cable Cubby
using the proper adhesive or putty.
4
Place the lid insert in the tray and ensure a
proper t. If necessary, carefully trim the
lid insert.
If using screws, perform
2
and
3
.
If NOT using screws, perform
4
.
Option 1a: Mount lid insert with scr
ew
Mark and drill four 3/32-inch pilot
holes, 3/8 inch deep.
Secure the lid insert into the lid tray
using four #6 at head wood screws.
1
2
3
Completing the Installation
1. Align the lid tray to the Cable Cubby. The back edge of the lid lines up with the back of the Cable Cubby lid mechanism.
2. Secure the lid tray onto the Cable Cubby using the provided #4 at head lid tray screws.
3. See the Cable Cubby 1252 MS Installation Guide to complete the Cable Cubby assembly and mount the Cable Cubby in the
table.
Extron
/