Regency HDPFTT4824CH Installation guide

Type
Installation guide
Any problems or questions call Regency Ofce Furniture at 1-866-816-9822
IMPORTANT NOTICE:
● Place all wooden parts on a clean and smooth surface such as a rug or carpet to avoid the parts from being scratched.
● Check to be sure that you have all parts and hardware.
● Remove all wrapping materials, including staples & packing straps before you start to assemble.
● Do not tighten all screws/bolts until completely assembled.
● Keep all hardware parts out of reach of children.
MFTT####, MTT####, MSP####, MDP#### - INSTRUCTIONS
Hardware:
J) Screws(6) K) Washers(4) L) Bolts(12) M) Glides(4)
Parts:
A) Top Bracket(2) B) Foot Bracket(2) C) Back Support(2) D) Front Support(2) E) Exterior Leg Cover(2) F) Interior Leg
Cover(2) G) Wire Management Trough (ITEM MTT### ONLY) H) Modesty I) Table Top
NOTE: Back Supports differ from Front Supports with additional holes for modesty attachment.
Organize your parts and hardware. You will need (2) people, a Phillips head screwdriver and a rubber mallet.
A
B C
H
I
J K L M
D
E
F
G
STEP 1: Insert 2 Glides(M) into each of the Foot Brackets(B).
B
M
M
Any problems or questions call Regency Ofce Furniture at 1-866-816-9822
MFTT####, MTT####, MSP####, MDP#### - INSTRUCTIONS
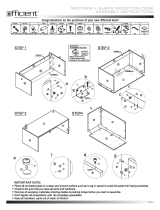
BEFORE STARTING STEP 2A-B, NOTE THE HOLE PLACEMENT IN FIGURE 1.
The set of three holes on each of the Front Supports and Back Supports should face in toward one another.
STEP 2A: Assemble Legs by inserting Back Supports(C) into each Foot Bracket(B).
NOTE: Modesty Holes on Back Supports should face interior side as shown below.
STEP 2B: Now insert the Front Supports(D) into each Foot Bracket(B). Then insert each Top Bracket(A) into the Front
Supports(D) and Back Supports(C). Finally, attach the Foot Brackets(B) and Top Brackets(A) to the Front Supports(D) and Back
Supports(C)with 4 Bolts(L) per Leg.
NOTE: Do not tighten bolts until all bolts have been started.
Left Leg
(interior side)
Right Leg
(interior side)
CC
B
B
Modesty Holes
DD
A A
Figure 1
L L L L
L L L L
STEP 3A: Snap the Interior Leg Cover(F) into Back Support(C) and Front Support(D) using a rubber mallet.
NOTE: Interior Leg Cover is installed on the side with the modesty holes.
STEP 3B: Snap the Exterior Leg Cover(E) into Back Support(C) and Front Support(D) using a rubber mallet.
CD
Modesty Holes
F E DC
Any problems or questions call Regency Ofce Furniture at 1-866-816-9822
MFTT####, MTT####, MSP####, MDP#### - INSTRUCTIONS
STEP 4: Attach Modesty Panel(H)
between legs with lip facing in, using
2 Bolts(L) and 2 Washers(K) for
each side.
L,K
H
L, K
STEP 5: Flip Table Top(I) upside down and align Top Support(A) of legs so there
is an even amount of overhang on the left and right sides. Align the back of the top
support to the back edge of the top. Use 4 Screws(J) to attach legs to top and
2 Screws(J) to attach the Modesty Panel(H) to the table top as well.
J
J
I
A A
STEP 6A: Using (2) people, ip the desk upright.
STEP 6B: ONLY APPLIES FOR ITEM MTT####. Extend the Wire Management Trough(G) and hook onto the Top
Supports(A) on each of the legs.
H
J J
  • Page 1 1
  • Page 2 2
  • Page 3 3

Regency HDPFTT4824CH Installation guide

Type
Installation guide

Ask a question and I''ll find the answer in the document

Finding information in a document is now easier with AI