
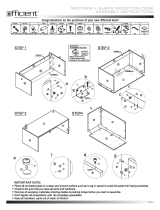
Any problems or questions call Regency Ofce Furniture at 1-866-816-9822
IMPORTANT NOTICE:
● Place all wooden parts on a clean and smooth surface such as a rug or carpet to avoid the parts from being scratched.
● Check to be sure that you have all parts and hardware.
● Remove all wrapping materials, including staples & packing straps before you start to assemble.
● Do not tighten all screws/bolts until completely assembled.
● Keep all hardware parts out of reach of children.
You will need 2 person(s) for this assembly. You will need a Phillips head screw driver.
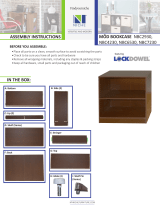
Stand Up Storage Cabinet LSC4136 • INSTRUCTIONS
Parts: O: Left Door • P: Right Door • Q: Bottom Stringer • R: Top Support(2) • S: Bottom • T: Sides(2)
U: Shelf(2) • V: Back
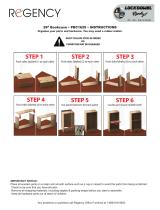
STEP 1 : Insert 1 Cam Pin(A) into Back(V) and connect/
tighten(gure 1) the Bottom(S) to the back. Also connect Bot-
tom Stringer(Q) as shown below.
Figure 1: To open Cam, point
arrow toward Cam Pin hole.
To lock Cam, turn clockwise.
A
B
C
D
R
P
U
Q
T
S
E
F
G
H
I
J
K
L
M N
Hardware :
A: Cam Pin(13) • B: Cam Cap(12) • C: Cam Plug(4) • D: Wood Screw(4) E: Small Screw(32)
F: Hinge(4) G: Hinge Mount(4) • H: Glides(4) • I: Handle(2) • J: Handle Screw(4) K: Shelf Pin(4)
L: Lock Screws(4) • M: Lock Lip • M: Keys(2)
O
V
V
Q
A
V
S

Any problems or questions call Regency Ofce Furniture at 1-866-816-9822
IMPORTANT NOTICE:
● Place all wooden parts on a clean and smooth surface such as a rug or carpet to avoid the parts from being scratched.
● Check to be sure that you have all parts and hardware.
● Remove all wrapping materials, including staples & packing straps before you start to assemble.
● Do not tighten all screws/bolts until completely assembled.
● Keep all hardware parts out of reach of children.
Stand Up Storage Cabinet LSC4136 • INSTRUCTIONS
STEP 2 : Screw in 6 Cam Pins(A) into each Side(T).
You will need 2 person(s) for this assembly. You will need a Phillips head screw driver.
T
A
T
A
A
A
AA A
A
A
A
A A
STEP 3 : Connect Back/Bottom Assembly from step 1
to the Left Side(T). Also connect both Top Supports(R)
to the Left Side(T). Tighten all Cam locks(gure 1).
T
SVRR
STEP 4 : Attach Right Side(T) and tighten all cam
locks(gure 1).
T
STEP 5 : Flip Unit over and attach 4 Glides(H) with 4
Small Screws(E) each Glide. Small Screws should be
drilled into the Sides(T).
STEP 6 : Place 8 Shelf Pins(K) and 2 Shelves(U) in
the locations you desire.

Any problems or questions call Regency Ofce Furniture at 1-866-816-9822
IMPORTANT NOTICE:
● Place all wooden parts on a clean and smooth surface such as a rug or carpet to avoid the parts from being scratched.
● Check to be sure that you have all parts and hardware.
● Remove all wrapping materials, including staples & packing straps before you start to assemble.
● Do not tighten all screws/bolts until completely assembled.
● Keep all hardware parts out of reach of children.
Stand Up Storage Cabinet LSC4136 • INSTRUCTIONS
STEP 7 : Connect 4 Hinges(F) to the Doors(O,P) with
2 Small Screws(E) each hinge. There are holes that
mark the location of the screws to aid in alignment.
You will need 2 person(s) for this assembly. You will need a Phillips head screw driver.
O
P
F
F
F
F
STEP 8 : Connect 4 Hinge Mounts(G) to the Sides(T)
with 2 Small Screws(E) each Mount. Ensure that the
screw on the mounts are toward the back of the unit
when attached.
G G
STEP 9 : Connect 4 Hinge Mounts(G) to the Sides(T)
with 2 Small Screws(E) each Mount. Ensure that the
screw on the mounts are toward the back of the unit
when attached.
STEP 10 : Connect Doors(O,P) to Mounting
Brackets(G) on the Sides(T).
STEP 10A : Screw(10A) from bracket(A)
interlocks with hinge(B) opening just as
screw(10B) on hinge(B) interlocks with mount(A)
opening.
Note..The screw 10B is an adjustment for the door
position. Turn right to adjust door to center and
left to adjust toward the side.
10A
10B
A
B

Any problems or questions call Regency Ofce Furniture at 1-866-816-9822
IMPORTANT NOTICE:
● Place all wooden parts on a clean and smooth surface such as a rug or carpet to avoid the parts from being scratched.
● Check to be sure that you have all parts and hardware.
● Remove all wrapping materials, including staples & packing straps before you start to assemble.
● Do not tighten all screws/bolts until completely assembled.
● Keep all hardware parts out of reach of children.
Stand Up Storage Cabinet LSC4136 • INSTRUCTIONS
STEP 11 : Connect the Handles(I) to the Doors(O,P)
with 2 Handle Screws(J) each handle. The open side
of the handle should face toward the outside of the
unit.
You will need 2 person(s) for this assembly. You will need a Phillips head screw driver.
J
STEP 12 : Close the doors(O,P) and place Lock
Lip(M) on the Top Support(R) centered in relation to
the lock on the Right Door(P). Use two Lock Screws(L)
to attach locking lip ush to the front side of Top Sup-
port. The open side of the Lock Lip should be facing
the back of the unit.
STEP 13 : Place all Cam Caps(B) and Plugs(C) in
place. You are now ready to connect the single/mul-
tiple unit top.
(To connect top see top instructions also enclosed.)
-
 1
1
-
 2
2
-
 3
3
-
 4
4


Ask a question and I''ll find the answer in the document
Finding information in a document is now easier with AI
Related papers
-
Regency LSC2935JV Installation guide
-
-
-
-
-
-
Regency HDPFTT4824CH Installation guide
-
-
-
Other documents
-
 Officient NEOTERIK Assembly Instructions
-
Unbranded 9875MHL Operating instructions
-
 Niche NBC2930WH Installation guide
-
 Niche PBC1629WC Installation guide
-
Regency Seating B61775MOBE Operating instructions
-
ROOMS TO GO 87025055 Assembly Instructions
-
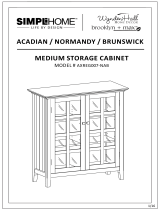
Simpli Home AXWSH003-72-TB Operating instructions
-
-
 Brooklyn + Max BMACA15-GR Installation guide
-
Catskill Craftsmen 15445 Operating instructions


