Page is loading ...

Any problems or questions call Regency Ofce Furniture at 1-866-816-9822
IMPORTANT NOTICE:
● Place all wooden parts on a clean and smooth surface such as a rug or carpet to avoid the parts from being scratched.
● Check to be sure that you have all parts and hardware.
● Remove all wrapping materials, including staples & packing straps before you start to assemble.
● Do not tighten all screws/bolts until completely assembled.
● Keep all hardware parts out of reach of children.
You will need 2 person(s) for this assembly. You will need a Phillips head screw driver.
Stand Up Bookcase LBC4123 • INSTRUCTIONS
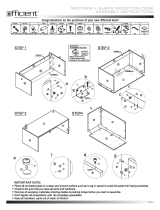
Hardware: A: Cam Pins(13) • B: 12 Cam Caps(12) • C: Wood Screws(4) • D: Shelf Pins(8)
Parts: E: Top Support(2) • F: Bottom Stringer(1) • G: Bottom(1) • H: Back(1) • I: Side(2) J: Shelves(2)
STEP 1 : Connect/tighten(gure 1) the
Bottom Stringer(F).
Figure 1: To open Cam, point
arrow toward Cam Pin hole.
To lock Cam, turn clockwise.
A
B
C
D
E
I
J
F
G
H
G
F
STEP 2 : Lay Back(H) and both Sides(I) down with all holes facing up.
Insert 13 Cam Pins(A) as shown below.
H I I
A
A
A
A
A
A
A
A
A
A
A
A
A

Any problems or questions call Regency Ofce Furniture at 1-866-816-9822
IMPORTANT NOTICE:
● Place all wooden parts on a clean and smooth surface such as a rug or carpet to avoid the parts from being scratched.
● Check to be sure that you have all parts and hardware.
● Remove all wrapping materials, including staples & packing straps before you start to assemble.
● Do not tighten all screws/bolts until completely assembled.
● Keep all hardware parts out of reach of children.
Stand Up Bookcase LBC4123 • INSTRUCTIONS
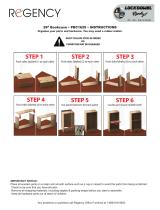
STEP 3 : Connect/Tighten(gure 1) Bottom
Assembly to Back(H).
You will need 2 person(s) for this assembly. You will need a Phillips head screw driver.
H
G
STEP 4: Connect/Tighten(gure 1) Bottom and Back assembly to
the Left Side(I).
STEP 5: Connect/Tighten(gure 1) Top
Supports(E) with cam locks facing down to
Left Side(I).
H
G
I
I
E
E
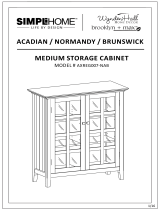
STEP 6: Connect/Tighten(gure 1) Right Side(I) to the
Top Supports(E), Back(H), and Bottom(G). Place all Cam Caps(B)
and position your 8 Shelf Pins(D). You are now ready to insert
shelves and connect the single/multiple unit top.
(To connect top see top instructions also enclosed.)
I
/