Page is loading ...

Screen Innovations
9715-B Burnet Rd, Suite 400 Austin, TX 78758
512.832.6939
www.screeninnovations.com
Solo / Solo Pro
Installation Instructions
Lithium Rechargeable RTS

Thank you for purchasing an SI product. If you
have any questions or need any assistance with
your Solo, we would love to help you.
Technical Support: 512.832.6939
Hours of Support: 7:30am - 5pm CST
screeninnovations.com
support@screeninnovations.com
CONTENTS
Initial Consideration ........................................ Pg 1
Parts in the Box ................................................. Pg 2
Installation .......................................................... Pg 3 - 10
Start Up - Battery ............................................... Pg 11 - 12
Running ................................................................ Pg 13
Programming ..................................................... Pg 13 - 14
Pairing second RF Remote ............................ Pg 15
Storage and Transport .................................... Pg 16 - 19
Care and Maintenance .................................... Pg 20 - 22
Troubleshooting ............................................... Pg 23 - 24
Additional Accessories .................................. Pg 25 - 26
Warranty .............................................................. Pg 27

INITIAL CONSIDERATIONS
Thank you for your purchase of Solo or Solo Pro. The
screen is mountable outdoors, but is not waterproof.
It has not been designed to be run or left in the rain or
condensing humidity. Also avoid water spray, splash
and extreme heat or cold. Protect your Solo or Solo Pro
and you can expect years of quality use. .
For RF controlled projection screens, they operate at
433.42MHz. Minimize or eliminate any sources of RF
interference and shielding. Any metal, wire, or foliage
can reduce or block the signal - reducing the operating
range of the controls. Other nearby transmitters may
cause interference also.
Solo/ Solo Pro screen
RF
remote
Battery charger
Charging cable
Quick release brackets w/
wood fasteners
PARTS IN THE BOX
Initial Consideration 1 Parts in the Box 2

INSTALLATION
Proper mounting preparation will ensure a great
installation. Mounting brackets must be level to each
other, and screwed into structural members of some
kind, such as wall studs. You may use wood screws
provided, or other anchors (not provided) capable of
carrying the load, that is suitable to the substrate.
DO NOT MOUNT TO ONLY SHEET ROCK.
Install the Quick Release Brackets
1. Determine the top of the desired viewing area on
the wall.
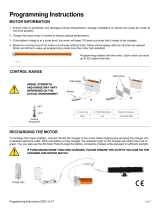
2. The mounting brackets should be located 1 " + Drop
+ the desired top of viewing height. The factory set
drop is 1”, but may be programmed to be up to 12”.
Ex: 10" Drop + 1 " + 82” viewing area above floor =
93 ” bracket screw height.
NOTE : Maximum drop for Short Throw material is 4".
3
8
3
8
3
8
Factory drop is 1"
Case Length
Max. drop is 12"
NOTE: Max. drop for
Short Throw is 4".
View
Height
Installation 4Installation 3

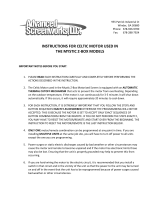
3. Determine the desired viewing area with vertical
centerline of the projected viewing area.
4. The Solo screen must be installed with the brackets
no more than 10 inches from each end of the
cassette. Measure the overall length of the cassette
to determine the min. and max. horizontal spacing of
the mounts. Mark the location of the quick mount
brackets over a stud and within an appropriate
distance from the ends.
2" Min to 10" Max
2" 10"
Wall Brackets
secured to studs
or structural
supports
Center Line of Viewing Area
Wood Studs or
other Structure
View Height
Installation 5 Installation 6

Item 1
Item 2
7. Slide Item 2 over Item 1 until it snaps in place. You
will hear a click.
8. Repeat quick mount installation for the second
mount. Place a level on the tops of the both quick
mounts to verify that they are level before
installation. Correct if necessary and securely install
the second bracket.
5. Remove the snap-on cover (Item 2) from one of the
supplied quick mounts.
6. Securely screw Item 1 to the wall at one of the
marked locations in the orientation shown.
No. 10
Flathead Screw
Item 1
Installation 8Installation 7

10. Uninstall the Solo:
- Unsnap it by rotating it up and out from the bottom
until both brackets click
- Lift the Solo off of the brackets
9. Install the Solo:
- Tilt it slightly up
- Hang on the top lip of the mounting brackets
- Adjust the unit side to side to center on the
viewing area
- Click in place (*both brackets must click).
Installation 10Installation 9

START UP
1. Connect the Charger - Solo and Solo Pro are shipped
in sleep mode. Prior to first use, wake the screen
from sleep:
a. Plug the charger into the wall, connecting the
charging cable to the charger and magnetic
charging port on the cassette. The screen will jog
up and down once to signal that the motor is now
awake.
b. In the case that the charger does not wake up the
screen, use a thin tool to depress the motor button
through the small hole just in front of charging
port. The screen will jog once to indicate it is
awake.
1a. Connect charger (Preferred)
1b. Depress the Motor button
thin tool
Start Up 12Start Up 11

RUNNING
PROGRAMMING
Solo and Solo Pro screens are very easy to operate.
The RF remote, supplied with the screen, controls the
opening and closing from up to 40 feet away. Enjoy!
Setting the Drop - Solo and Solo Pro are factory preset
to have 1” of drop, the distance between the top of
the viewing area and the cassette. The drop can be
adjusted up to 12”(4" for Short throw). To adjust the
drop, do the following:
1. Drop the screen to the lower limit by briefly
pressing the down button on the RF remote.
2. Hold the UP and DOWN buttons simultaneously
until the screen jogs once.
3. Use the DOWN and UP buttons to position the
viewing area vertically, up to 12”(4" for Short
Throw) from the bottom of the cassette.
DO NOT set the lower limit (top of viewing) more
than 12” (4" for Short Throw) from the cassette.
Doing so risks damaging the screen material.
4. Once the viewing area is positioned, hold the
STOP button until the screen jogs once. This saves
the new lower limit. If this Step is not completed,
the screen will jog once after about 3 minutes,
indicating that it is no longer in program mode,
and the motor will only recall the previous lower
limit. No changes will be saved.
Drop 1” set
at factory up to 12” Max
NOTE: Max. drop for Short Throw is 4".
1” - 12”
Running and Programming 14Running and Programming 13

PAIRING SECOND RF REMOTE
To pair a second remote, first take the original remote
supplied with the Solo and press the Program button
on the back of the remote until the screen jogs once.
Then, briefly press* the program button on the back
of the new remote. The screen will jog once. The new
remote is now paired with the screen.
*A brief press is about ½ second long. Too short or too long of
a button press may not perform the desired operation.
PROGRAM
BUTTON
D
e
s
i
g
n
e
d
i
n
Au
s
t
i
n
T
X
Designed in Austin TX
STORAGE AND TRANSPORT
Before storing or transporting, deactivate the motor by
putting it in sleep mode, to make sure the screen does
not deploy and get damaged.
Putting The Motor To Sleep - Use a thin tool to hold
the button on the back of the remote until the screen
jogs once. Press and hold the UP, STOP, and DOWN
buttons at the same time until the screen jogs again.
The motor is now asleep. To wake up the screen, see
the steps outlined in the START UP (page 11).
thin tool
Storage and Transport 16Pairing second RF Remote 15

It is preferred to store or transport your Solo or Solo Pro
horizontally. Although it may be stored vertically in a
closet, or out of the way, it should only be transported
horizontally or as near horizontally as possible.
Shock and vibration experienced during transportation
when vertical may shift the screen material and cause
wrinkles. If this occurs, the wrinkles may be removed in
most cases by manually redistributing the material with
the following steps:
1. Bump the bottom of the weight bar up several
times along it.
2. With one hand grab over the center of the weight
bar and hold the material at the bottom of the
screen.
3. With the other hand lightly grab the screen material
around the weight bar. Gently slide your grip toward
the edge of the screen to redistribute the material.
4. Repeat the process to move the material from the
center toward the other edge.
5. The wrinkles may not fall out immediately if the
screen has been stored in a wrinkled condition.
6. If after 30 minutes to 1 hour the wrinkles are still
there, use a blow drier on them to help speed up
the process.
DO NOT GET THE SCREEN TOO HOT OR THE
MATERIAL MAY BE PERMANENTLY DAMAGED.
Storage temperature is important, not only for the
battery, but also the screen material. Store it between
0°C and 50°C. Ensure it is a temperature controlled area.
Storage and Transport 18Storage and Transport 17

CARE AND MAINTENANCE
DO NOT scrub the screen material. This will
damage the viewing surface.
These screens are designed and engineered to be
virtually maintenance free. There are no user serviceable
parts inside, except for the screen material. The screen
needs to be kept clean - free of dust, dirt, hair, particles,
and any other foreign material. Loose material may
be carefully brushed away with a microfiber cloth.
Smudges and splotches from water soluble dirt may be
removed with a damp microfiber cloth.
The battery for your Solo/ Solo Pro will need to be
recharged when the battery charge level is low. The
motor has a built in low charge indicator. It will flash
red twice every 2 to 3 minutes. This will be seen in the
cassette mail slot on the right end in a darkened room.
It may also be seen through the program pin hole on the
cassette.
If you need to ship your battery powered Solo or Solo
Pro, the battery needs to be at 30% charge or less to
avoid special shipping paperwork and the package
must have a lithium battery label visible on the
shipping carton. See IATA regulations regarding lithium
batteries for more info.
Care and Maintenance 20Storage and Transport 19

To charge, plug in the wall charger into a 120V outlet,
then connect the magnetic end of the cable to the
charging port on the cassette. The light on the charger
will change from green to red as soon as the magnetic
end is connected, indicating that the batteries are
charging. Charge for at least 6 hours. When they are
fully charged, the charger indicator light will change
from red to green. Remove and store the cable and
charger and the screen is now ready to use. The
batteries can be charged and discharged over 500
times before end of life. With a 1 year typical use
period between charges, the batteries will last the life
of the product.
NOTE: As the temperature of the batteries drops, the
battery voltage also drops. If the Solo temperature
gets close to freezing, the motor may start flashing
red, indicating that it thinks it should be charged.
Simply bring the screen and batteries up to room
temperature. The motor light will stop flashing red.
Although the cassette is protective, it should be
handled with care. Inadvertent small scratches, dents
or dings may be unsightly, but they will not affect
the operation of the screen. Wipe any smudges or
handprints off with a damp cloth. Dry thoroughly
after wiping.
Care and Maintenance 22Care and Maintenance 21

TROUBLESHOOTING
All Solo and Solo Pro screens are programmed and
tested at the factory. All battery powered models are
shipped in ‘sleep mode’ to preserve battery life and to
keep the motor from being inadvertently operated by
stray RF signals during transport or storage. In case of
a malfunction please use the following troubleshooting
guide table.
Possible Cause SolutionSymptom
Non-
responsive
remote
Motor is asleep
Remote orientation
RF interference
Motor battery fully
discharged
Plug the charger and
connect cable
Hold remote vertical
Turn off other sources
of RF
Charge for 6 hours
min.
Possible Cause SolutionSymptom
Non-
responsive
remote
(-cont.)
RF Shielding
Remote battery is
dead
Move to position
where metal objects,
wiring, or foliage does
not block the signal.
Replace with CR2430
3V lithium button
battery
Tech Support: 512.832.6939
Vertical
wrinkles in
screen
When down
button is
pressed,
screen
stops
halfway
Material has
shifted at the
weight bar
An intermediate
stop was set for
the motor
Gently move the
material out to each
end of the weight bar
until smooth.
Call SI Customer
Support to fix
Troubleshooting 24Troubleshooting 23

ADDITIONAL ACCESSORIES
(purchased seperately)
Charging cableFlying kit
MyLink Solo remoteUniversal locking brackets
Suction cup brackets
Ceiling bracket
Connect
Additional Accessories 25 Additional Accessories 26

WARRANTY
New SI products carry a standard 1- year warranty on
parts and labor.
FCC WARNING: This device complies with Part 15 of
the FCC Rules.
Operation is subject to the following two conditions:
(1) This device may not cause harmful interference
(2) This device must accept any interference received,
including interference that may cause undesired
operation.
Solo, the Solo wordmark, and the Screen Innovations
logo are registered trademarks and the exclusive
property of Screen Innovations.
Warranty 27
/