Page is loading ...

INSTRUCTIONS FOR CELTIC MOTOR USED IN
THE MYSTIC Z-BOX MODELS
IMPORTANT NOTES BEFORE YOU START:
1. PLEASE READ EACH INSTRUCTION CAREFULLY AND COMPLETELY BEFORE PERFORMING THE
ACTIONS DESCRIBED IN THE INSTRUCTION.
2. The Celtic Motor used in the Mystic Z-Box Motorized Screen is equipped with an AUTOMATIC
THERMAL CUTOFF MECHANISM that acts to prevent the motor from overheating. Depending
on the outdoor temperature, if the motor is run continuously for 3-5 minutes it will shut down
automatically. If this occurs, it will require approximately 20 minutes to cool down.
3. FOR EACH INSTRUCTION, IT IS EXTREMELY IMPORTANT THAT YOU FOLLOW THE STEPS AND
BUTTON SEQUENCES EXACTLY AS DESCRIBED OTHERWISE THE PROGRAMMING WILL NOT BE
ACCEPTED. THIS IS BECAUSE THE MOTOR IS SET TO ACCEPT ONLY EXACT SEQUENCES OF
BUTTON COMBINATIONS FROM THE REMOTE. IF YOU DO NOT PERFORM THE STEPS EXACTLY,
YOU MAY HAVE TO RESET THE MOTOR/REMOTE AND START OVER FROM THE BEGINNING. THE
INSTRUCTION TO RESET THE MOTOR/REMOTE IS THE LAST INSTRUCTION BELOW.
4. ONLY ONE motor/remote combination can be programmed at any point in time. If you are
installing MULTIPLE UNITS at the same job site, you will have to turn off power to all units
except the one you are programming.
5. Power surges or static electric discharges caused by bad weather or other circumstances may
cause the motor and remote to become unpaired and if the motor has electronic limits those
may also be lost. Ensuring that the unit is properly grounded may help to prevent this from
occurring.
6. If you are hard-wiring the motor to the electric circuit, it is recommended that you install a
switch in that circuit and in the vicinity of the unit so that the power to the unit may be turned
on and off in the event that the unit has to be reprogrammed because of power surges caused
bad weather or other circumstances.
955 Patrick Industrial Ct
Winder, GA 30680
Phone: 678-926-9700
Fax: 678-288-7924

A. THE MOTOR AND SINGLE CHANNEL REMOTE COMES SYNCHRONIZED FROM THE FACTORY
B. THE UPPER AND LOWER LIMITS HAVE BEEN SET AT THE FACTORY
C. THERE WILL BE NO NEED TO CHANGE THE PROGRAMMING IN THE REMOTE UNLESS
SIGNIFICANT CHANGES ARE MADE TO THE UNIT, SUCH AS CUTTING THE VERTICAL SIDE RAILS.
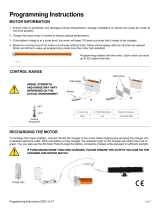
D. HOW TO: SWITCH THE MOTOR BETWEEN CONTINUOUS AND MANUAL MODE
Prior to adjusting any of the factory settings of the motor and remote, be sure to place the
motor in manual mode.
In manual mode, when you press & release the UP or DOWN buttons the screen moves
approximately 3” and stops. In manual mode, if you press & hold the UP or DOWN button for 3
seconds then the screen will run continuously.
Being in manual mode will reduce the chance of damage occurring to the unit while settings are
being changed. To do this:
1. PRESS & HOLD the STOP BUTTON until the motor jogs up and down or sounds 5
beeps
2. Release the STOP BUTTON, THEN PRESS & RELEASE the STOP BUTTON. The motor
will jog up and down or sound 3 beeps
To take the motor out of manual mode and back into continuous mode repeat steps 1 & 2
above.
E. HOW TO: REVERSE THE DIRECTION OF THE MOTOR
Should the motor be in a state where the UP button on the remote lowers the screen panel and
the DOWN button raises the screen panel, you will need to reverse the direction of the motor.
To do this:
1. PRESS & HOLD the STOP BUTTON until the motor jogs up and down or sounds 5
short beeps
2. PRESS & RELEASE the DOWN BUTTON. The motor will jog up and down or
sound 3 short beeps.

F. HOW TO: IF LIMITS NEED TO BE RESET. DO THE FOLLOWING:
1. ALWAYS SET THE LOWER LIMIT FIRST
2. USE THE REMOTE TO MOVE THE BOTTOM BAR TO ITS LOWER LIMIT
3. USING A PAPER CLIP OR PIN, PRESS THE PROGRAM BUTTON FOUND IN THE HOLE ON THE
BACK OF THE HAND HELD REMOTE. THE MOTOR WILL JOG TO CONFIRM THAT IT IS OPEN
FOR PROGRAMMING
4. PRESS UP OR DOWN BUTTON TO FINE TUNE YOUR LIMIT.
5. WHEN THE DESIRED POSITION IS REACHED PRESS STOP BUTTON TO IDENTIFY THIS AS THE
LIMIT
6. PRESS THE PROGRAM BUTTON. THE MOTOR WILL JOG OR BEEP 3 TIMES TO CONFIRM THAT
IT IS CLOSED TO PROGRAMMING. LOWER LIMIT PROGRAMMING IS COMPLETE.
7. NOW SET THE UPPER LIMIT AS FOLLOWS
(A) USE REMOTE TO MOVE THE BOTTOM BAR TO THE UPPER LIMIT
(B) USING A PAPER CLIP OR PIN, PRESS THE PROGRAM BUTTON FOUND IN THE HOLE ON
THE BACK OF THE HAND HELD REMOTE. THE MOTOR WILL JOG OR BEEP 5 TIMES TO
CONFIRM THAT IT IS OPEN FOR PROGRAMMING
(C) PRESS THE UP OR DOWN BUTTON TO FINE TUNE YOUR UPPER LIMIT.
(D)WHEN THE DESIRED POSITION IS REACHED PRESS THE STOP BUTTON TO IDENTIFY THIS
AS THE LIMIT
(E) PRESS THE PROGRAM BUTTON. THE MOTOR WILL JOG OR BEEP 3 TIMES TO CONFIRM
THAT IT IS CLOSED TO PROGRAMMING.
G. HOW TO: SYNCHRONIZE A 2
ND
REMOTE (EITHER A 2
ND
HAND HELD OR WALL MOUNT) TO THE
MOTOR:
1. PRESS AND HOLD THE STOP BUTTON ON THE PRIMARY HAND HELD REMOTE. THE MOTOR
WILL JOG OR BEEP 5 TIMES. RELEASE THE STOP BUTTON.
2. PRESS AND RELEASE THE UP BUTTON ON THE 2
ND
REMOTE. THE MOTOR WILL JOG OR BEEP
3 TIMES TO CONFIRM THAT THE 2 REMOTES ARE SYNCHRONIZED.

H. HOW TO: PAIR A REMOTE TO A MOTOR OR RE-SYNCHRONIZE A MOTOR AND REMOTE THAT
HAVE BECOME DELINKED
1. DISCONNECT THE POWER FROM THE MOTOR; UNPLUG IF IT IS PLUGGED IN OR TURN OFF
BREAKER IF THE MOTOR IS HARD-WIRED.
2. PRESS & HOLD THE UP BUTTON UNTIL THE LIGHT ON THE REMOTE GOES SOLID.
3. WHILE CONTINUING TO HOLD DOWN THE UP BUTTON, TURN THE POWER BACK ON TO THE
MOTOR: PLUG IT BACK IN IF PLUGGED, TURN ON BREAKER IF HARD WIRED
4. RELEASE THE UP BUTTON AND THEN IMMEDIATELY PRESS & RELEASE THE UP BUTTON
ONCE.
I. HOW TO: RESET MOTOR & REMOTE; DECOUPLE REMOTE FROM MOTOR; DELETE
PROGRAMMING
1. PRESS AND HOLD THE STOP BUTTON. THE MOTOR WILL JOG OR BEEP 5 TIMES. RELEASE
THE STOP BUTTON.
2. TURN TO THE BACK OF THE REMOTE AND USING A PAPER CLIP/TOOTH PICK/PIN PRESS
THE PROGRAM BUTTON, THE MOTOR WILL JOG OR BEEP 3 TIMES TO CONFIRM THAT
PROGRAMMING HAS BEEN DELETED.
/