Page is loading ...

Models: FL1/CL12BZ50/KN/LED (99875)
FL1/CL12BZ50/YK/LED (99876)
FL2/CL28BZ50/KN/LED (99877)
FL2/CL28BZ50/YK/LED (99878)
FL2/CL48BZ50/KN/LED (99879)
FL2/CL48BZ50/YK/LED (99880)
IMPORTANT
READ INSTRUCTIONS CAREFULLY BEFORE INSTALLING.
KEEP THESE INSTRUCTIONS FOR FUTURE REFERENCE.
WARNING - Risk of re or electric shock.
WARNING - Make certain power is switched OFF before starting
installation or attempting any maintenance. Consult an
electrician if not qualied to prevent electrical shock
Application/ Use:
This product is rated for use in wet locations.
LED Flood Series
Installation Instructions
Halco Lighting Technologies | 2940 Pacic Drive | Norcross, GA 30071 | Toll Free 800.677.3334 | Phone 770.242.3612 | Fax 800.880.0822 | halcolighting.com | Atlanta | Carlstadt | Cleveland | Houston | Los Angeles | Phoenix
© 2017 Halco Lighting Technologies, LLC. All rights reserved. Halco is a registered trademark of Halco Lighting Technologies. All sizes and specications are subject to change. 06-01-17.
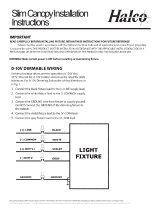
Black/Brown
Line
White/Blue
Neutral
Green
Ground
Luminaire
Figure 1.
Installation steps:
IF USING KNUCKLE MOUNT:
STEP 1: Before starting ensure that the power is
disconnected.
STEP 2: Unpack luminaire and ensure that there are no
damaged parts.
STEP 3: Attach luminaire to outdoor cover, routing the
luminaire wires into the junction box.
Connect luminaire cables as shown in
Figure 1. Black to Black, White to White
and Green to Green.
STEP 4: Aim luminaire by loosening bolt on the arm, and
repositioning to the desired angle. Tighten the bolt.
Product # Product Code Input Voltage (V) Input Current (mA) Input Wattage (W)
99875 FL1/CL12BZ50/KN/LED 120-277 0.9 12
99876 FL1/CL12BZ50/YK/LED 120-277 0.9 12
99877 FL2/CL28BZ50/KN/LED 120-277 0.23 28
99878 FL2/CL28BZ50/YK/LED 120-277 0.23 28
99879 FL2/CL48BZ50/KN/LED 120-277 0.40 48
99880 FL2/CL48BZ50/YK/LED 120-277 0.40 48
IF USING YOKE MOUNT:
STEP 1: Before starting ensure that the power is
disconnected.
STEP 2: Unpack luminaire and ensure that there are
no damaged parts.
STEP 3: Secure luminaire to at mounting surface
using 2 bolts.
STEP 4: Aim luminaire by loosening the 2 bolts on the
U-Bracket to the desired angle. Tighten down
both bolts.
STEP 5: Wire end of cord to power supply as seen below.

Halco Lighting Technologies |
2940 Pacific Drive | Norcross, GA 30071 | Toll Free 800.677.3334 | Phone 770.242.3612 | Fax 800.880.0822 | halcolighting.com | Atlanta | Carlstadt | Cleveland | Houston | Los Angeles | Phoenix
© 2017 Halco Lighting Technologies, LLC. All rights reserved. Halco is a registered trademark of Halco Lighting Technologies. All sizes and specifications are subject to change. 06-14-17.
IMPORTANT SAFETY INFORMATION:
CAUTION: This luminaire must be wired in accordance with the National Electrical Code and applicable local codes and
ordinances. Proper grounding is required to insure personal safety. Carefully observe grounding procedure
under installation section.
CAUTION: Installation and servicing of this equipment should be performed by qualied personnel only.
CAUTION: Do not mount near gas or electrical heaters.
CAUTION: Equipment should be mounted in locations and at heights where it will not readily be subjected to tampering
by unauthorized personnel.
CAUTION: The use of accessory equipment not recommended by the manufacturer may cause an unsafe condition.
Any modication or use of non-original components will void the warranty and product liability.
CAUTION: Do not use this equipment for other than intended use.
CAUTION: Do not install in dead air, sheltered, buried or boxed in location. This luminaire should not be installed in areas
that will entrap heat. It is not intended to be used in potentially dangerous or hazardous locations such as
ammable or explosive atmospheres.
CAUTION: This luminaire is not for use with UL924 Emergency Lighting Equipment.
Troubleshooting:
1) Check that the line voltage at the luminaire is correct and the circuit breaker is on. Voltage must be a minimum of
120VAC and no greater than 277VAC.
2) If all the LEDs on the light engine are OFF, LED driver may be defective. Using a voltmeter, check to see if
voltage is present at the output of power supply. If low or no voltage, then replace power supply.
3) If any individual LEDs are OFF the LED light engine is defective. Please have the serial number from the light engine
available when you contact technical support
4) Ensure that luminaire is grounded properly.
5) Check for water or moisture in the luminaire or junction box.
6) If a photocell is used, be sure it is functioning properly.
7) Ensure the photocell is rated for LED loads with minimum load requirement.
Cleaning and Maintenance:
Caution: Do not clean or maintain while the luminaire is energized. Check that the luminaire temperature is cool enough
to touch. Periodically check and remove any accumulated dirt or debris from the lens and around luminaire.
1) Clean glass lens with non-abrasive glass cleaning solution.
2) Do not open the luminaire to clean the LED. Do not touch the LED.
Replacement Parts:
Contact your sales representative for replacement part availability.
Warranty Information:
This product is warranted for 5 years from the date of purchase.
If this product does not perform to the specications supplied on this package, send an email or write to the address
below for product return and replacement. This replacement is the sole remedy available.
Liability for incidental or consequential damage is expressly excluded.
Visit www.halcolighting.com for full warranty details and compatibility information.
/