Page is loading ...

Warrior, Inc.
11100 SW Industrial Way
Tualatin, OR 97062
Phone: (888) 220-6861
Fax: (503) 692-0364
customerservice@warriorproducts.com
www.warriorproducts.com
KIT CONTENTS:
Item
Qty
Item
Qty
MOD Rear Bumper
1
Backup Sensor Bracket
4
Installation instructions
1
1/4” x 3/4” Hex Bolt
8
MOD Rear Nut Plate
2
1/4” Washer
8
1/2” x 1-1/2” Hex Bolt
4
1/4” Lock Washer
8
1/2” Washer
4
Plastic wire retaining clips
4
1/2” Lock Washer
4
Hole Plug
4
INSTALLATION NOTES:
Read through these instructions completely before beginning your installation.
Before installing your new MOD bumper, remove the factory rear bumper and tow
hook(s). Consult the Factory Service Manual or research online if needed. Using a search
term such as “Jeep JK rear bumper removal” should provide a number of results.
When removing the factory bumper DO NOT DISCARD FACTORY BUMPER HARDWARE.
You will be re-using some of the bolts to install your new MOD bumper.
This bumper has provisions to mount Jeep JL/JLU backup sensors. Jeep JK/JKU models
are not equipped with backup sensors so the backup sensor brackets and hardware
included with the kit will not be needed for this application. We have provided 4 hole
plugs to retain a clean look.
If you would like to relocate your rear license plate to
the bumper for any reason, you can securely attach your
plate with the optional Warrior Products Part #1555
License Plate Mount. This rugged mount is designed
specifically to compliment the MOD rear bumper. All
necessary mounting hardware and an LED light is
included.
The existing holes for the tow hook(s) on the bottom of
the frame will be used to mount the bumper. You must
mark and drill the frame where there is not already an existing hole. These holes will
allow you to install included Nut Plates.

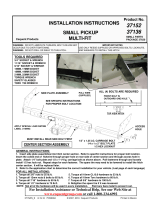
1. Set the bumper into place over the rear
frame rails and loosely start the side bolts
(from the Factory bumper) to position the
bumper.
2. Push the bumper up to the frame and
tighten mounting hardware enough to
hold the bumper in place.
3. With the bottom mounting flanges
completely up to the frame, mark and
center punch the CENTER of the frame
mount slots at the locations that do not
have an existing hole (i.e. passenger side).
(NOTE: The hole centers should be spaced
2-11/16” apart.)
4. Now that the holes are marked for drilling,
remove the bumper and set it aside.
5. Drill the holes in the bottom of the frame at your center punch marks to 9/16” using a step drill
bit, or by starting with a pilot drill bit and working up in size.
6. (A 1/2” drill bit will work if it is the largest size you have. The 2-11/16” measurement will be more
critical, and you may have to open the holes up by working the drill bit around or using a file.)
7. Paint any bare metal as a result of drilling the holes and let dry.
8. If you have the optional Rear MOD Bumper License Plate Mount (Warrior Part # 1555), now is a
good time to install it because you will have more clearance to work. (It can also be installed
with the bumper in place). Refer to the instructions supplied with the mount.
9. Prepare to install the bumper. Insert the
Nut Plate(s) into the frame rail(s).
10. Position the Nut Plates with the nuts up as
shown. Carefully center the outer-most
nuts (with 2-11/16” spacing) over the
previously drilled holes. (NOTE: The 3rd nut is
not used for this application.)
11. Now, taking care to not move the jeep
around too much (you do not want the Nut
Plates to shift), place the bumper back on
the jeep in position over the frame rails.
12. Loosely start but do not tighten the side
bolts (re-use the factory bolts).
Mark CENTER
of slots (Front
to Rear, and
Side to Side).
2-11/16” spacing

13. Place a lock washer and a flat washer on
each of the 1/2” bolts for the nut plates. Pass
the bolt through the frame mount slots,
through the frame, and align with the nut
plate while gently turning the bolt to
engage the nuts on the Nut Plate. Start the
second bolt before tightening the first.
(IF YOU HAVE DIFFICULTY WITH THIS STEP
READ BELOW FOR TIPS AND TRICKS.)
14. Repeat for the opposite side.
TIPS AND TRICKS FOR THREADING HEX BOLTS INTO NUT PLATES
Do not push the bolt any harder than necessary for the threads to engage and make sure you are inserting the
bolt straight. Let the weight of the Nut Plate fall down on the bolt.
When starting the first bolt you can use a screwdriver or punch through the adjacent hole to shift the nut plate
into alignment, or to help hold it steady. This can be helpful if you shift the plate out of position on your first
attempt.
Use a 7/16” bolt to easily engage the threads of one of the nuts. Cock the 7/16” bolt slightly to the side and pull
down to hold the nut plate while starting the 1/2” bolt in the other hole. You can also use a wooden dowel, tape
wrapped punch or similar.
If you get the first bolt to grab the threads of the nut but it is not properly engaged (cross-threaded), you can
now use this bolt to hold/position the nut plate while you start the second bolt. After the second bolt is started,
remove the first bolt (that was started cross-threaded) and re-install correctly.
This last option requires temporarily removing the bumper. Cut the head off of a 1/2”-13 bolt or use 1/2”-13
threaded rod. Thread the cut bolt into the nut plate before installing the bumper with the bolt shank hanging
down through the holes in the frame. Carefully slide bumper up over the bolt shank when positioning. Use the
cut bolt to hold nut plate while starting the first bolt, then remove and insert the permanent bolt with washer
and lock washer.
15. Once you have ALL the mounting hardware started, you can now securely tighten the bolts.
Start by tightening the bottom bolts so that the bumper mount can properly seat to the
frame. Tighten the side bolts last. There are a total of 8 mounting bolts.
16. Install the included plastic plugs into the
holes in the face of the bumper. If you feel
that the plugs are looser than you prefer,
you can use a small amount of black RTV
silicone or similar to help secure the plug.
17. If you have installed the optional Warrior Products Rear MOD Bumper License Plate Mount, do
not forget to connect the license plate light wiring.
18. Installation is now complete! Enjoy your new Warrior Products MOD Bumper!
If you need further assistance installing your product, please contact us by email at
customerservice@warriorproducts.com or call us at (888) 220-6861.
/