Page is loading ...

ARIESAUTOMOTIVE.COM
•
NEED ASSISTANCE?
•
877.287.8 634
•
RA
•
PAGE 1
INSTALLATION MANUAL
REAR
Tools Required
Torque wrench Ratchet
Socket set Level
Wrench set Drill
Small screwdriver Drill bit, .25"
Hex key set --
Level of Difficulty
Moderate
Notes and Maintenance
Before you begin installation, read all instructions thoroughly.
Proper tools will improve the quality of installation and reduce the time required.
To protect the product, wax after installing. Regular waxing is recommended
to add a protective layer over the finish. Do not use any type of polish or wax
that may contain abrasives that could damage the finish.
For polished, gloss and other smooth finishes,
polish may be used to clear small scratches and scuffs on the finish.
Mild automotive detergent may be used to clean the product. Do not use dish detergent, abrasive
cleaners, abrasive pads, wire brushes or other similar products that may damage the finish.
Periodic inspection of all wires and connections should be
performed to ensure there is no visible damage or loose connections.
CAUTION: Improper electrical installation may result in personal injury. Unless you
are familiar with the installation and handling of electrical systems, have this step
performed by someone who has that familiarity.
Refer to the table to the left when securing hardware during the
installation process to help prevent damage to the product or vehicle.
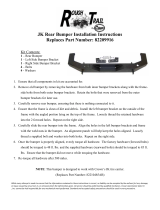
Product Photo (available with or without LED lights, see table below for configurations)
Center Section Parts List
1 TrailChaser
™
center section
1 C-channel bracket
2 Hex bolt, M14
8 Flat washer, M14
8 Lock washer, M14
8 Button head screws, M6
6 Lock nut, M6
2 Cable ties
1 License plate bracket
1 License plate bracket cover
Corner Parts List
1 Driver / left corner
1 Passenger / right corner
1 Driver / left side bracket
(not used on Jeep JL)
1 Passenger / right side bracket
(not used on Jeep JL)
4 Hex bolt, M10 x 35mm
8 / 6* Hex bolt, M10 x 30mm
4 Button head bolt, M10 x 40mm
20 / 16* Flat washer, M10 x 20mm
8 Flat washer, M10 x 27mm
16 / 14* Lock washer, M10
12 / 10* Nut, M10
2 LED work light (#1501252)
(side extensions with LEDs only)
* Quantities listed are dependent on the side
extension option (without LEDs / with LEDs)
Note: All hardware may not be used
Rear TrailChaser
™
Kits & Components
Kit# Material Center# Side# LED Lights
2082082 Aluminum 2081025 2081221 Not included
2082083 Aluminum 2081025 2081223 Included
2082080 Steel 2081024 2081220 Not included
2082081 Steel 2081024 2081222 Included
All TrailChaser
™
bumpers and components are finished with a textured black powder coat
2082082 aluminum
2082080 steel
2082083 aluminum
2082081 steel LED lights included
LED lights not included
All hardware listed below will be
provided when ordering a kit number.
If ordering a replacement center or
side extentions you will receive the
hardware listed for that part only.

ARIESAUTOMOTIVE.COM
•
NEED ASSISTANCE?
•
877.287.8 634
•
RA
•
PAGE 2
Torque Specifications
M10 bolt 33 ft-lbs.
M12 bolt 58 ft-lbs.
M14 bolt 93 ft-lbs.
Use above torque setting unless otherwise noted
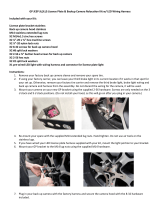
Step 1
Remove the factory mud guards on each
side of the Jeep by removing the three bolts
securing each mud guard in place.
Step 2
Remove the side braces on each side
of the Jeep by removing the four bolts
securing each side brace in place.
Step 3
Disconnect the wiring harness for the
license plate light from the body of the Jeep.
Separate the connector from the
wiring harness. A small screw driver
may be needed to separate the connector.
Note: The bumper does not
accommodate rear backup sensors.

ARIESAUTOMOTIVE.COM
•
NEED ASSISTANCE?
•
877.287.8 634
•
RA
•
PAGE 3
Step 5
Remove the two bolts securing the cross
member to the bottom of the bumper.
With assistance, remove
the bumper from the Jeep.
Step 6
Remove the license plate light,
nuts and harness. Set aside for use
in the installation of the new bumper.
Step 7
Place the bumper on a flat work surface.
Attach the bumper side extensions by
securing with an M10 hex bolt, lock washer,
two M10 flat washers and a nut at each
attachment point.
If installing the side extensions
without LEDs, repeat this process
for all four mounting locations.
If installing the side extensions
with LEDs, repeat this process
for all three mounting locations.
Repeat this step for the passenger side.
Adjust alignment as necessary and tighten
fasteners on both sides.
Step 4
Remove the four bolts securing the tow
hook on the driver side. The tow hook will
not be reinstalled.
Remove the two large bolts on the passenger-
side frame. Note: The six large bolts from the
tow hook and the frame will be re-used for the
bumper installation.
Remove the two nuts securing the bracket
to the bumper. Repeat on the passenger side.

ARIESAUTOMOTIVE.COM
•
NEED ASSISTANCE?
•
877.287.8 634
•
RA
•
PAGE 4
Step 9
With assistance, lift
the bumper into place
Step 10
With the bumper held in place, secure
the bumper to the Jeep by inserting two M14
bolts, lock washers and flat washers through
the bumper and the Jeep frame into the nuts on
the C-channel bracket on the passenger side.
Snug the fasteners,
but do not fully tighten.
Step 11
Re-use two of the factory bolts, lock
washers and flat washers removed
from the bottom of the frame to
reattach the bumper to the bottom
of the frame on the driver side.
Snug the fasteners,
but do not fully tighten
Step 8
Take the C-channel bracket and place it
into the passenger side frame of the Jeep.
Make sure the nuts in the C-channel
align with the holes in the bottom
of the Jeep frame.

ARIESAUTOMOTIVE.COM
•
NEED ASSISTANCE?
•
877.287.8 634
•
RA
•
PAGE 5
Step 13
Tighten the four bolts on the bottom of the
driver and passenger side of the vehicle.
Tighten the four bolts on the side of the
driver and passenger side of the vehicle.
Note: M12 fasteners should be
torqued to 58 ft-lbs. M14 fasteners
should be torqued to 93 ft-lbs.
Step 14
Secure the license plate bracket to the bumper
using an M6 button head screw and lock nut.
Move the license plate bracket to the desired
location and drill an additional 1/4" hole.
Place another M6 screw through the
drilled hole and secure with a lock nut.
Tighten both M6 fasteners.
Step 12
Use the four remaining factory bolts, lock
washers and flat washers to secure the
bumper to the frame of the vehicle on the
driver and passenger side.
Snug the fasteners,
but do not fully tighten.

ARIESAUTOMOTIVE.COM
•
NEED ASSISTANCE?
•
877.287.8 634
•
RA
•
PAGE 6
Step 16
Re-using the factory fasteners,
secure the license plate light to
the license plate bracket cover.
Fasten the license plate bracket cover to the
license plate bracket using two M6 screws.
Step 15
Route the factory wiring harness for
the license plate light through the large
hole on the driver side of the bumper.
Connect the wiring harness to
the license plate light and place
it in the license plate bracket cover.

ARIESAUTOMOTIVE.COM
•
NEED ASSISTANCE?
•
877.287.8 634
•
RA
•
PAGE 7
Step 19
Mount the LED lights in the recessed
pockets on the bumper corners with
the provided hardware.
Adjust the light to the desired angle
and fully tighten all of the hardware.
Note: If these lights are being used
with a 24V system, the relay will need
to be replaced with a 24V unit.
Disconnect the supplied switch
from the wiring harness and install
in the desired location.
Step 18
Reconnect the wiring harness and test
the function of the license plate light.
Use the provided cable ties to fasten any
loose wiring to the body of the Jeep.
Note: If you are installing a rear bumper
without LED lights, proceed to step 21.
Step 17
Fasten the license plate to the license plate
bracket using four M6 button head cap screws
and lock nuts. Once all four fasteners have
been started, tighten them all.

ARIESAUTOMOTIVE.COM
•
NEED ASSISTANCE?
•
877.287.8 634
•
RA
•
PAGE 8
Step 20
Once the LED lights and switch are installed,
connect the harness extension to each light.
Insert the male plug on the harness extension
into the female socket on each LED light.
Route the harness extension to the front of
the vehicle and connect to the wiring harness.
Insert the male plug on the wiring harness into
the female socket of the harness extension.
Reconnect the blue, red and black spade
connectors to the switch as shown in the
'Wiring Harness' diagram.
Connect the red fused wire with the ring
terminal to the positive (+) battery post.
Connect the black wire ring terminal to the
negative (-) battery post or other suitable
vehicle grounding point.
Mount the provided relay to the vehicle
and secure all wires with zip ties away
from moving parts to avoid damage.
Test the lights to ensure proper function.
5Meter
DT Female
Connector
DT Male
Connector
Harness Extension
12V
RELAY
+
BATTERY
-
BATTERY
FUSE
SWITCH
Black wire to gold
switch terminal
Wiring Harness
MALE
CONNECTOR
FEMALE
CONNECTOR
Step 21
With the bumper installed, periodic
inspections should be performed to ensure
all mounting hardware remains tight.
Congratulations on the installation of your
new ARIES rear TrailChaser
™
bumper.
To protect your investment, see the
'Notes and Maintenance' section on
the first page of this instruction manual.
/