Page is loading ...

Prussian Luftblitzwagen
B28-VSF-011
Please read these instructions fully before starting construction.
PVA or equivalent glue will be required to stick sections together.
Sand paper can be used to gently clean any joints.
A sharp modelling knife will be required to remove sections from the sprue. Please use knives with due care and remember
to cut away from yourself at all times.
During the construction of this model, you may find it convenient to use pegs / elastic bands to hold pieces in place while
you allow glue to dry.
You may find it easier to paint sections of your model as you go along prior to the final assembly (see below).
The rear railings are formed from the pieces
shown above.
Glue them together as shown with the etched
rivets facing outwards.
Attach the sides.
Add the ramp surround.
Glue the “U” shaped section behind the ramp
surround so there is a lip (as shown above)
Take the hul side pieces and inner support.
Glue them together as shown with the arrow
pointing towards the pointy end.
The lower hull plates.

Glue them into place.
The ramp is made from these two parts.
Glue the “teeth” to the ramp.
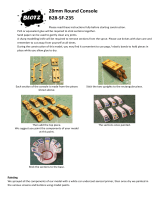
Take the motor supports and bracers.
Attach these to the hull piece.
Insert the bracer.
Each motor has a pair of pieces.
Glue them to each motor as shown above – note
the lug sticking out on each piece. Add the square
piece to the front of the motor.
The blanking plates.
Glue one to each motor.

The sides of the motor are formed from these
pieces.
Glue these into position around the motor.
The ships wheel is made from these three pieces.
Glue them together as shown.
Glue the deck piece to the top of the hull.
Take the ramp and its hinges.
Glue one hinge into position.
Place the lug from the ramp into the hinge then
glue the other hinge into place.
Note – DO NOT GLUE the ramp lugs within the
hinges if you wish the ramp to open/close.
Glue the upper hull into place.

The centre of each rotor is formed from the three
pieces shown on the left. Push the disk over the
two spindle pieces (as seen on the right).
Add the clear disk, then push the other disk over
the spindle to lock it in place.
Add the rotor assembly to the motor.
Glue the ships wheel into place.
The completed model.
Painting
While the model was in its sub-components (i.e. upper hull, deck, lower hull, ramp) we painted each one.
All the pieces apart from the deck were sprayed black (car undercoat). The edges of the deck and the underside
were hand painted with black emulsion paint.
All the black areas then had a heavy dry brush of a dark blue/grey colour, followed by a medium dry brush of a pale
grey and finally a light drybrush of an almost white colour – all were DIY household emulsion paint.
The stripes were added with model colour and the Prussian eagle and roman numerals were taken from a transfer
sheet from an old model kit.
The centre and edges of the rotor blades were painted with a yellow glaze (model paint).
/