Page is loading ...

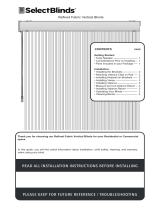
CHILD SAFE
D
E
S
I
G
N
E
D
W
I
T
H
C
H
I
L
D
S
A
F
E
T
Y
F
E
A
T
U
R
E
S
ROLLER SHADES
INSTALLATION INSTRUCTIONS
10 0%
1
0
0
%
C
a
n
a
d
i
a
n
O
w
n
e
d
&
O
p
e
r
a
t
e
d
MADE IN CANADA
MISE EN GARDE
Les enfants en bas âge peuvent s’étrangler avec des cordes. Enlevez
immédiatement ce produit si une corde mesurant plus de 22 cm devient
accessible ou si le contour d’une boucle de plus de 44 cm devient accessible.
RISQUE D’ÉTRANGLEMENT
WARNING STRANGULATION HAZARD
Young children can be strangled by cords. Immediately remove
this product if a cord longer than 22 cm or a loop exceeding
44 cm around becomes accessible.

2
Installation Bracket
Getting Started
Bracket Installation
A few simple tools
are required:
l Measuring tape
l Power drill, drill bits (1/16”)
and/or screw drivers
l Phillips driver bit
l Pencil
l Level
Shades are shipped with the required number of brackets
for proper installation.
End brackets should be located approximately 3" from
either end.
Depending on the width of the shade, additional
brackets may be necessary, evenly spaced between the
two end brackets.
Using the installation bracket as a template, measure to
the edge of the bracket and mark the hole locations with a
pencil for drilling.
Brackets must be in line and level. Shim brackets on inside
mounts if necessary. The head rail must be level for the
shade to operate properly.
Make Sure Mounting
Surface is Level
Additional fasteners other than those sent with your shade may be required depending on the mounting surface.
Wallboard and plaster require the use of anchors such as expansion toggle bolts.
Brick, tile or stone need special plugs and drill bits.
Remember to always pre-drill holes in wood to avoid splitting.
Shade Width # of Brackets
Up to 40" 2
40"- 72" 3
72"- 84" 4
84" and up 5
Mounting Options & Instructions
Inside Mount
A minimum of 2 3/4” is needed to fully recess the shade.
Make sure the brackets are level and aligned.
Attach each bracket using two screws.
Outside Mount
The minimum mounting height for outside mounted shades is 1 1/2”.
Make sure the brackets are level and aligned.
Attach each bracket using two screws.
Spacer Blocks (optional)
Each spacer block projects brackets 3/8" away from mounting surface.
Make sure the brackets are level and aligned.
Attach each bracket using two screws.
Screws should be long enough to secure the bracket to
the mounting surface.
Extension Brackets (optional)
Optional extension brackets are used to project the back of the shade
up to 3” from the mounting
surface. Attach the mounting bracket to the extension bracket with
the nut and bolt provided.
Inside Mount
Minimum 2 3/4” Surface
Outside Mount
Minimum 1 1/2” Surface
Outside Mount with Spacer
Blocks
Additional 3/8” Projection
Outside Mount with
Extension Brackets
Minimum 2” Surface
2 3/4”
1 1/2”
2”
1 1/4”
3”

3
1. Insert installation
screws into open
holes/slots.
2. Mount and secure
brackets to ceiling or wall.
Brackets are universal and
can accommodate both
mounting methods.
3. Verify brackets are
secure on left and right
side.
1. Drill or Screw Driver
2. Installation Screws
(provided with product)
3. Installation Bracket
(provided with product)
1. Insert fabric roll/tube
between mounting brackets.
2. Secure fabric into
designated mounting points.
3. Apply fascia to front of
brackets to cover fabric
roll/tube.
4. Apply end-cap covers to
brackets (if applicable).
3.
2.
4.
3 15/16”
4 3/16”
4” Fascia Valance
1. Mount and secure
brackets to wall.
2. Press Valance into
bracket.
3. Make sure brackets are
secured on both left and
right side.
1. Drill or Screw Driver
2. Installation Screws
(provided with product)
3. Installation Bracket
(provided with product)
3.5”
4.55”
Minimum Jamb
Depth: 1 1/2”
1. Insert installation
screws into open
holes/slots.
2. Mount and secure
brackets to ceiling or wall.
Brackets are universal and
can accommodate both
mounting methods.
3. Verify brackets are
secure on left and right
side.
1. Drill or Screw Driver
2. Installation Screws
(provided with product)
3. Installation Bracket
(provided with product)
1. Insert fabric roll/tube
between mounting
brackets.
2. Secure fabric into
designated mounting
points.
3. Apply end-cap covers to
brackets (if applicable).
CASSETTE/FASCIA
VALANCE/BRACKET
REQUIRED TOOLS
& MATERIALS MOUNT INSTRUCTION REFERENCE REFERENCE
PVC Valance
Roller Shade
Open Roll Bracket #1
Roller Shade
Open Roll Bracket #1-
Extension
Bracket
Cover/Endcap
(inside view)
Bracket
2 1/2”
2 1/4”
2 1/2” 2 3/8”
Bracket
Cover/Endcap
(inside view) Bracket
2 1/2”
2 1/4”
3” 2 7/8”
Valances & Brackets: Instructions
1. Insert installation
screws into open
holes/slots.
2. Mount and secure
brackets to ceiling or wall.
Brackets are universal and
can accommodate both
mounting methods.
3. Verify brackets are
secure on left and right
side.
1. Drill or Screw Driver
2. Installation Screws
(provided with product)
3. Installation Bracket
(provided with product)
1. Insert fabric roll/tube
between mounting
brackets.
2. Secure fabric into
designated mounting
points.
3. Apply end-cap covers to
brackets (if applicable).
Roller Shade
Open Roll Bracket #2
Roller Shade
Open Roll Bracket #2 -
Extension
Bracket
Cover/Endcap
(inside view)
Bracket
2 1/2”
2 1/4”
2 1/2” 2 3/8”
Bracket
Cover/Endcap
(inside view) Bracket
2 1/2”
2 1/4”
3” 2 7/8”

4
Choose Cassette/Headrail and Follow Instructions
1. Insert installation
screws into open
holes/slots.
2. Mount and secure
brackets to ceiling or wall.
Brackets are universal and
can accommodate both
mounting methods.
3. Verify brackets are
secure on left and right
side.
1. Drill or Screw Driver
2. Installation Screws
(provided with product)
3. Installation Bracket
(provided with product)
1. Click bracket into
headrail to lock into
position.
2. Make sure brackets are
secured on both left and
right side.
CASSETTE/FASCIA
VALANCE/BRACKET
REQUIRED TOOLS
& MATERIALS MOUNT INSTRUCTION REFERENCE REFERENCE
Small Cassette
Compact Cassette
Square Cassette
Opera-S Cassette
Opera-M Cassette
With universal ceiling or wall bracket
For ceiling
mount
For wall
mount.
Minimum
bracket
depth for
inside
mount
1 1/4”
3 1/8”
2 1/8”
2 3/8”
Minimum bracket
depth for inside
mount 1 3/4”
For ceiling mount
For wall
mount.
3 1/8”
3 5/8”
2 7/8”
With universal ceiling or wall bracket
Minimum
bracket
depth f
or inside
mount
1 3/4”
For ceiling mount
For wall
mount.
3 1/8”
2 7/8”
Note: Not available with fabric insert.
3 5/8”
With universal ceiling or wall bracket
3 1/8”
5 1/2”
For Ceiling Mount
For Wall
Mount
Minimum
bracket
depth
for inside
mount
1 1/2”
With universal ceiling or wall bracket
With universal ceiling or wall bracket
Minimum
bracket
depth f
or inside
mount
1 1/2”
For wall
mount.
3 1/4”
2 1/2”
4 3/8”

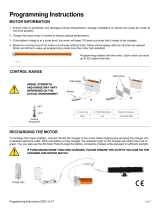
Chain Cover/Shroud
Installation & Operation Instructions
• Chain Cover/Shroud is placed over the control chain.
• Chain Cover/Shroud is kept in a closed position by gravity.
• Chain Cover/Shroud is manually lifted/raised by hand to expose a small amount of control chain.
• Chain Cover/Shroud must continue to be held in a raised/opened position by hand.
• Small amount of exposed control chain can be to used manually to operate (raise/lower) products as required.
• Once released, gravity will automatically close Chain Cover/Shroud once again.
Chain Cover/Shroud - Summary
2. Lift up Chain
Cover/Shroud to
access control chain
and operate.
1. Optional magnetic
tabs/catches/plates
included with
product can be
attached to the
window, wall or
opening. Suggested
but not required.
3. Pull Chain up or
down as desired
to operate shade.
4. Release once done
and Chain Cover/Shroud
will return to child-safety
position.
Easy to Install and Operate
8” or Less 8” or Less
Lift/Raise
Hold
Operate
Lower
8” or Less
MISE EN GARDE
Les enfants en bas âge peuvent s’étrangler avec des cordes. Enlevez
immédiatement ce produit si une corde mesurant plus de 22 cm devient
accessible ou si le contour d’une boucle de plus de 44 cm devient accessible.
RISQUE D’ÉTRANGLEMENT
WARNING STRANGULATION HAZARD
Young children can be strangled by cords. Immediately remove
this product if a cord longer than 22 cm or a loop exceeding
44 cm around becomes accessible.
NOTE:
All products, operating, or lift systems must comply with following the warning stated below. Chain Cover/Shroud
must be used for all applications. A product cannot be considered properly/safely installed unless this
installation/operating rule is strictly followed. Please follow the instructions for both “Inside” and “Outside”
mounted products. Extension brackets are suggested for outside mounted products.
Magnet
Magnet
Magnet

Miracle Lift
Installation Instruction
AB
Turn clockwise
to give
more tension
Turn counter
clockwise to
loosen tension
10 0
%
1
0
0
%
C
a
n
a
d
i
a
n
O
w
n
e
d
&
O
p
e
r
a
t
e
d
MADE IN CANADA
MAXXMAR WINDOW FASHIONS
150 Bartor Road, Toronto, Ontario M9M 1H1
Tel: 416-742-6299 - Toll Free: 1-866-916-6299 - Fax: 416-742-1772
www.maxxmar.com
Maxx-Lift
For Regular Shades
Insert 3 mm Allen Key (A) into the slot (B) on
the side of the shade. Turn CLOCKWISE to
give more tension or COUNTER-CLOCKWISE
to loosen tension on the shade.
For Opera/Double Shades
Insert 3 mm Allen Key (A) into the
slot (B) on the side of the shade. Turn
COUNTER-CLOCKWISE to give more
tension or CLOCKWISE to loosen
tension on the shade.
MISE EN GARDE
Les enfants en bas âge peuvent s’étrangler avec des cordes. Enlevez
immédiatement ce produit si une corde mesurant plus de 22 cm devient
accessible ou si le contour d’une boucle de plus de 44 cm devient accessible.
RISQUE D’ÉTRANGLEMENT
WARNING STRANGULATION HAZARD
Young children can be strangled by cords. Immediately remove
this product if a cord longer than 22 cm or a loop exceeding
44 cm around becomes accessible.
Cordless
Cordless

MOTORIZATION
INSTRUCTION GUIDE
ORIGINAL GENERATION
COOL MOTION
MISE EN GARDE
Les enfants en bas âge peuvent s’étrangler avec des cordes. Enlevez
immédiatement ce produit si une corde mesurant plus de 22 cm devient
accessible ou si le contour d’une boucle de plus de 44 cm devient accessible.
RISQUE D’ÉTRANGLEMENT
WARNING STRANGULATION HAZARD
Young children can be strangled by cords. Immediately remove
this product if a cord longer than 22 cm or a loop exceeding
44 cm around becomes accessible.

Maxx Motor
Original Generation
Domlux & Cool Motion
Operation & Programming Instructions
Cool Motion: Basic Operation and Troubleshooting
Specifications
Motor Load Torque: 0.7Nm/34rpm, 1.1Nm/25rpm, 2Nm/28rpm
Battery: Li-ion Battery, 2000mAH, 7.4V.
Note:
l The side of motor head with SETTING button should
face towards you (towards the outside).
l Motor antenna should be as straight as possible in the position
far away from metal objects. Direct contact with metal objects must be avoided, otherwise, the
receiving distance will be seriously affected.
l Please charge the battery when motor alarm goes off or when motor begins to falter.
2
Original Generation Cool Motion
Operation & Programming Instructions
Command Item Key Combination Description Illustration
Program
the First
Transmitter
with Motor
Note:
Please skip this step and go to the next step if the
manufacturer has programmed a transmitter with the
motor before delivery.
2Press the CONFIRM
button on transmitter
Press SETTING
button on motor head
for 3 seconds
Release button when
motor jogs
1
2
3
The blind is in program mode
If motor goes up: do nothing
more. If motor goes down:
proceed to the next step
Release both buttons when
motor jogs
Motor goes up, its rotation
direction has been revised
Press the UP button
Press LIMIT + STOP
buttons for
3 seconds untill the
blind jogs
Press the UP button
Keep pressing LIMIT
button on any
programmed
transmitter
Press the DOWN
button on transmitter
Press the STOP but-
ton when motor run-
ning close to the end
point of bottom limit
Press either UP or
DOWN button
Press the CONFIRM
button on transmitter
once
Release button when motor jogs
Motor runs down
Motor stops
Motor runs step by step to
adjust bottom limit accurately
Motor jogs up and down.
Limit Setting has been set
Change
Motor
Rotation
Direction
1
2
3
4
5
1
The whole limit must be finished at one time.
Setting
Lower
Limit

Cool Motion: Basic Operation and Troubleshooting Continued
3
Command Item Key Combination Description Illustration
Setting
Upper
Limit
Setting
Favourite
Position
Program
Transmitter
using a
Programmed
Transmitter
Delete all
Original
Transmitters
Delete itself
from Motor
Charging
FAQ
6
7
8
9
1
2
2
1
3
1
2
Press UP button on
transmitter
Press STOP button
when motor gets
close to end-point of
upper limit
Press either UP or
DOWN button
Motor runs step by step to adjust
upper limit accurately
Motor jogs up and down.
Limit Setting has been set
Move blind to desired favourite
position
Favourite position has now been
set
Motor will jog again: Transmitter B
has been programmed
Motor stops
Motor runs up
Press UP or DOWN
button
Press and hold LIMIT
button and UP
button at same time
until motor jogs
STOP button now
functions as favourite
Press CONFIRM
button on
Transmitter B
Keep pressing LIMIT
button on Transmitter
A, then press
DOWN button
If nothing works, please check that the battery is fully charged
If the motor keeps running in the same direction continually, the setup limit needs to be re-set.
The motor works with a Li-ion battery, please charge it when the motor alarm goes off or when the motor
begins to falter. Please charge the motor using professional charger CH-8, 4V/1A. Charging time: up to
4 hours or when indicator light turns green. Please disconnect from charger when done.
Press CONFIRM
button 3 times to jog
Keep pressing LIMIT
button on the first
programmed Trans-
mitter A, then press
CONFIRM button
Press the CONFIRM
button on transmitter
This can only be performed after setting motor limit.
Skip this step and proceed to the next one if the
subsidiary transmitter is not needed.
Motor will run to the favourite
position and stops
Motor will jog, then release both
buttons
This Transmitter has been
deleted from the motor
Release both buttons once motor
jogs: now all transmitters have
been deleted except for
Transmitter A

Maxx Motor
Original Generation Cool Motion
Rechargeable Bluetooth Battery Motor
Operation & Programming Instructions
Specifications
Motor Load Torque: 1.1Nm / Speed: 28rpm
Battery: DC7.4V/2000mAH
Note:
l The side of motor head with SETTING button should
face towards you (towards the outside).
l Motor antenna should be as straight as possible in
the position far away from metal objects. Direct contact with metal objects must be avoided, otherwise, the
receiving distance will be seriously affected.
l Please charge the battery when motor alarm goes off or when motor begins to falter.
l Please change switch from OFF to ON, after which, the motor will begin to work after one beep.
4
Original Generation Cool Motion
Rechargeable Bluetooth Battery Motor
Operation & Programming Instructions
Cool Motion Rechargeable Bluetooth Battery Motor: Basic Operation & Troubleshooting
Command Item Key Combination Description Illustration
Program
the First
Transmitter
with Motor
Note:
Please skip this step and go to the next step if the
manufacturer has programmed a transmitter with the
motor before delivery.
2Press the CONFIRM
button on transmitter
Press SETTING
button on motor head
for 3 seconds
Release button when motor
jogs and beeps
1
2
3
The blind is in program mode
If motor goes up: do nothing
more. If motor goes down:
proceed to the next step
Release both buttons when
motor jogs and beeps
Motor goes up, its rotation
direction has been revised
Press the UP button
Press LIMIT + STOP
buttons for 3 seconds
untill the blind jogs
Press the UP button
Keep pressing LIMIT
button on any
programmed
transmitter
Press the DOWN
button on transmitter
Press the STOP but-
ton when motor is
close to the end point
of bottom limit
Press either UP or
DOWN button
Press the CONFIRM
button on transmitter
Release button when motor jogs
and beeps
Motor runs down
Motor stops
Motor runs step by step to adjust
bottom limit accurately
Motor jogs up and down.
Limit Setting has been set
Change
Motor
Rotation
Direction
1
2
3
4
5
1
The whole limit must be finished at one time.
Setting
Lower
Limit

5
Command Item Key Combination Description Illustration
Setting
Upper
Limit
Setting
Favourite
Position
Program
Transmitter
using a
Programmed
Transmitter
Delete all
Original
Transmitters
Delete itself
from Motor
Charging
Bluetooth
Operation
FAQ
6
7
8
9
1
2
2
1
3
1
1
2
2
Press UP button on
transmitter
Press STOP button
when motor gets
close to end-point of
upper limit
Press either UP or
DOWN button
Motor runs step by step to adjust
upper limit accurately
Motor jogs up and down.
Limit Setting has been set
Move blind to desired favourite
position
Favourite position has now been
set
Motor will jog again: Transmitter B
has been programmed
Motor stops
Motor runs up
Press UP or DOWN
button
Press and hold LIMIT
button and UP
button at same time
until motor jogs
STOP button now
functions as favourite
Press CONFIRM
button on
Transmitter B
Keep pressing LIMIT
button on Transmitter
A, then press
DOWN button
The motor works with a Li-ion battery, please charge it when the motor alarm goes off or when the motor
begins to falter. Please charge the motor using professional charger CH-8, 4V/1A. Charging time: up to
4 hours or when indicator light turns green. Please disconnect from charger when done.
Press CONFIRM
button 3 times to jog
Keep pressing LIMIT
button on the first
programmed Trans-
mitter A, then press
CONFIRM button
Press the CONFIRM
button on transmitter
This can only be performed after setting motor limit.
Skip this step and proceed to the next one if the
subsidiary transmitter is not needed.
Motor will run to the favourite
position and stops
Motor will jog, then release both
buttons
This Transmitter has been
deleted from the motor
Release both buttons once motor
jogs: now all transmitters have
been deleted except for
Transmitter A
Cool Motion Rechargeable Bluetooth Battery Motor: Basic Operation & Troubleshooting Continued
Download APP from Apple Store or Google Play and use key words 3L SMART BLIND. New users need to
register a new account and follow step 2 below. Subsequent users can share the same account:
App settings via “Sync with existing account” - see menu under SETTINGS.
Press SETTING button on motor 3 times - when motor beeps, the motor is reset and in discoverable mode.
Pease follow all of the APP’s instructions to continue program or operations.
If nothing works, please check:
l whether power switch on motor is switched to ON.
l whether Bluetooth has been reset to discoverable mode.
l whether Cellphone Bluetooth is on and enabling access.
l If the motor keeps running in the same direction continually, the setup limit needs to be re-set.

Motorization
MaxxLink and
Home Automation
MaxxLink
Control your blinds from anywhere using your phone or tablet. Voice commands are
available if Integrated with Amazon Alexa or Google Home (Google Assistant).
System requirements
• A strong WiFi signal (3 bars or more) in the location where you
will setup your Smart Controller.
• The MaxxLink only supports 2.4GHz WiFi(IEEE 802
11b/g/n), not SGHz.WiFi security needs to be set to WPA-PSK or
WPA2·PSK.
• A smartphone or tablet running Android 5.0 (Lollipop) or higher,
or lOS 8 or higher is needed.
Code for MaxxLink: M6707
Getting to know your MaxxLink
1. Download the Neo Smart Blinds app
Download the app to your phone or tablet by searching Neo Smart Blinds on Google Play or the App Store.
Note: Do not Install Neo Smart Blinds Blue
2. Plug in your MaxxLink in reach of your home WIFI
Choose a place not too far from your home router or a place you know has good WiFI signal strength. You will be able to change its
location after, If necessary.
3. Create an account and choose the setup code written on the cover
After opening the app, tap on Create one to create a new account. Enter a valid email address and choose a pass word, select the
region time zone from the place where the MaxxLink will be located. Choose the setup code written in the cover and tap on Register.
4. Follow the app step by step to add the MaxxLink
Have in hand the home WiFi password. It will be necessary to connect the MaxxLink to the Internet.
Note: Some Android users won't be connected quickly to the hotspot. If it is the case, please wait about 10 seconds before returning to the
app. During this time, your device may notify you that the hotspot does not have Internet access, and will prompt you whether you
want to remain connected. You need to select the option that will allow you to keep connected before returning to the app
Troubleshooting
1. The home WIFI doesn't appear in the step 4
Try rescanning, if the problem persists, you will need to reposition the MaxxLink to a place with stronger WiFi signal. In this case, exit the
process (tap on the menu, then tap Your Rooms), replace the MaxxLink and start over.
2. The MaxxLink LED in the bottom is not blinking blue - the process fails in the last step Press the S button for 10 seconds, then
press the R button once and start over. Pay special attention when typing the WiFi password.
Need more help?
Visit neosmartblinds.com/smartcontroller for detailed instructions about how to use the app and troubleshooting.
Integrations
1. Smart home devices
Visit neosmartblinds.com/smartcontroller-integrations for detailed information about connecting to Amazon Alexa, Google Home and
other systems.
2. Control 4
Please send an email to [email protected] with your name,your email and your company's name. This Information is necessary
to always send to you any further driver update.
MaxxLink Status:
6
Motorization: MaxxLink & Home Automation
/