Page is loading ...

To complete your project, you will also need:
•Drilldriverwith1/4”and1/8”drillbits
•7/16”wrench
•Tapemeasure,pencil/markerandsafetyglasses
•treatedwoodpost
Planning
•Priortoconstruction,checkwithyourlocalregulatoryagency
forspecialcoderequirementsinyourarea.
•Contactyourutilitysuppliertolocateandmark
undergroundlines.
•Carefulplanningandmeasuringofyourfenceprojectis
essential,asmovingpostsaftertheconcretesetsis
extremelydifcult.
Digging Post Holes
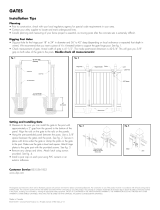
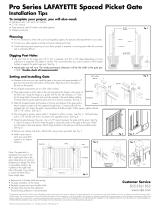
•Digpostholeforthehingepost18”to24”indiameterand
36”to42”deep(dependingonlocalordinanceorexpected
frostdepthinwinter).Werecommendthatyouinsertapieceof4x4treatedlumbertosupportthegatehingepost.
SeeFig.1.
•Actualgatesizewillvary.Theinsidepost–to-postdimensionwillbethewidthofthegateplus1-1/4”.
Double-check all measurements!
Assembling and Installating the Gate
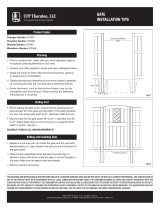
•Measuretobesureyoucaninstallthegatetothepostwithapproximatelya2”gapfromthegroundtothebottomof
thegate.Aligntherailsonthegatetotherailsonthefencepanels.
•Layallgatecomponentsoutonaat,cleansurface.
•Placegatejambsonbothsidesoftherailsandplacethehingesinthecenterofthefencerail.Usingthehingeasa
guide,drillthefour(4)necessary¼”holesforthehingebolts.Ensuretherailsarefullyinsertedinthejambbefore
drilling.Theboltsneedtogothroughthejambandrailtofunctionproperly.SeeFig.2.
•Slidethehingedbracketandbracketonthetopandbottomofthegatejambs.Attachhingestojambswiththe
suppliedthroughbolts.Connectboltswiththesuppliedcapnuts.Ensurethegateissquarebeforeallboltsaretight.
Whensquare,tightenallboltswith7/16”wrench.SeeFig.2.
•Hangthegatebetweentheposts.Usea5/8”spacerbetweenthegateandtheposts.SeeFig.3.Secureinplacewith
shimsunderthegateorclampthejambonthegatetothepost.Makesurethegateislevelandsquare.Attachhinge
bracketstothegatepostwiththeprovidedscrews.SeeFig.4.
•Removeanyclampsandshims.Attachlatchusingscrews
provided.SeeFig.5.
•InstallapostcaponeachpostusingPVCcementoran
exterioradhesive.
Pro Series Privacy Gate
Installation Tips
fig. 2
5/8
Fig.4 DoverGateSpacer.ai
fig. 3

Note:Thegatelatchisdesignedtobeusedontheleftorrighthandsideofthegate,dependingoncustomerpreference
ordesign.Thelatchisassembled,readytobeinstalledontherighthandsideofthegate.Ifyoudesiretoswitchthelatch
followthesesimplesteps:
•Removethe2shoulderboltsandspring.
•Changeorientationoftheclicker
•Re-attachspringandinsertshoulderbolts.
•Shoulderboltsmustbefullytightened.Threadlockingadhesiveisrecommended.
Latch
Striker
Fig.6 DoverLatch.ai
fig. 5
Customer Service
855-556-1852
www.ufpi.com
Thediagramsandinstructionsshownareforillustrationpurposesonlyandarenotmeanttoreplacealicensedprofessional.Anyconstructionoruseoftheproductmustbein
accordancewithalllocalzoningand/orbuildingcodes.Theconsumerassumesallrisksandliabilityassociatedwiththeconstructionoruseofthisproduct.Theconsumeror
contractorshouldtakeallnecessarystepstoensurethesafetyofeveryoneinvolvedintheproject,including,butnotlimitedto,wearingtheappropriatesafetyequipment.
EXCEPTASCONTAINEDINTHEWRITTENLIMITEDWARRANTY,THEWARRANTORDOESNOTPROVIDEANYOTHERWARRANTY,EITHEREXPRESSORIMPLIED,ANDSHALL
NOTBELIABLEFORANYDAMAGES,INCLUDINGCONSEQUENTIALDAMAGES.
©2012UniversalForestProducts,Inc.Allrightsreserved.6367PrivGate_4/13
fig. 4

Servicio al Cliente
855-556-1852
www.ufpi.com
Losdiagramasylasinstruccionesquesemuestransonsóloparanesilustrativosynosustituyenaunprofesionalconlicencia.Cualquierconstrucciónousodelproductodebe
estarenconformidadcontodosloscódigoslocalesdezonicacióny/odeconstrucción.Elconsumidorasumetodoslosriesgosyresponsabilidadesasociadosconlaconstruc-
ciónoelusodeesteproducto.Elconsumidorocontratistadebetomartodaslasmedidasnecesariasparagarantizarlaseguridaddetodoslosinvolucradosenelproyecto,
incluyendo,peronolimitadoal,usodelequipodeseguridadapropiado. EXCEPTOPORLOQUESEINDICAENLAGARANTÍALIMITADAPORESCRITO,ELGARANTENO
OFRECENINGUNAOTRAGARANTÍA,EXPRESAOIMPLÍCITA,YNOSERÁRESPONSABLEPORNINGÚNDAÑO,INCLUSODAÑOSCONSECUENTES.
©2012UniversalForestProducts,Inc.Todoslosderechosreservados.6367PrivGate_4/13
Pestillo
Fig.6 DoverLatch.ai
Plancha
de cerradura
fig. 5fig. 4
Nota:ElpestillodepuertaDoverestádiseñadoparaserutilizadoenelladoizquierdooderechodelapuerta,dependiendode
lapreferenciadelclienteodeldiseño.Elpestilloestámontado,listoparaserinstaladoenelladoderechodela
puerta.Sideseacambiarelpestillosigaestossencillospasos:
•Quitelos2pernosdeajusteyelresorte.
•Cambielaorientacióndelclicker.
•Vuelvaacolocarelresorteeinsertelospernosdeajuste.
•Lospernosdeajustedebenestarbienapretados.Serecomiendaelusodeunadhesivobloqueadorderoscas.
/
