Veranda 181973 Operating instructions

Type
Operating instructions

Veranda 181973 is an arched lattice top gate that adds style and security to your outdoor space. Made with durable materials, it's built to last and withstand the elements. Easy to install, it comes with all necessary hardware and instructions for a quick setup.

Veranda 181973 is an arched lattice top gate that adds style and security to your outdoor space. Made with durable materials, it's built to last and withstand the elements. Easy to install, it comes with all necessary hardware and instructions for a quick setup.

6'X42" ARCHED LATTICE TOP GATE
ASSEMBLY INSTRUCTIONS AND INSTALLATION TIPS
At the top of the picket assembly, slide the H-rail over the top of the
pickets (fig. 3).
Slide the lattice into the top channel of the H-rail (fig. 4).
Slide the top notched rail over the top of the lattice (fig. 5).
Step 1
Step 2
Step 3
Step 4
PLANNING: Prior to construction, check with your local regulatory
agency for special code requirements in your area. Contact your
utility supplier to locate and mark underground lines.
Careful planning and measuring of your fence project is essential,
as moving posts after the concrete sets is extremely difficult.
NOTE: PicketLock
is a
patent-pending technology
that provides a glue- and
fastener-free connection
between the pickets and
rails. You may spray soapy
water onto components to
help them slide more easily
into their corresponding
channels. A non-marring
rubber mallet may also
be used to gently tap
components more firmly
into place.
Take the bottom rail and align one of the pickets with the channel in
the bottom rail. Slide the picket into the channel (fig. 1).
Begin to insert the remaining pickets into the channel of the bottom rail
(fig. 2). Because the pickets have a tongue-and-groove design, be sure
to insert each in the same direction. Tightly align the tongue of each
picket into the groove of the next one as they slide into the channel.
Continue to slide the pickets to the opposite side of the bottom rail
until all are inserted into the channel.
Actual size: 68-1/2"h x 41-1/2"w
Insert the lattice channels on both ends of the lattice between the top
rail and H-rail (fig. 6).
Place gate jambs on both sides of the rails and place the hinges on
the gate jamb so they are aligned with the rails. Using the bracket as
a guide, drill the three (3) necessary 1/4" holes for the bracket bolts.
Repeat these steps for the hinged brackets as well (fig. 7). Ensure the
rails are fully inserted in the jamb before drilling. The bolts need to go
through the jamb and rail to function properly.
Slide the hinged bracket and bracket on the top and bottom of the gate
jambs. Attach hinges to jambs with the supplied through bolts. Connect
bolts with the supplied cap nuts. Ensure the gate is square before all
bolts are tight. When square, tighten all bolts with a 7/16" wrench.
Step 5
Items you may need:
Soapy water
Non-marring
rubber mallet
Wooden wedge
Power drill
1/4" drill bit
7/16" wrench
• Shims
fig. 7
fig. 1 fig. 2
fig. 3
fig. 4
fig. 6
fig. 5
Measure to be sure you can install the gate to the post with approximately
a 2" gap from the ground to the bottom of the gate. Align the rails on
the gate to the rails on the fence panels.
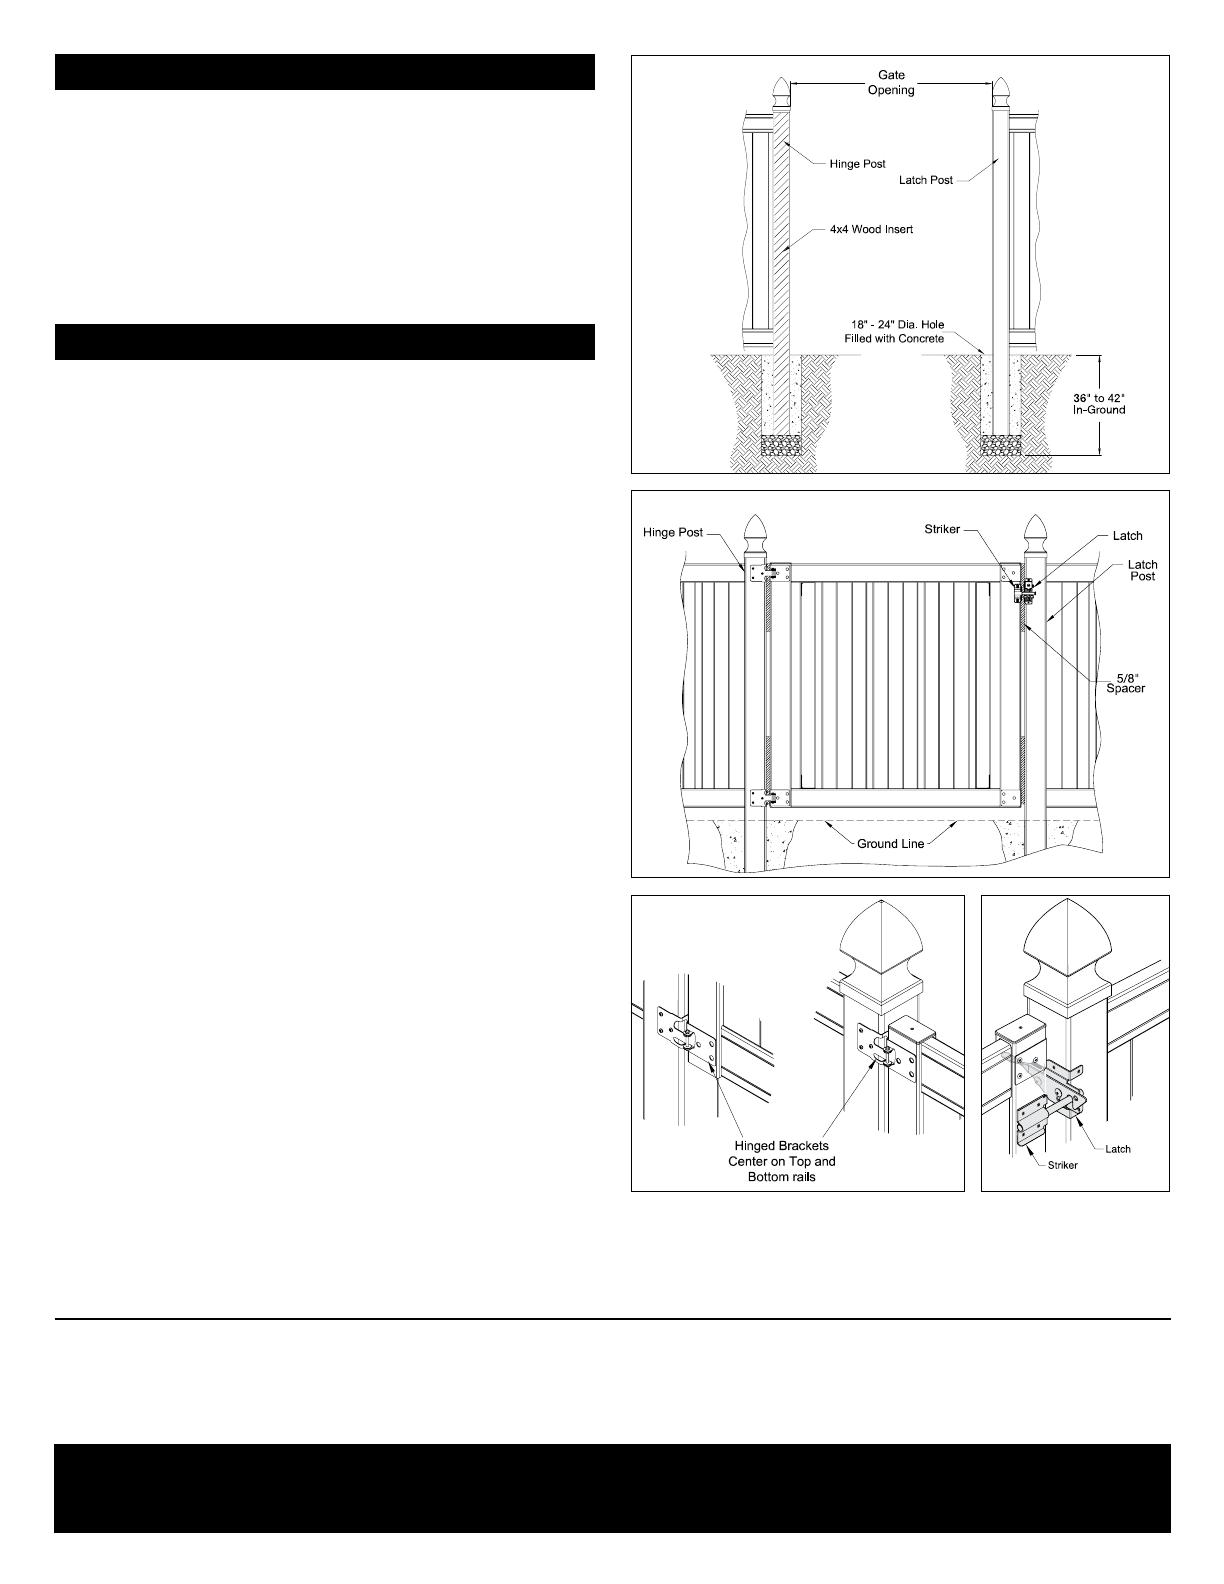
Hang the gate between the posts. Use a 5/8" spacer between the
gate and the posts (fig. 9). Secure in place with shims under the gate
or clamp the gate jamb to the post. Make sure the gate is level and
square. Attach hinge brackets to the gate post with the provided
screws (fig. 10).
Remove any clamps and shims. Attach latch using screws provided
(fig. 11).
Install a post cap on each post using PVC cement or an exterior adhesive.
NOTE: The gate latch is designed to be used on the left- or right-hand
side of the gate, depending on customer preference or design. The
latch is assembled and ready to be installed on the right-hand side of
the gate. If you desire to switch the latch, follow these simple steps:
Remove the 2 shoulder bolts and spring
Change the orientation of the striker
Reattach the spring and insert the shoulder bolts
Shoulder bolts must be fully tightened. Thread-locking adhesive
is recommended.
Dig post hole for the hinge post 18" to 24" in diameter and 36" to 42"
deep (depending on local ordinace or expected frost depth in winter).
We recommend that you insert a piece of 4x4 treated lumber to support
the gate hinge post (fig. 8).
Check measurement of gate. Actual width of the gate is 41-1/2".
The inside post-to-post dimension is 42-3/4". This will give you a
5/8" gap on both sides of the gate to the posts. DOUBLE-CHECK
ALL MEASUREMENTS!
Installing the Gate
Digging Post Holes
fig. 8
fig. 9
fig. 10 fig. 11
©2014 Universal Forest Products, Inc. All rights reserved.
2801 E. Beltline NE, Grand Rapids, MI 49525 800.332.5724 7810 _7/14
www.ufpi.com
THE DIAGRAMS AND INSTRUCTIONS IN THIS BROCHURE ARE FOR ILLUSTRATION PURPOSES ONLY AND ARE NOT MEANT TO REPLACE A LICENSED PROFESSIONAL. ANY CONSTRUCTION OR
USE OF THE PRODUCT MUST BE IN ACCORDANCE WITH ALL LOCAL ZONING AND/OR BUILDING CODES. THE CONSUMER ASSUMES ALL RISKS AND LIABILITY ASSOCIATED WITH THE
CONSTRUCTION OR USE OF THIS PRODUCT. THE CONSUMER OR CONTRACTOR SHOULD TAKE ALL NECESSARY STEPS TO ENSURE THE SAFETY OF EVERYONE INVOLVED IN THE PROJECT,
INCLUDING, BUT NOT LIMITED TO, WEARING THE APPROPRIATE SAFETY EQUIPMENT. EXCEPT AS CONTAINED IN THE WRITTEN LIMITED WARRANTY, THE WARRANTOR DOES NOT
PROVIDE ANY OTHER WARRANTY, EITHER EXPRESS OR IMPLIED, AND SHALL NOT BE LIABLE FOR ANY DAMAGES, INCLUDING CONSEQUENTIAL DAMAGES.
  • Page 1 1
  • Page 2 2
  • Page 3 3
  • Page 4 4

Veranda 181973 Operating instructions

Type
Operating instructions

Veranda 181973 is an arched lattice top gate that adds style and security to your outdoor space. Made with durable materials, it's built to last and withstand the elements. Easy to install, it comes with all necessary hardware and instructions for a quick setup.

Ask a question and I''ll find the answer in the document

Finding information in a document is now easier with AI

in other languages