Page is loading ...

SHADOWBOX
Installation Tips
Planning
• Priortoconstruction,checkwithyourlocalregulatoryagencyforspecialcode
requirementsinyourarea.
• Contactyourutilitysuppliertolocateandmarkundergroundlines.
• Sketchoutthelayoutofyourfenceandcalculatethenumberofpanels,gates,
posts,bracketsandcapsneededforyourproject.
• Carefulplanningandmeasuringofyourfenceprojectisessential,asmoving
postsaftertheconcretesetsisextremelydifficult.Mostyardsarerelativelylevel
andwillallowforafairlysimpleinstallation.Ifyouryardissteeplypitchedor
isveryuneven,besuretoallowfortherequiredmountingheightoftheadjacent
panelwhensettingyourposts.Youmayneedto“stairstep”thepanelsinextreme
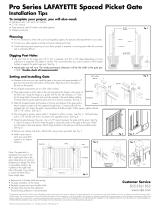
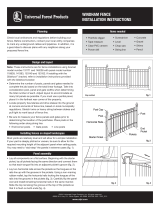
cases.Seefig.1.
Digging Post Holes
• Digpostholes10"to12"indiameterand36"to42"deep(dependingonlocal
ordinanceorexpectedfrostdepthinwinter).Seefig.2.
• Checkmeasurementoffence.ActualsizeoftheShadowboxpanelis68-1/2"tallx
66-7/8"wide.Thepanelisdesignedtobemountedbetweenpoststhatare72"
center-to-centerspacing(67"betweenposts).Useastringlinetoensureallpostholes
areinlineandverifyspacingbetweenholes. Double-check all measurements!
Installing Brackets to Posts
• Preparethepre-assembledfencepanelsbyslidingthemountingbracketsintotherails
withtheopenspacefacingouttowardthepicket.Seefig.3.Slidethebracketfullyin
therail.Later,youwillbeabletoslidethebracketoutwardtogetaperfectfitifyour
postopeningisslightlywiderthanthesuggesteddimensionof67".
Setting and Installing Posts and Panels
• Startingwithacorner,mixconcreteinthefirstholepertheinstructionsonthebag.
Mixthoroughlyandinstallthepostintotheholeandtaptheposttotheproperdepth.
Measuretobesureyoucaninstallthefinishedpaneltothepostwithanapproximately
2"gapfromthegroundtothebottomofthepanel.Youalsoneedtoleavea1-1/2"
spacefromthetopofthepaneltothetopofthepost.The1-1/2"spacingallowsthecap
tobeinstalledtothetopofthepostwithoutinterferencewiththetoprail.Seefig.2.
• Installthenextpostasdescribedabove,payingcarefulattentiontothe67"spacing
betweenposts.Itisimportanttodeterminetheheightrequirementformountingthe
nextpanel,asyoumayneedtoleavemorepostabovethegroundtoaccommodate
itsmountingheight(trueifyouareinstallingthefenceonanunevenlandscape).Slide
thepanelwiththebracketsinstalledbetweenpostsandpositionthepaneltothe
desiredheight.Usewoodenblocksorshimstoobtaintheproperspacingfromthe
ground.Usingthesuppliedscrews(fourperbracket),attachthepanelbrackettotheposts.Besuretocenterthefencebracketsonthepost
Oncethepanelisinplace,useadrilltomakeapilotholethroughtherailintothebracketwitha1/8”drillbit.Placescrewthrough
therailintothebrackettoholditinplace.
• Usealeveltoensurethefenceisplumbandthepostsaresquarewiththeground.Bracethepanelandposttoholdthepositionasthe
concretesets(atleastovernight).Continuesettingpostsandinstallingpanelstocompletetheproject.Oncepostsareset,finishpanel
installationbyusingtheprovidedscrewstosecurethefencebrackettothepanel(onescrewoneachside).
• InstallapostcaponeachpostusingaclearPVCcementoranexterioradhesive.
Customer Service 855-556-1852
www.ufpi.com
Step Method.eps
fig. 1
fig. 2
fig. 3
Thediagramsandinstructionsshownareforillustrationpurposesonlyandarenotmeanttoreplacealicensedprofessional.Anyconstructionoruseoftheproductmustbeinaccordancewithalllocalzoning
and/orbuildingcodes.Theconsumerassumesallrisksandliabilityassociatedwiththeconstructionoruseofthisproduct.Theconsumerorcontractorshouldtakeallnecessarystepstoensurethesafetyofeveryone
involvedintheproject,including,butnotlimitedto,wearingtheappropriatesafetyequipment.EXCEPTASCONTAINEDINTHEWRITTENLIMITEDWARRANTY,THEWARRANTORDOESNOTPROVIDEANY
OTHERWARRANTY,EITHEREXPRESSORIMPLIED,ANDSHALLNOTBELIABLEFORANYDAMAGES,INCLUDINGCONSEQUENTIALDAMAGES.
©2010-2011UniversalForestProducts,Inc.Allrightsreserved.5784Shdbx_4/13

SHADOWBOX
Consejos de instalación
Planificación
• Antesdecomenzarlaconstrucción,compruebeconsuagenciareguladoralocal
cualquierrequisitoespecialensuárea.
• Contácteseconlascompañíasdeserviciospúblicosparalocalizarymarcarlas
líneassubterráneas.
• Hagaunbosquejodeldiseñodesucercaycalculeelnúmerodepaneles,puertas,
postes,soportesymoldurasnecesariosparasuproyecto.
• Esesencialunaplanificaciónymedicióncuidadosadesucerca,puestoquemover
lospostesdespuésdequeelconcretosehaasentadoesextremadamentedifícil.La
mayoríadelospatiossonrelativamenteniveladosypermitenunainstalaciónbastante
sencilla.Sisupatiotieneunagranelevaciónoesmuydesigual,asegúresedeplanear
laalturademontajedeseadadelpaneladyacentecuandopreparesuspostes.Encasos
extremosustedpuedenecesitar“graduarlospeldaños”delospaneles.VealaFig.1.
Excavación de huecos para postes
• Excavehuecosparapostesde10pulgadasa12pulgadasdediámetroyde36
pulgadasa42pulgadasdeprofundidad(dependiendodelareglamentaciónde
construcciónlocalodelaprofundidaddeescarchaqueseespereenelinvierno).
VealaFig.2
• Compruebelamedidadelacerca.EltamañorealdelpanelShadowboxesde
68-1/2pulgadasdealtox66-7/8pulgadasdeancho.Elpanelestádiseñado
parasermontadoentrepostesespaciadospor72pulgadasdecentroacentro
(67pulgadasentrepostes).Useunacuerdaalineadoraparaasegurarsequetodos
loshuecosdelospostesestánalineadosyverifiqueelespacioentreloshuecos.
¡Compruebe dos veces todas las medidas!
Instalación de los soportes a los postes
• Preparelospanelesdecercapreensambladosdeslizandolossoportesenlosrielesconla
aberturahacialasestacas.Vealafigura3.Deslicecompletamentelossoportesenelriel.
Mástardeustedpodrádeslizarelsoportehaciafueraparaobtenerunencajeperfectosi
laaperturadelposteesunpocomásanchoqueladimensiónsugeridade67pulgadas.
Colocación e instalación de los postes y paneles
• Comenzandoenunaesquina,mezcleelconcretoenelprimerhuecodeacuerdoa
lasindicacionesenlabolsa.Mezclebieneinstaleelposteenelagujeroydépequeños
golpesalpostehastalograrlaprofundidadapropiada.Midaparaasegurarsequepuede
instalarelpanelacabadoalposteconunaaperturaaproximadade2pulgadasdesdeel
suelohastalaparteinferiordelpanel.Tambiénnecesitadejarunespaciode1-1/2
pulgadasdesdelapartesuperiordelpanelalapartesuperiordelposte.Elespaciode
1-1/2pulgadaspermiteinstalarlamolduraenlapartesuperiordelpostesininterferencia
delbarandalsuperior.Vealafig.2.
• Instaleelsiguientepostecomosedescribearriba,prestandomuchaatenciónalespacio
de67pulgadasentrelospostes.Esimportantedeterminarlaalturarequeridaparamontar
elsiguientepanel,puestoquepuedenecesitardejarmásespaciodepostesobreelsuelo
paraacomodarsualturademontaje(estoesverdadsiinstalalacercasobreunterreno
desnivelado).Desliceelpanelconlossoportesinstaladosentrelospostesyposicioneelpanelalaalturadeseada.Usebloquesdemadera
ocuñasparaobtenerelespacioapropiadodesdeelsuelo.Conlostornillosprovistos(4porsoporte),sujeteelsoportedelpanelalospostes.
Asegúresedecentrarlossoportesdelpanelsobreelposte.Unavezqueelpanelesteensulugar,utiliceuntaladroparahacerunagujeroatrave-
sandoelrielhastaelsoporteconunabrocade1/8”.Paseeltornilloatravésdelrielhastaelsoporteparamantenerloensulugar.
• Useunnivelparaasegurarsequelacercaestéenplomadayquelospostesesténenescuadraconelsuelo.Asegureelpanelyelposteparaque
sostenganlaposiciónamedidaqueelconcretoseasienta(porlomenosdurantelanoche).Continúecolocandolosposteseinstalandolospa-
nelesparacompletarelproyecto.Unavezcolocadoslospostes,terminelainstalacióndelospanelesusandolostornillosprovistosparaasegurar
elsoportedelacercadelpanel(untornilloacadalado).
•PongaunamoldurasobrecadaposteusandouncementoPVCtransparenteounadhesivoparausoexterior.
Servicio al Cliente
855-556-1852
www.ufpi.com
Step Method.eps
fig. 1
fig. 2
fig. 3
Losdiagramaseinstruccionesenestefolletosonsoloconfinesilustrativosynoreemplazanaunprofesionalcertificado.Cualquierconstrucciónousodeesteproductodebeestardeacuerdocontodoslos
códigoslocalesdeplanificaciónurbanay/oconstrucción.Elconsumidorasumetodoriesgoyresponsabilidadasociadosconlaconstrucciónousodeesteproducto.Elconsumidorocontratistadebetomar
todoslospasosnecesariosparagarantizarlaseguridaddetodoslosinvolucradosenelproyecto,incluyendoperonolimitándosealusodelequipoapropiadodeseguridad.EXCEPTOCOMOSEINDICAEN
LAGARANTÍALIMITADAESCRITA,UNIVERSALCONSUMERPRODUCTS,INC.NOOFRECENINGUNAOTRAGARANTÍA,SEAEXPRESAOIMPLÍCITA,YNOSERÁRESPONSABLEDENINGÚNDAÑO,
INCLUSODEDAÑOSCONSIGUIENTES.
©2010-2011UniversalForestProducts,Inc.Todoslosderechosreservados.5784Shdbx_4/13
/


