Page is loading ...

FEATURES MODELS
CODE
CHANGE
GUIDE
CODELOCKS UK
HEADQUARTERS
Tel: +44 (0) 1635 239645
Fax: +44 (0) 1635 239644
www.codelocks.com
Helpline, service & spares
Freephone: 0800 393 405
CODELOCKS INC US
Tel: +1 714 979 2900
Fax: +1 714 979 2902
www.codelocks.us
Helpline, service & spares
Toll free: 1.877.codelock
CODELOCKS
(Australia) PTY LTD
Tel: +61 2 9882 1009
Fax: +61 2 9882 6030
www.codelocks.com.au
Helpline, service & spares
Toll free: 1800 052 131
www.codelocks.com
CC-CL500-v4:1215
• Code Free Access mode is available on locks CL505,
CL515 and CL525. This is signied by a button with a
black dot.
• Inside handle always retracts the latch for exit.
• Weather resistant.
• Vandal resistant, with stainless steel buttons, and
clutch protection if the outside handle is forced.
• Reversible handles.
• Fits doors between 35mm (13/8”) and 60mm (21/2”)
thick without modication.
CL520/CL525 ONLY
• Split follower lock enables inside handle to retract
latch and deadbolt simultaneously, satisfying ‘means
of escape’ requirements for exit at all times. Prevents
accidental lock-ins.
• Deadbolt thrown by key to lock out code users after
work hours.
• Key will retract the latchbolt giving access for admin
functions.
• Double euro prole cylinder with 3 keys.
• Any euro prole cylinder may be used.
• On multiple door installations consideration should be
given to having all cylinders keyed alike, with restricted
key issue, for ease of management.
CL510/CL515* with tubular latchbolt
60mm (2 3/8”)
CL520/CL525*
with full Panic Function mortice lock and cylinder
55mm (21/4”)
84mm (35/16”)
235mm
(91/4”)
72mm
(213/16”)
CL500/CL505* for use with existing lock
35mm (13/8”) - 60mm (21/2”)
178mm (7”)
1
2
3
4
5
6
7
8
9
0
C
1
2
3
4
5
6
7
8
9
0
C
1
2
3
4
5
6
7
8
9
0
C
* Please note: Model numbers ending with a 5 are not illustrated above.

CODE CHANGE INSTRUCTIONS
MAINTENANCE
No maintenance of the working parts is necessary.
DO NOT OIL.
To maintain the nish the lock should be cleaned
regularly with a soft cloth. A silicone spray or similar
should be used to provide a protective lm against grit
and grime.
MANY CODES TO CHOOSE FROM
The CL500 code chamber (CL500, CL510, CL520)
consists of 11 buttons from which the code is selected,
and a ‘C’ button which is used to re-set the chamber
after an incorrect entry, and which must always be used
as the rst digit of a code. Buttons may only be used
ONCE in a code. For example, 1212 is not possible.
A CL500 code, or combination, can be entered in any
order or sequence; eg 1234 can be 4321 or 1342 or
whatever sequence is most convenient to remember.
With 11 buttons, a total of 2,047 different codes are
available, any of which can be entered in any sequence.
The total is arrived at as follows:
Most people will set a code in the range of 4 to 7 digits,
and the total number of codes in this range is 1,584.
The lock is factory set with a randomly selected 5 digit
code starting with the C button. The code is not recorded
by the factory. The code can be changed as often as
required to any other 5 digit code. Every new code must
start with the C button. Using the spare tumblers, one red
and one blue, the code length can be changed to 4 or 6
digits. Shorter codes are possible, but 1 or 2 digit codes
are not recommended.
NOTE: CL505, CL515 and CL525 have 10 coded buttons
giving 1,023 different codes.
CL500/CL505
Front and back plates
CL510/CL515
mortice latch
CL520/CL525
mortice lock
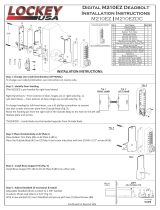
Take your CL500 lock off the door by unscrewing the
2 bolts in the backplate.
Press the C button to reset the chamber and place the
lock case on a at surface with the buttons down.
Remove the 4 red screws and carefully lift off the code
chamber plate. Check that all 12 springs are held in place
on the plate.
Note that the red tipped code tumblers correspond in
position to the existing code. The blue tipped non-code
tumblers ll the other positions. The C tumbler is not
coloured.
Hold the lock in your hand and depress the C button.
Keeping the C button depressed use tweezers to re-
position the tumblers to correspond with your new code.
The square notches of ALL tumblers MUST face outwards,
with the coloured tips ON TOP: See diagram below.
DO NOT force the tumblers in.
NB: Holding the C button depressed whilst removing
or replacing the tumblers is ESSENTIAL to avoid
damaging the internal mechanism. DO NOT attempt
to reposition the C tumbler.
1
4
2
5
3
BLUE
Door hung on RIGHT viewed from the
code side.
RED
Door hung on LEFT viewed from the
code side.
C
C
C
C
C
C
C
C
C
C
C
+ 1 digit = 11 codes
+ 2 digits = 55 codes
+ 3 digits = 165 codes
+ 4 digits = 330 codes
+ 5 digits = 462 codes
+ 6 digits = 462 codes
+ 7 digits = 330 codes
+ 8 digits = 165 codes
+ 9 digits = 55 codes
+ 10 digits = 11 codes
+ 11 digits = 1 code
Total codes
2,047
C
6
8
7
Replace the code chamber plate carefully with the
4 red screws.
Check the operation of the new code, and make a
written note of it before reinstalling the lock.
For door hung on RIGHT t blue tipped spindle on
code side, red tipped spindle on non-code side.
For door hung on LEFT t red tipped spindle on
code side, blue tipped spindle on non-code side.
* Please note: Model numbers ending with a 5 are not illustrated above.
Red tipped code
tumbler with square
notch in low position
Blue tipped non-code
tumbler with square
notch in high position
Section through lockcase
showing square notches in
tumblers facing outwards
/