2900 Deadbolt & 2950 Hook Bolt
Installation Instructions
Before Installing: Change User Code/Combinaon (OPTIONAL)
To change user code/combinaon, see instrucons below.
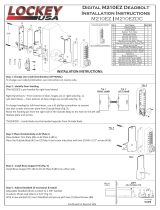
Step 1: Remove all previously installed hardware. Note: DO NOT discard previously installed Trim Plate (may be used).
Step 2: Using the template provided, mark mounng holes on the surface of the door.
Note: Aer marking mounng holes, check to ensure the drive/spindle hole is placed at the boom.
This mounng is opposite compared to most Adams Rite configuraons.
Step 3: Check template to guarantee proper measurements and hole paern. Drill holes accordingly.
Step 4: Aer drilling mounng holes, check to make sure that the lock and spindle/tailpiece line up with holes.
Step 5: The lock is factory pre-handed for le-hand doors.
To change handing, remove the two blue screws and cover plate from the Outside/Combinaon Body.
Next, move the pin from the le side of the Outside Body to the hole on the right side.
Replace plate and screws.
Note: For 2900 DC and 2950 DC, Inside Body handing pin must be placed on opposite side from Outside Body.
Step 6: Hold Deadbolt/Hookbolt in place with Drive/Spindle hole on boom and secure with mounng screws.
Step 7: To Verify Correct Spindle Length, hold Inside Body to the door.
Place spindle/tailpiece through the spindle/drive hole of the Deadbolt/Hookbolt.
Check to ensure that the spindle/tailpiece engages the lock.
Spindle should extend from exterior of door 3/8” min. to 5/8” max.
If spindle extends less than 3/8” it may not engage the lock.
If spindle extends more than 5/8”, it will cause the lock to bind.
If spindle is too long, cut it to the correct length using pliers.
Step 8: Place rubber escutcheon on Outside Body and place Outside Body on door.
Step 9: Place rubber escutcheon on Inside Body and secure Inside Body to the Outside Body on the door using the provided screws.
Aer installing the lock, replace and secure face plate.
Please Note: Due to variances in face plate sizes, you may need to use the previously installed face plate.
Note: The strike may need to be modified to accommodate the 2900 Deadbolt/2950 Hookbolt.
Note: In some cases, the rubber escutcheon may need to be trimmed on the inside body to allow proper door closure.
This is due to the jamb edge on the interior of the door. In rare cases, you may also need to trim the jamb edge to accommodate the lock.
The LockeyUSA 2900 Deadbolt and 2950 Hook Bolt are designed for narrow sle prep doors or replaces configuraons with exisng
narrow sle hardware with 1 1/8” prep (Adams Rite).
Note: For 1 1/8” narrow sle prep doors, please skip to Step 2.
=3/8” to 5/8”
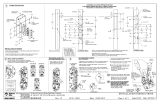
How to Change Code
1. Using a #2 screwdriver, remove the four (4) red
screws.
2. Carefully remove cover plate.
WARNING: Springs are attached to plate.
RED = CODE TUMBLERS
BLUE = NON-CODE TUMBLERS
‘C’ = CLEAR (DO NOT REMOVE)
3. Press & Hold ‘C’ button to release tumblers.
IMPORTANT: ‘C’ buon must be pressed and held down when removing
and inserng tumblers. Failure to do so will damage the lock and void the
warranty.
4. While holding the ‘C’ buon, remove/add Code (Red) and
Non-Code(Blue) tumblers to create your desired code.
Ex. 3 Red = 3-Digit Code/ 6 Red = 6-Digit Code
Important: Ensure notched side of tumbler fits into slot (right).
5. Aer changing your code, release the ‘C’ buon to secure the
tumblers in place.
6. Replace the cover plate and secure with four (4) red screws, using
a #2 screwdriver.
7. TEST CODE before installing/re-installing your lock.