Page is loading ...

Key override option
may be specified
for any CL100 and
CL200 lock
Surface deadbolt
Mortice deadbolt
Mortice latch
Mortice latch
with hold-open feature
Key override option
Back to back mortice latch
MANY CODES TO CHOOSE FROM
The CL100 and CL200 code chamber consists of 13
buttons from which the code is selected, and a ‘C’ button
which is used to re-set the chamber after an incorrect
entry, and which must always be used as the first digit of
a code. Buttons may only be used ONCE in a code. For
example, 1212 is not possible.
A CL100 and CL200 code, or combination, can be entered
in any order or sequence; eg 1234 can be 4321 or 1342 or
whatever sequence is most convenient to remember.
With 13 buttons, a total of 8,191 different codes are
available, any of which can be entered in any sequence.
The total is arrived at as follows:
‘C’ plus 1 digit = 13
“ 2 ” = 78
“ 3 ” = 286
“ 4 ” = 715
“ 5 ” = 1287
‘C’ plus 6 digits = 1716
“ 7 ” = 1716
“ 8 ” = 1287
“ 9 ” = 715
“ 10 ” = 286
‘C’ plus 11 digits = 78
“ 12 ” = 13
“ 13 ” = 1
Total = 8191
Most people will set a code in the range of 4 to 7 digits,
and the total number of codes in this range is 5434.
The lock is factory set with a randomly selected 6 digit
code starting with the C button. The code is not recorded
by the factory. The code can be changed as often as
required to any other 6 digit code. Every new code must
start with the C button. Using the spare tumblers, one red
and one blue, the code length can be changed to 5 or 7
digits. Shorter codes are not recommended.
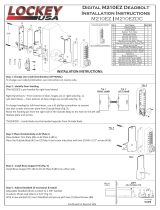
1. Take your CL100 or CL200 lock off the door by
unscrewing the 2 screws in the backplate.
2. Press the C button to reset the chamber and place the
lock case on a flat surface with the buttons down.
3. Remove the 2 red screws and carefully lift off the code
chamber plate. Check that all 14 springs are held in
place on the plate.
4. Note that the red tipped code tumblers correspond in
position to the existing code. The blue tipped non-code
tumblers fill the other positions. The C tumbler is not
coloured.
5. Hold the lock in your hand and depress the C button.
Keeping the C button depressed use tweezers to
re-position the tumblers to correspond with your new
code. The square notches of ALL tumblers MUST face
outwards, with the coloured tips ON TOP: See diagram
below. DO NOT force the tumblers in.
NB: Holding the C button depressed whilst re-positioning
the tumblers is ESSENTIAL to avoid damaging the internal
mechanism. DO NOT attempt to reposition the C tumbler.
6. Replace the code chamber plate carefully with the 2
red screws.
7. Check the operation of the new code, and make a
written note of it before re-installing the lock.
8. Insert the spindle, with the spring on the code side. On
latchbolt locks the spindle must engage the latch as follows:
Red tipped code
tumbler with square
notch in low position
Blue tipped non-code
tumbler with square
notch in high position
Section through lockcase
showing square notches in
tumblers facing outwards
Door hung on right viewed from outside
Door hung on left viewed from outside
MAINTENANCE
No maintenance of the working parts is necessary.
DO NOT OIL. To maintain the finish the lock should be
cleaned regularly with a soft cloth. A silicone spray or
similar, should be used to provide a protective film against
grit and grime.
GUARANTEE
If any CL100 or CL200 lock should develop a fault, at any
time due to manufacture, just call the Helpline and arrange
for it to be repaired free of charge.
STAYING IN CONTROL HAS NEVER BEEN EASIER
CL100 and CL200 locks can be used at home on doors,
garages and garden sheds, and at work in offices, workshops
and storerooms requiring restricted access. Available in Silver
Grey, Polished Brass and Stainless Steel.
code change instructions

trouble shooting guide
CODELOCKS LTD
Tel 01635 239645
Fax 01635 239644
www.codelocks.com
Helpline, service & spares
FREEPHONE 0800 393 405
On latch locks only. The outside knob and inside handle retract
the latch when turned TOWARDS the door frame.
The spindle is positioned at the wrong angle.
Refer to the code change instructions overleaf. Remove the
lock from the door and reposition the spindle as shown in the
instructions. On hold-open locks ensure that the blue handing
screw on the lever handle plate is in the correct hole.
The knob will not turn after entering the original code.
The code does not match the card.
The knob will not turn after entering a newly changed code.
One or more of the code tumblers are the wrong way
around.
The latch bolt does not move smoothly in and out.
The lock is installed incorrectly.
The inside and outside knobs do not return easily to the
centre position after use.
The spindle is too long for the door thickness.
The inside handle does not retract the latch.
The spindle is too short for the door thickness.
The inside lever handle does not return to the upright position
after operating.
The lever return spring is broken.
The latch does not engage and so the door remains
unlocked after use.
The latch is not entering the strike.
Your door or frame may have warped since the lock was
installed. Check that the latchbolt is lined up with the strike
aperture and adjust the position of the strike as necessary.
Make sure the deadlocking plunger cannot enter the strike
aperture alongside the latch bolt when the door is closed.
Call the
Helpline for a replacement spring, free of charge.
The spindle must project from the inside face of the door by at
least 8mm so as to engage the handle. The spindle may have
been cut too short during installation. Call the
Helpline to
obtain a longer spindle.
The spindle must not project more than 30mm into the inside
handle. If it does then it will be trapped between the front and
back handles and prevent them moving easily. The spindle
must be shortened.
Check that the lock is square on the door and positioned
accurately over the latch. Check that the latch is positioned
horizontally and parallel to the door surfaces.
Re-read the code change instruction and check that the square
notches on the tumblers face to the outside edge of the lock
with the coloured tips on top.
Remove the lock from the door, turn the lock case upside
down and check that the red tumblers correspond with the
code on the card.
NB: the ‘C’ tumbler is not coloured - but MUST start every code.
PROBLEM AND PROBABLE CAUSE ACTION
The 500 series mechanical lock should be specified
for doors requiring full-size lever handles, passage set
operation during normal working hours, and code lock-out
by deadbolt (525 model only). The key can be used by
security and cleaning staff to retract the latch as well as the
deadbolt without using a code. The inside lever handle will
always retract the deadbolt of the 525 model, thus avoiding
accidental lock-ins and meeting safety regulations.
500 series
For full information on all mechanical
and electronic locks in our range visit
www.codelocks.com
CODE CHANGE
INSTRUCTIONS
& TROUBLE
SHOOTING GUIDE
1
2
3
4
5
6
7
8
9
0
C
CC-1/200-V02
/