Page is loading ...

MODEL 416/ 426
SWITCHBOX
Read all instructions and warnings before installing and using.
INSTALLER: This manual must be delivered to the end user of this equipment.
IMPORTANT:
INSTALLATION
& OPERATION
MANUAL
Battery
2
3
45
61
32 amps 16 amps 16 amps 10 amps 10 amps 10 amps
32 amps 16 amps 16 amps
Vehicle chassis (earth)
18 ga. black wire
when mounted in hot environments or
operated close to their capacity. Do not use
1/4" dia. glass fuses as they are not suitable
for continuous duty in sizes above 15 amps.
4) Connect the black wire to vehicle chassis
(earth).
Larger wires and tight connections (crimp
connectors perform poorly over time) will
provide longer service life for components. It
is highly recommended that terminal blocks
or soldered connections be used with shrink
tubing to protect the connections. Do not use
insulation displacement connectors (e.g. 3M®
Scotchlock type connectors). Route wiring
using grommets and sealant when passing
through compartment walls. Minimize the
number of splices to reduce voltage drop.
High ambient temperatures (e.g. under hood)
will significantly reduce the current carrying
capacity of wires, fuses, and circuit breakers.
Use "SXL" type wire in engine compartments.
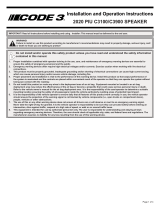
416 Switchbox
16 ga.
orange
16 ga.
blue
14 ga.
white
10 ga.
red/ black
16 ga.
yellow/
black
14 ga.
purple
8 ga red
input
Customer supplied
fuse (sized to 125%)
55 amps max load for entire Switchbox
Vehicle chassis (earth)
18 ga. black wire
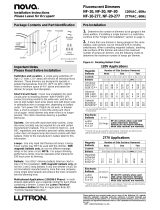
Customer supplied
fuse (sized to 125%)
(+) 12 Volt ignition circuit
white/ black wire
Panel backlighting
8 ga red input
Battery
32 amps 16 amps 16 amps 10 amps 10 amps 10 amps
32 amps
16 amps 16 amps
55 amps max load for entire Switchbox
20 amp
breaker
40 amp
breaker
20 amp
breaker
16 ga.
yellow/
black
16 ga.
orange
16 ga.
blue
14 ga.
purple
14 ga.
white
10 ga.
red/ black
3
2
1
5
6
4
Introduction
The 416 Switchbox is a 6 switch control center
without circuit breakers. The model 426 is the same
6 switch control center protected by 3 circuit breakers.
The 426 also offers backlighting as standard
equipment. Backlighting is optional on the 416.
Procedure
Wiring Instructions:
1) The installer needs to first determine the
current load in amps of each of the devices
to be switched by the Switchbox.
2) Connect the devices to the desired switch,
noting the current limitations of each switch
and group of switches.
3) An 8 gauge wire should be run from the
Red 8 gauge Switchbox input wire to a
user supplied fuse, then to the (+) side of
the battery, the alternator, or the stud on
the battery side of the solenoid. The user
supplied fuse should be located as close
to the battery as possible and sized to
125% of the total load carried by the
Switchbox (i.e.: if the total load carried is
40 amps; 40 amps x 125% = 50 amp fuse).
A circuit breaker is not recommended
here, they are very sensitive to high
ambient temperatures and will false trip
WARNING!
!
426 Switchbox

The use of this or any warning device does not insure that all drivers can or will observe or
react to an emergency warning signal. Never take the right-of-way for granted. It is your
responsibility to be sure you can proceed safely before entering an intersection, driving
against traffic, responding at a high rate of speed, or walking on or around traffic lanes.
The effectiveness of this warning device is highly dependent upon correct mounting and
wiring. Read and follow the manufacturers instructions before installing or using this device.
The vehicle operator should insure daily that all features of the device operate correctly. In
use, the vehicle operator should insure the projection of the warning signal is not blocked by
vehicle components (i.e.: open trunks or compartment doors), people, vehicles, or other
obstructions.
This equipment is intended for use by authorized personnel only. It is the users responsibil-
ity to understand and obey all laws regarding emergency warning devices. The user should
check all applicable city, state and federal laws and regulations.
Public Safety Equipment, Inc., assumes no liability for any loss resulting from the use of
this warning device.
WARNING!
!
2

3
NOTES

Public Safety Equipment, Inc.
10986 N. Warson Road
St. Louis, Missouri 63114-2029USA
Ph. (314) 426-2700 Fax (314) 426-1337
www.code3pse.com
Code 3 is a registered trademark of Public Safety Equipment, Inc.
3M is a registered trademark of 3M Company, Inc.
Revision 4, 5/02 - Instruction Book Part N0 T06581
©2002 Public Safety Equipment, Inc. Printed in USA
WARRANTY
This product was tested and found to be operational at the time of manufacture. Provided this product
is installed and operated in accordance with the manufacturer's recommendations, Public Safety Equipment
guarantees all parts and components except the lamps for a period of 1 year from the date of purchase or
delivery, whichever is later. Units demonstrated to be defective within the warranty period will be repaired or
replaced by the factory or at a factory authorized service center at no cost.
Use of a lamp or other electrical load of a wattage higher than installed or recommended by the factory
causes this warranty to become void. Failure or destruction of the product resulting from abuse or unusual
use and/or accidents is not covered by this warranty.
PSE shall in no way be liable for other damages including consequential, indirect or special damages
whether loss is due to negligence or breach of warranty.
PSE MAKES NO OTHER EXPRESS OR IMPLIED WARRANTY INCLUDING, WITHOUT LIMITATION,
WARRANTIES OF FITNESS OR MERCHANTABILITY, WITH RESPECT TO THIS PRODUCT.
PRODUCT RETURNS
In order to provide you with faster service, if you are going to return a product for repair or replace-
ment*, please contact our factory to obtain a Return Goods Authorization Number (RGA number) before you
ship the product to PSE. Write the RGA number clearly on the package near the mailing label. Be sure you
use sufficient packing materials to avoid damage to the product being returned while in transit.
*PSE reserves the right to repair or replace product at its discretion. PSE assumes no responsibility or liability for
expenses incurred for the removal and/or reinstallation of products requiring service and/or repair.
/