Page is loading ...

Instructions for 90" Tall Cabinet Installation
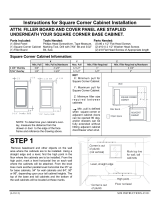
Remove base board and other objects on
the wall area where the cabinets are to be
installed. Using a straight edge and a level,
find the high spot in the floor where the
cabinets are to be installed. From the high
spot, mark a level horizontal line on each
wall where the cabinets will be attached.
From the level lines mark another parallel
level horizontal line 35" up for base and
90" up for tall and wall cabinets.
The top of the base, tall and wall
cabinets will be located at these marks.
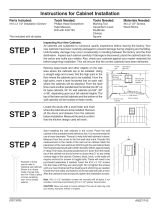
Stand 90" tall cabinet upright near desired
installation locaton. Position the toe kick
assembly with toe kick board in front.
Slide toe kick assembly underneath tall cabinet.
(Note: a piece of 1/4" material can be placed
on top of toe kick assembly panel to aide
in sliding toe kick assembly underneath the tall
cabinet.) Align right, left and back sides of
toe kick assembly flush with cabinet.
Locate the studs with a studfinder and mark
where the cabinets are to be installed.
Remove all the doors and drawers from the
cabinets before installation.
STEP 1
STEP 2
STEP 3
Mark top line
for wall, tall
cabinets
Plumb
line
Corner is out
of plumb
(not vertical)
Corner is out
of plumb
Floor not level
High point
Use level to
draw line
Level, straight edge
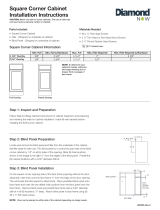
Parts Included:
86" Cabinet
4" Toe Kick Assembly
8 #10 x 2 1/2" Screws
Parts Needed:
#6 x 2 1/2" Screws
10/30/08 KC5072 R1
Note: The use of nails in the installation of this cabinet voids all guarantees, written or implied.
Tools Needed:
Phillips Head Screwdriver
#2 Phillips Bit
Drill with 1/16" & 3/32" Bit
Marking Tool
Level
Studfinder
C-clamps
Tape Measure

10/30/08 KC5072 R1
STEP 4
Start installing the base cabinets in the corner
following the base cabinet instructions and work
your way over to the 90" tall cabinet. Using
C-clamps, align and join the cabinets together at the
face frames. Make sure that the face frames align
both on the face and vertically. With a 1/16" drill bit,
drill starter holes through the face frames near the
top and bottom. Insert and tighten the screws.
These screws will need to be purchased separately,
a #6 x 2 1/2" is recommended. The 4 remaining
#10 x 2 1/2" screws supplied will be needed in the
next steps.
STEP 5
STEP 6
Check the cabinet for level and plumb. Shim to
fill uneven areas between the floor and base of
the cabinet, and between the wall and the back
of the cabinet. Failure to do this step could
result in damage to the cabinet. Pay close
attention to the spots where you plan to attach
the cabinet to the wall and make sure that the
bottom of the cabinet is fully supported.
Shim
Shim
2"
Min.
Drill through the cabinet back into the pre-
located studs with a 3/32" diameter bit,
2 3/8" deep. The holes should come no
closer than 2" to any inside vertical edge of
the cabinet. Two screw holes should be
located in the upper section of the cabinet
and two in the lower section. Cement,
block, brick or tile walls will require plastic
shields for screws or toggle bolts. These
will need to be purchased separately, if
needed. The size of the hole will need to be
sized accordingly.
STEP 7
6"
3"
Face Frame
Back Panel
End Panel
1"
Using the dimensions shown, mark the bottom of
tall cabinet for predrilling. Measure 1" from inside
of end panel and 6" from inside of face frame in
the front. In the back of cabinet, measure 1" from
inside of end panel and 3" from back panel. Mark
the holes on both the left and right sides of tall
cabinet bottom. Make sure the toe kick assem-
bly is flush with the cabinet. With a 3/32" drill
bit, drill starter holes using the four marks that were
made on the bottom. Using four of the #10 x 2 1/2"
screws, fasten the tall cabinet to toe kick assembly.
Must use a #2 phillips bit when fastening the #10 x
2 1/2" screws.

10/30/08
STEP 8
Run the #10 x 2 1/2" screws into the holes
until they are nearly tight. Must use a #2
phillips bit when fastening the #10 x 2 1/2"
screws. Make sure the back is fully
supported with shims, as needed, and does
not bow into any imperfections in the wall.
Check the cabinet for level and plumb and
adjust as needed. Tighten the screws fully
and recheck for level and plumb. Reinstall
the cabinet doors and drawers. Install
hardware if needed.
KC5072 R1
/