Page is loading ...

INSTALLATION INSTRUCTIONS FOR FRAMED
AND FULL ACCESS CABINETRY
WARNING: The use of nails (versus screws) voids factory warranty, written or implied.
1. Before starting the installation
These instructions are intended as supplemental reference for those who have the appropriate skills and experience to safely
and successfully install cabinetry, including familiarity with basic carpentry principles and safe and proper tool use. Wall framing
and construction can vary greatly, and these instructions may not describe all construction methods. Also, there may be electric,
plumbing, gas lines or other utilities behind the wall, for which contact must be avoided during installation. If for any reason after
reading these instructions you do not feel confident in the ability to safely and successfully install this cabinetry, please contact
a licensed contractor for installation. MasterBrand Cabinets is not responsible for improper installation or property damage.
WARNING: Electric, plumbing, gas lines and other utilities, are frequently installed or embedded behind walls where cabinets are being installed.
Before drilling any holes or driving any screws, be sure you will not be making contact with any of these utilities. Failure to follow these instructions
may result in property damage and serious or fatal injury. If you do not feel confident in your ability to ensure that you will not
make contact with utilities behind a wall during installation, please contact a licensed contractor to install the cabinets.
Ʌ Helpful Hint: Read through this manual carefully before starting your project to become familiar with all the steps.
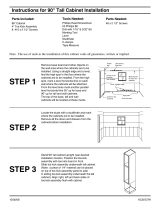
2. Check the cabinetry
Check to make sure the cabinets and accessories received agree with order information and are not damaged. Refrain
from moving or removing existing plumbing fixtures and kitchen cabinets until verifying that the correct products are on hand
to replace them. Review the layout with the project designer to verify all part locations and to identify all finished end locations.
See Illustration A.
Remove the packaging, as well as the doors, drawers, adjustable shelving and roll out trays or shelves from the new cabinets.
This will reduce weight and prevent injury or damage from falling shelves, swinging doors and sliding drawers during the initial
installation phase.
Full Access Cabinets are equipped with clip on/o hinges for easy door removal. Find the clip at the end of the hinge, facing the
inside of the cabinet. Simply squeeze the clip and the hinge will release without changing the door adjustment.
Scribe
moulding
(if needed)
Scribe
moulding
(if needed)
Shim to
level cabinets
Shim to
plumb
cabinets
Crown
moulding
Illustration A
INSTALLATION SCREW NOTES:
For Standard Cabinetry use 2-1/2" round washer head screws
For Wall Hung Vanities or cabinets with Prep for Wall Hung
Modification use 3-1/2" round washer head screws
Screw Full Access Cabinets together using 1-1/8 wood screws
Screw Framed Cabinets together using 2-1/2" wood screws
Tools needed:
Pencil Tape Measure Pry Bar
Straight Edge Hammer Stud Finder
Drill & Bits Jig Saw Wood Screws
Chalk line Level Wood Chisel
Framing Square C-Clamps Safety Glasses
Hole Saw Miter Saw
Phillips and Flathead Screwdrivers and Drill Driver Bits
Round Washer Head Screws

3. Pre-installation of cabinetry
Remove existing cabinets, base boards and other objects on the wall area where cabinets are to be installed.
4. Preparing for installation
Locate electric, plumbing or gas lines running behind the walls. Openings may
need to be cut in the back panel of the cabinet(s) to accommodate utilities before
installation. Avoid accidentally damaging existing utilities during installation. Mark
the location of all the studs on the walls that are to support the new cabinets. It is
critical that cabinets are firmly attached to pre-located wall studs. Be sure to
avoid electric, plumbing, gas lines or other utilities that might be behind the wall when
locating the studs and when drilling into the wall or driving a screw.
Houses can become unlevel due to settling and shifting. It is important to determine
where the highest point in the floor is along the walls slated for cabinet installation.
Check the floor with a level to determine the highest point.
Using a chalk line or straight edge, draw a level line at 34-1/2 on the wall from the
highest point on the floor where the new base cabinets will be installed. This line
establishes the base cabinet height. Now measure the overall height of the specified
cabinetry from the same location on the floor. Draw a similar level line on the wall where
the wall/tall cabinets will be installed. This line establishes the top of the overall cabinet
height. See Illustration B.
5. Installing the base cabinets
If the preference is to install upper cabinets first, skip this step and proceed to Step 6. Once Step 6 is complete, return to Step 5 for
base cabinet installation. As with all base and wall cabinets, any necessary cut-outs for utilities such as plumbing, electricity or gas
should be made in the back of the cabinets prior to installation. Measure utility location carefully and transfer the information to
the back of the cabinetry.
Helpful Hints:
Ʌ Always pre-fit the cabinets before permanently securing them, as having to change screw locations will
leave unwanted holes in the cabinets.
Ʌ For Blind Corner installations, the cabinet doors must clear hardware on adjacent cabinetry or appliances.
Pull cabinetry far enough from wall “B” (distance “X”) to allow proper clearance. See Illustration C
Ʌ Install strapping or blocks on wall to support countertop in corners if needed. See Illustration D
Start with the corner cabinet (if applicable). Slide the cabinet into the desired corner and determine
if it needs to be shimmed up to the previously drawn line (34-1/2). Level as necessary with shims,
remembering the finished toe kick panel will cover the shims after it is applied. Check the top
with a level and adjust the shims accordingly. When the corner cabinet is level, secure it through
the cabinet back and hanger rails, if applicable, into the pre-located wall studs using 2-1/2 round
washer head screws (Use 3-1/2 round washer head screws for Wall Hung Vanities and cabinets
with Prep for Wall Hung Modification). Depending upon the framing and construction of the wall,
the Installer assumes responsibility for the use of appropriate installation screws.
Counter top supports
24"
24"
Wall B
Filler
Adjacent
cabinet
Right side shows
Wood
corner cabinet
X Wall A
Install strapping on wall
to support countertop
Base corner cabinet installation:
when a base corner cabinet is not
up against another cabinet, a panel
may be installed to close in the side.
Blind corner installation:
pull blind corner cabinet far enough
from wall B, (distance x) to allow
the cabinet door to clear hardware
on adjacent cabinet or appliance.
Illustration C
Illustration D
Typical end section
24"
18"
30"
12"
84"
54"
34 1/2"
36"
Wall cabinet
bottom line
54" up from
highest point
Mark Center line
of wall studs
Mark Center line
of wall studs
Corner out
of square
High point
of oor
Shallow point of wall
Top View
of Room
Wall cabinet top
line at 84" up from
highest point. 30"
tall wall cabinets.
34 1/2”
up from
highest point
Illustration B

Slide the next cabinet into position so that the side is flush
and plumb against the side of the previously installed corner
cabinet. Using C-clamps, clamp the two cabinets together and
shim under the cabinets where necessary. Check to ensure the
cabinet is level. See Illustration E
Screw Framed Cabinets together through the face using 2-1/2
wood screws.
Screw Full Access Cabinets together through the cabinet box
using 1-1/8 wood screws or connector bolts.
Pre-drill holes to prevent splitting or cracking. Use two to four wood screws to join the two cabinets together, depending on the
cabinet height.
When the two cabinets are joined together, secure the cabinet at pre-located wall studs to the wall, following the base cabinet
chalk line, using 2-1/2 round washer head screws (Use 3-1/2 round washer head screws for Wall Hung Vanities and cabinets with
Prep for Wall Hung Modification) through the cabinet back and hanger rails, if available, into pre-located wall studs behind the
cabinet. Complete the installation of the base cabinets using the same procedure. If there is a window above your base cabinets,
be sure to appropriately center the cabinet under the window, if specified, using fillers or extended stiles if applicable, between
cabinets or cabinet and wall. See Step 7 for more details regarding fillers.
6. Installing the wall cabinets
Ʌ Helpful Hint: Make a single cabinet support stand to hold the cabinet in position during the installation process. See Illustration F
Installing wall cabinetry is similar to base cabinet installation, starting
with the corner cabinet. Begin by positioning the corner cabinet so that
the top is flush with the level line that was drawn previously (refer to
step 4). It is helpful to draw the cabinets on the wall as a guide, including
any mouldings that will extend further than the cabinets. This also
serves as a double check, ensuring that all components will fit. Center
any cabinetry above the range or cooktop and allow specified clearances
between any window openings surrounded by cabinetry using fillers or
extended stiles if applicable, between cabinets or cabinet and wall. See
Step 7 for more details regarding fillers.
After checking the cabinet to ensure that it is level and plumb, secure it
through the upper and lower cabinet hanger strips, if applicable, into the pre-located wall studs using 2 -1/2 round washer head
screws (Use 3-1/2” round washer head screws for Wall Hung Vanities and cabinets with Prep for Wall Hung Modification). It is
recommended that a minimum of four (two upper & two lower) screws secure each wall cabinet to the wall. Following the same
procedure as with the base cabinets, place the next wall cabinet into position, clamp them together with C-clamps, join the two
cabinets together and finally, secure it to the wall, fastening into pre-located wall studs. See Illustration E
Complete the installation of the remainder of wall cabinets using the same procedure.
Clamp frame stiles/end
panels and screw together
Wall stud
Framed Full Access
Illustration E
Support Stand
Illustration F

6.A. Installing a single wall cabinet
Please review the first four steps in preparation for a single wall cabinet installation.
The cabinet should be located on the wall, so that the pre-located studs that will be used
for attachment do not fall within 2" of the inside vertical edges of the cabinet. Ensure that
the cabinet is level and plumb and shim to fill uneven areas between the wall and the back
of the cabinet. Failure to do so could result in damage to the cabinet.
Pay close attention to the locations that the cabinet will attach to the wall, making sure
that there are no voids. Drill through the cabinet back or hanging rails, into pre-located
wall studs using a 3/32" diameter bit, 2" deep in a minimum of 4 places. The holes should
be no closer than 2" and no further than 12" from any inside vertical edge. The holes should also be located at the top and bottom
of the back. The use of 2-1/2 round washer head screws is required. Cement, block, brick or tile walls will require anchors for the
screws. These will need to be purchased separately, if needed.
Insert screws into the holes until they are nearly tight. Make sure that the cabinet back is fully supported with shims as needed, and
does not bow with any imperfections found in the wall. Confirm that the cabinet is level and plumb, adjust as needed. Tighten the
screws down and recheck that the cabinet is level and plumb.
IMPORTANT: Structural modifications of a wall cabinet can significantly weaken the cabinet. For this reason modifications are not recommended,
such as cutting the back to clear wall obstructions. If an obstruction exists, it is suggested to first try and use cabinet(s) that do not require any
modification. If modification is required, the warranty of the cabinet is void and it is the responsibility of the installer to take appropriate steps to
compensate for any loss of strength or support due to the modification.
7. Installing fillers for Full Access and Framed cabinetry
There are times when it is necessary to install filler pieces with both
Full Access and Framed cabinetry. Fillers are required when cabinetry
is adjacent to a wall, or with depth changes where the adjacent cabinet
is deeper.
Ʌ Fillers will also give appropriate clearance for door pulls or knobs.
Ʌ Fillers can also be scribed to the wall for a tight custom fit.
Ʌ Fillers can also be used between cabinets or the cabinet and wall to help
center cabinets around windows and create properly sized openings for
appliances.
Extended stiles in place of fillers may be an option for some framed
cabinet installations. See Illustration G for filler installation options.
8. Completing the installation
Once all of the cabinet boxes are installed, re-install the adjustable shelving, doors, drawers and make any needed adjustments.
Drawer fronts can be adjusted by loosening the screws that attach the drawer front to the drawer box, repositioning the drawer
front and retightening the screws . Drawer fronts can also be adjusted by adjusting the features found in the drawer slides. Doors
can be adjusted in multiple locations using the screws built within the hinge. It is important to make all adjustments prior to
installing decorative hardware. Install decorative hardware (knobs and pulls) if applicable, along with any moulding.
Measure and cut the toe kick skins and attach them using finishing nails or panel adhesive. Run silicone caulking compound where
the base cabinets meet the walls and floor and along the backsplash or back edge of the countertop to prevent any moisture from
seeping in. After the caulk is dry, cabinetry should be wiped with a solution of mild soap and warm water, using a clean, soft cloth to
remove any dust and grime from the installation. Use an additional clean, soft cloth to dry the cabinetry after cleaning.
Pre-drill holes and install filler to
cabinet before installing the cabinet
Figure A
Figure B
Filler
Filler
Illustration G
© 2018 MasterBrand Cabinets, Inc.
2” min.
12” max.
/