Page is loading ...

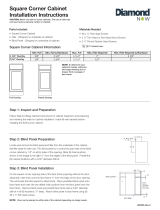
Instructions for Cabinet Installation
Parts Included:
#10 x 2 1/2" Installation Screws*
*Not included with all styles.
Tools Needed:
Phillips Head Screwdriver
Tape Measure
Drill with 3/32" Bit
Materials Needed:
#8 x 2 1/2" Screws
Wood Shims
STEP 1
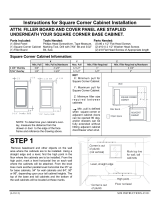
Inspecting Your New Cabinets:
All cabinets are subjected to numerous quality inspections before leaving the factory. Your
new cabinets have been carefully packaged to prevent damage during shipping and handling.
Unfortunately, damage may occur occasionally in handling between the factory and the final
destination. Inspect each cabinet carefully. If damage is discovered, place the cabinet back into
the carton and notify your retailer. Also, check your cabinets against your master materials list
before beginning installation. This will ensure that the correct cabinets have been delivered.
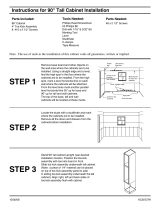
Tools Needed:
Marking Tool
Carpenter's Level
Studfinder
Clamps
Square
Remove base board and other objects on the wall
area where the cabinets are to be installed. Using
a straight edge and a level, find the high point in the
floor where the cabinets are to be installed. From the
high point, mark a level horizontal line on each wall
where the cabinets will be attached. From the level
lines mark another parallel level horizontal line 35" up
for base cabinets, 54" for wall cabinets and 84", 90"
or 96", depending upon your tall cabinet heights. The
top of the base and tall cabinets and the bottom of the
wall cabinets will be located at these marks.
Plumb
line
Use level to
draw line
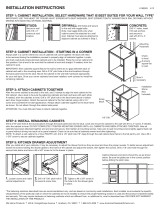
Start installing the wall cabinets in the corner. Place the wall
cabinet at the predetermined reference line. It is recommended to
use a brace (example: T-brace) to help hold wall cabinets in place.
Measure from the corner to the first wall stud mark. Transfer this
measurement to the inside of the wall corner cabinet. Mark the
placement of the next wall stud. Drill through the wall cabinet back
into the prelocated studs with a 3/32" diameter drill bit, approximately
2" deep. The holes should be positioned 3/4" down from the inside
top of the cabinet but should come no closer than 2" to any inside
vertical edge of the cabinet. Cement, block, brick, or tile walls will
require anchors for screws or toggle bolts. These will need to be
purchased separately if needed. Insert the #10 x 2 1/2" screws
into the holes until they are nearly tight. Do not tighten the screws
until you have finished all final leveling and shimming as needed.
Check the front sides and bottoms of all wall cabinets with a level.
After the cabinet is level and plumb, tighten the installation screws.
Note: #10 x 2 1/2" installation screws not included with all styles. If not
included, recommend purchasing #10 x 2 1/2" washer head screws.
CAUTION: Never use nails to mount cabinets. The use of nails may void
your factory warranty, written or implied.
Mark top line
for wall, tall
cabinets
Corner is out
of plumb
(not vertical)
Corner is out
of plumb
Floor not level
High point
Level, straight edge
Locate the studs with a stud finder and mark
where the cabinets are to be installed. Remove
all the doors and drawers from the cabinets
before installation. Measure the area to confirm
that the kitchen design used will work.
(03/13/09)
A5027 R15
STEP 2
STEP 3
STEP 4
Example of brace
used to aide in
installing wall cabinets.
Shown is a t-brace
made of scrap 2x4s
and 1x4. Place a piece
of scrap carpeting
over 1x4 to protect
cabinet.

(03/13/09)
A5027 R15
Continue with your wall cabinet installation by placing the next
cabinet on the wall at the predetermined reference line. After the
two cabinets are mounted to the wall, use clamps and clamp
the cabinet face frames together firmly. Be careful to line up the
bottom horizontal edges. With a 3/32" drill bit, drill starter holes
through the face frames near the top and bottom. Insert and
tighten the screws. These screws will need to be purchased
separately, a #8 x 2 1/2" is recommended. Check cabinet with
a level on the cabinet front, sides, and bottom. Shim where
necessary. Once the cabinet is level and plumb, tighten all the
installation screws and remove the clamps. Continue installing
the rest of your wall cabinets in the same manner.
Note: if installing single wall cabinet, follow instructions shown in
Step #9 for proper installation.
STEP 5
Once the wall cabinets have been installed, the base
cabinets can now be installed. Start installing the base
cabinets in the corner. Using clamps, align and join the
cabinets together at the face frames. Make sure that
the face frames align both on the face and vertically.
Follow Step 5 for attaching face frames.
STEP 8
STEP 6
Check the cabinet for level and plumb. Shim to
fill uneven areas between the floor and base of
the cabinet, and between the wall and the back
of the cabinet. Failure to do this step could result
in damage to the cabinet.
Drill through the cabinet back into the prelocated
studs with a 3/32" diameter drill bit, approximately
2" deep. The hole should come no closer than 2"
to any inside vertical edge of the cabinet. One
screw hole should be located in the upper section
of the cabinet and one in the lower section.
STEP 7
Insert the #10 x 2 1/2" screws into the holes until they
are nearly tight. Make sure the back is fully supported
with shims, as needed, and does not bow into any
imperfections in the wall. Check the cabinet for level and
plumb and adjust as needed. Tighten the screws fully
and recheck for level and plumb.
NOTE: #10 x 2 1/2" installation screws not included with all
styles. If not included, recommend purchasing #10 x 2 1/2"
washer head screws.
If switching door from left to right side of face frame on
base cabinets, the face frame must be predrilled. Using
marked locations on face frame as a guide, predrill using
a 1/8" drill bit, 1" deep. Make sure that all shelf clips are
used on the back side of the mullion on all cabinets.
Shim
Shim

Check for Door and Drawer Alignment:
When all of your base cabinets are securely installed to the walls, the next step is to check
each door and drawer for proper alignment.
Example: When a drawer front does not lie flush against the face frame, check that each cabinet
is level, both vertically and horizontally. You may find it necessary to realign the side-mounted
drawer guide. The drawer guide can be adjusted side to side by moving the slide member by
hand and making the necessary adjustments until the drawer lies flush against the front frame
of the cabinet.
STEP 11
(03/13/09) A5027 R15
STEP 9
Installing Single Wall Cabinets:
Follow Steps 2 & 3 for preparing the wall for your cabinet. The cabinet should be located so
that the studs that you plan to attach it to do not fall within 2" of the inside vertical edges.
Make sure the cabinet is level and plumb. Shim to fill uneven areas between the wall and the back
of the cabinet. Failure to do this step could result in damage to the cabinet. Pay close attention to
the spots where you plan to screw the cabinets to the wall to make sure there are no voids.
Drill through the cabinet back into your pre-located stud(s) with a 3/32" diameter bit, approximately
2" deep in 4 places.
The holes should be no closer than 2" and no further than
12" from any inside vertical edge. The holes should also
be located at the top and bottom of the back. The use of
#10 x 2 1/2" screws is required. Cement, block, brick or
tile walls will require anchors for the screws.
These will need to be purchased separately, if needed.
Insert the supplied #10 x 2 1/2" screws into the holes
until they are nearly tight. Make sure that the back is
fully supported with shims, as needed, and does not bow
into any imperfections in the wall.
Check the cabinet for level and plumb and adjust
as needed. Tighten the screws down fully and reinstall the shelves and doors. Make sure that the
clear shelf clips are used on the back side of the mullion on all applicable cabinets.
Important: Structural modification of a wall cabinet can significantly weaken the cabinet.
For this reason modifications are not recommended, such as cutting the back to clear wall
obstructions. If an obstruction exists, we suggest you first try to use cabinet(s) that do not
require modifications. If modification is required, the warranty of the cabinet is void and it
is the responsibility of the installer to take appropriate steps to compensate for any loss of
strength or support due to the modification.
STEP 10
2" Min.
Standard Hinge Adjustment:
The hinge on all framed door styles can be easily adjusted up and
down by loosening the hinge screw attached to the door frame.
Slide the door up or down until aligned and tighten the screw.
Full Overlay 6-Way Hinge Adjustment:
Full overlay style cabinet hinges allow for additional adjustment.
They have the "Up and Down" adjustment as mentioned above.
They also have "Side to Side" and "In and Out" adjustments. See
below for details on adjustments.
(Side to Side Adjustment) (In and Out Adjustment) (Up and Down Adjustment)
12" Max.

Cabinet Cleaning: Interior
Cabinet interiors are surfaced with a urethane-coated laminate that resists scuffs, mars and most common household spills. Wipe with a damp cloth or
sponge. For food residue or grease, use the suds from any common dishwashing liquid to wipe clean. Dry thoroughly. To avoid permanent damage, it is
important to clean the spill and dry the surface immediately.
Cabinet Cleaning: Exterior – Wood Cabinets
Wood exteriors are manufactured with a quality finish that protects the wood. Monthly cleaning is recommended. Wipe the surface of your cabinets with
a clean, damp cloth. For general soil or grease, use the suds from any common dishwashing liquid to wipe clean. Dry thoroughly. Excess moisture can
damage any cabinet finish; areas near the sink, range, dishwasher, oven and baseboards are the most susceptible. Keep these surfaces dry. Because
these cabinets use a quality varnish on the finish, waxing your cabinets is not necessary. CAUTION: Avoid using cleaners that contain bleach, ammonia
or any type of abrasives (see cleaner label). These cleaners can cause damage to your cabinet finish.
Characteristics of Wood
Authentic woods vary in color and character markings such as streaks, knots and grain patterns. Since the finish stains may attract differently to these
grain patterns, some light and dark areas may result. The beauty lies in these natural variations of color and grain that give each cabinet its own individual
charm. Over time, changes in the finish color may occur. Because of a natural aging process, the finish can also “deepen” over time, darkening the color of
the wood or creating a “shadowing” effect where doors overlap the frame. Due to these minor differences in tone, it may not be possible to match the finish
color of existing cabinets exactly when replacing doors or adding cabinets at a later date. Lighter & natural finishes and glazes highlight the inherent qualities
of genuine wood to create a truly beautiful product. Only select solid hardwoods and hardwood veneers have been used to construct your cabinetry. The
beauty of these genuine woods lies in the variations of color and grain. Shadings of white, red, black, yellow and even green may be visible. Mineral streaks
may also add to the distinctive appearance, reflecting the tree’s “life history” as it absorbs minerals differently from one area to another. Grain and apparent
texture may range from even and consistent to varied and dramatic. These natural variations result in unique character markings on adjacent cabinets,
on pairs of doors and even within the same panel. These variations can also appear on edges of hardwood doors where solid lumber cores are exposed
in certain styles. MasterBrand Cabinets points out these unique characteristics of wood to remind you that each piece is different. The varied affect, more
clearly evident in the natural finish, may be different in a complete kitchen from that represented by a smaller display or finish sample. Neither MasterBrand
Cabinets nor your retailer can be responsible for the type or degree of variations which may actually characterize your cabinetry.
Cabinet Cleaning: Exterior – Thermofoil
Thermofoil cabinets are surfaced with a durable PVC that is colored throughout, allowing for years of outstanding wear and beauty. Monthly cleaning is
recommended, using the same procedure described for wood exteriors. EXCEPTION: Do not wax thermofoil cabinet surfaces.
Characteristics of Thermofoil
Thermofoil cabinetry features doors and drawer fronts surfaced with thermofoil PVC. These products also feature face frames constructed of solid wood
with a painted finish protected with a catalyzed varnish. Woods naturally expand and contract with changes in temperature and humidity; therefore, some
visible cracks may eventually form in the area of cabinet joints. Since the doors and drawer fronts are fabricated with different materials than the solid
wood face frames, the natural aging process may cause the two materials to show some color variations. The levels of exposure to sunlight, smoke and
household chemicals will all have an impact on the color variation.
The preceding is not a warranty. If you have specific warranty questions, contact your retailer for warranty information and limitations, or contact the
MasterBrand Cabinets customer service department at 1-800-465-4003
STEP 12
Trouble Shooting Guide: Problems You Can Handle
Even though your cabinets must pass rigid quality inspection procedures, irregularities arise as a result of shipping and handling procedures.
Also, certain errors during the installation process may cause problems that are not the fault of the cabinet manufacturer.Listed below
are several conditions and causes, as well as remedies for those situations.
STEP 13
Wood Dust Caution!
Sawing, sanding or machining wood products can produce wood dust which can cause a flammable or explosive hazard.
Wood dust may cause lung, upper respiratory tract, eye and skin irritation. Some wood species may cause dermatitis and/or respiratory allergic effects. The International Agency
for Research on Cancer (IARC) and the National Toxicology Program (NTP) has classified wood dust as nasal carcinogen in humans.
-Avoid dust contact with ignition source. First Aid:
-Sweep or vacuum dust for recovery or disposal -If inhaled, move to fresh air.
-Avoid prolonged or repeated breathing of wood dust in air. -In case of contact, flush eyes and skin with water.
-Avoid dust contact with eyes and skin. -If irritation persists, call a physician.
For additional information: Contact MasterBrand Cabinets for a Material Safety Data Sheet at 1-800-465-4003 to request a direct mailing.
Pro blem Pos sible C aus e Sol ution
Do uble Do ors on a w all or base
ca bine t d o no t l ine up.
Th is c oul d be th e r esul t o f im pro per cab ine t
in stal lat ion. T he cabi net is out of ali gnm ent and is
no t se t l evel an d s quar e ( plum b).
Lo osen th e ca bin et from th e wa ll and use sh ims
to pro per ly s qua re up t he cabi net . Adj ust th e
do or h ing es.
Ca bine t d oors do no t al ign ver ti-
ca lly (up and do wn) .
A hing e i s tw ist ed or t he cabi net is out of
al ignm ent or "ra cke d."
Ma ke s ure the ca bin et i s p lumb an d le vel .
Ad just th e do or hin ges.
Sp ace bet ween th e t wo a djo inin g
do ors is too gre at.
A hing e i s ou t o f a djus tme nt.
Ad just th e do or hin ges or add spa cers , d epe ndin
on sty le.
Ca bine t d rawe r d oes not cl ose
ev enly .
Dr awer al ignm ent is poo r. Ma nual ly adju st the dra wer gui de memb er.
Ca bine t s helf is sa ggin g i n th e
mi ddle .
Sh elf peg is not pr oper ly inse rte d on th e b ack
si de o f t he m idd le wood fr ame sec tion (c ent er
mu llio n).
Us e al l s helf pe gs in t hei r pr ope r po sit ion s.
Ad just pe gs a cco rdi ngly .
(03/13/09) A5027 R15
/