Lithonia Lighting Contractor Select EXG and EXR LED Exit Sign Installation guide
- Type
- Installation guide
Lithonia Lighting Contractor Select EXG and EXR LED Exit Sign
This emergency LED exit sign is designed to provide reliable and efficient illumination in the event of a power outage. With its long-lasting LED bulbs, this sign can operate for up to 90 minutes on battery power, ensuring that your building occupants can evacuate safely. The sign is also easy to install and maintain, making it a great choice for businesses and organizations of all sizes.
Some of the key features of the Lithonia Lighting Contractor Select EXG and EXR LED Exit Sign include:
- Long-lasting LED bulbs provide up to 90 minutes of emergency lighting


-
 1
1
-
 2
2


Lithonia Lighting Contractor Select EXG and EXR LED Exit Sign Installation guide
- Type
- Installation guide
Lithonia Lighting Contractor Select EXG and EXR LED Exit Sign
This emergency LED exit sign is designed to provide reliable and efficient illumination in the event of a power outage. With its long-lasting LED bulbs, this sign can operate for up to 90 minutes on battery power, ensuring that your building occupants can evacuate safely. The sign is also easy to install and maintain, making it a great choice for businesses and organizations of all sizes.
Some of the key features of the Lithonia Lighting Contractor Select EXG and EXR LED Exit Sign include:
- Long-lasting LED bulbs provide up to 90 minutes of emergency lighting
Ask a question and I''ll find the answer in the document
Finding information in a document is now easier with AI
Related papers
-
Lithonia Lighting ECC G M6 Installation guide
-
-
-
-
-
-
Lithonia Lighting EXR LED EL M6 Installation guide
-
-
-
Other documents
-
RAB Lighting EXIT34-RG Operating instructions
-
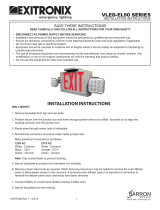 BARRON VLED-EL90 Thermoplastic Series Installation guide
-
GE current IND625 User manual
-
-
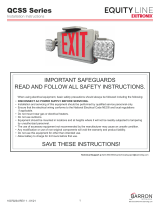 BARRON QCSS Series Slim Thermoplastic Combo Installation guide
-
 BARRON VEX-WP Weatherproof Thermoplastic Series Installation guide
-
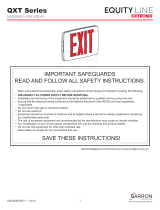 BARRON QXT Series Thin Thermoplastic Exit Installation guide
-
RAB ECOMBO34 Operating instructions
-
Cooper Lighting CAX Series User manual
-
Eaton Sure-Lites LPX Series Installation guide


